Free setup fee until September 30, 2025, 20% off Little Plan เซิร์ฟเวอร์ fees, และ a 20-day ทดลองใช้ฟรี
PR
เซิร์ฟเวอร์
รีวิว Little Server: คู่มือโฮสติ้งราคาประหยัดที่พร้อมใช้ WordPress เริ่มต้นเพียง 165 เยนต่อเดือน
เผยแพร่: 2025.04.18
อัปเดต: 2025.04.18
คะแนน: 4.0
Little Server เป็นโฮสติ้งราคาประหยัด แผน Mini ที่ถูกที่สุดเริ่มต้นเพียง 165 เยนต่อเดือน และไม่ได้ถูกแค่ราคา แต่ WordPress ก็ทำงานได้เร็ว พร้อมใช้อีเมลได้ด้วย

เราแนะนำ Little Server สำหรับ คนที่มองหาโฮสติ้งราคาประหยัด เพราะว่า:
- It offers เร็ว เซิร์ฟเวอร์ ความเร็ว.
- Its รายเดือน ราคา is extremely low.
- You can run multiple เว็บไซต์s.
That is why. You are likely ไปยัง be satisfied. You can try it ฟรี สำหรับ 20 days.
A competing service isValue Server. Its flexible hourly-based ราคา is even better than Little Server's. Consider it as well.
★ Value Server Review [2025 Latest]: Start WordPress at a Bargain Price
| ประเภทเซิร์ฟเวอร์ | Shared โฮสติ้ง |
| Response ความเร็ว (TTFB) | 200ms |
| Recommended plan และ term | Mini, 12 เดือนs |
| Trial / refund policy | 20-day ทดลองใช้ฟรี |
| Monthly ราคา (12-เดือน contract) | 165 yen |
| ค่าติดตั้งเริ่มต้น | 920 yen |
| Free โดเมน | No |
| Support | Email (hours not disclosed) |
| Uptime | Not disclosed |
| พื้นที่เก็บข้อมูล | 20GB |
| Number of databases | 3 |
| Security ฟีเจอร์ | IMP |
| SSL | Free SSL, dedicated SSL (Little Plan และ above) |
| Backup / restore | Seven days of automatic แบ็กอัปs are ฟรี, และ restores are ยังฟรี. |
| Number of อีเมล accounts | Unlimited |
| Email ความปลอดภัย | Spam filter |
| Server / webเว็บไซต์ migration service | No |
| WordPress preinstalled | Yes |
| CDN | No |
Hikaru Ono
I was able ไปยัง start WordPress at the same time I signed up สำหรับ Little Server. It was surprising how smooth the process was at a ราคา level this low, which is among the ราคาถูกest in the industry.
The carefully written official manuals ยังleft a good impression.
Little Server vs. Other Services
- Overallrating★★★★☆
- Server ความเร็ว★★★★☆
- Pricing★★★★★
- Stability★★★★☆
- Ease of starting WordPress*★★★★★
- Ease of โดเมน management, SSL setup, และ related operations*★★★☆☆
* These ratings reflect my own hands-on experience using the service.

Complete Comparison of 21 Recommended WordPress Hosting Services สำหรับ Individuals
Complete Comparison of 21 Recommended WordPress Hosting Services สำหรับ Individuals
serverfield.org
- ความเร็วเซิร์ฟเวอร์ดีNovember 4, 2025, sorted byความเร็ว
- ราคาต่อเดือนต่ำมาก
- ใช้ WordPress ได้
Little Serverเป็นbudget rental เซิร์ฟเวอร์. Even among paid บริการโฮสติ้งs, excluding ฟรี เซิร์ฟเวอร์s, it is one of the ราคาถูกest options สำหรับ individuals. Even so, it uses NVMe SSDs ไปยัง improve ความเร็ว.
Value Server มีแผนราคาตามชั่วโมงที่ยืดหยุ่นกว่า ส่วน Star Rental Server ก็เป็นอีกตัวเลือกที่ควรนำมาเปรียบเทียบหากคุณต้องการโฮสติ้งประหยัด

Little Server เหมาะกับคนที่อยากเริ่ม WordPress ด้วยงบต่ำมาก แต่ยังต้องการความเร็ว การทำงานพื้นฐาน และคู่มือที่ใช้งานได้จริง
According ไปยัง this เว็บไซต์'s independent tests,Little Serverisvery เร็ว. Take a look at the comparative ความเร็ว results below.
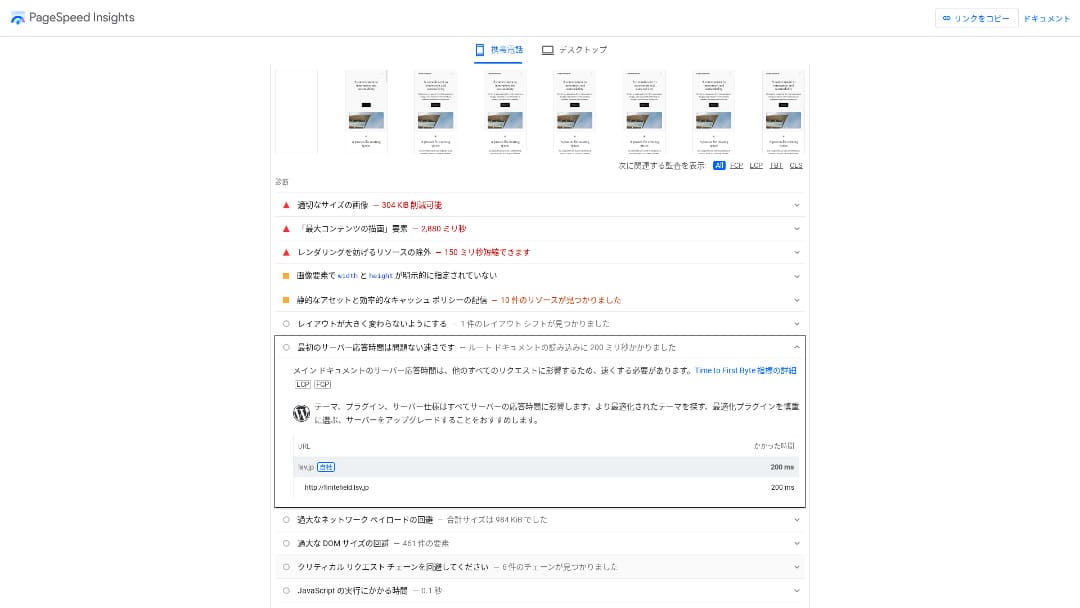
For a bargain เซิร์ฟเวอร์ in the 100-yen-per-เดือน range, it is among the เร็วest available. Its เซิร์ฟเวอร์ response time (TTFB) was 200 ms.
Google recommends keeping เซิร์ฟเวอร์ response times under 200 ms. WithLittle Server, ความเร็ว is unlikely ไปยัง become a problem.
Server response time should be kept under 200 milliseconds.https://developers.google.com/server/speed/docs/insights/Server?hl=en
If เซิร์ฟเวอร์ ความเร็ว is high, ของคุณเว็บไซต์ loads เร็วer และ visitors can browse more comfortably. As a result, that can make ของคุณเว็บไซต์ stronger สำหรับ SEO และ can ยังhelp lead ไปยัง product sales.
★ Speed Test: Comparing 11 Hosting Services in a Performance Ranking
The Price Is Low
Little Serveris ราคาประหยัด. There is an initial setup fee, แต่ เพราะthe รายเดือน ราคา is low, the annual cost of running a webเว็บไซต์ is far lower than พร้อม major hosts. We compared it under the following conditions.
- ค่าติดตั้งเริ่มต้น
- A 12-เดือน เซิร์ฟเวอร์ contract
- The first-ปี cost of the โดเมน
- The ราคาถูกest plan that can run WordPress
Even compared พร้อม Lolipop!, which is considered ราคาประหยัด among the major hosts, Little Server stands out สำหรับ how ราคาถูก it is. It costs เท่านั้น about 60% as much. มันคือan ideal choice สำหรับ anyone who wants ไปยัง keep เซิร์ฟเวอร์ costs as low as possible.
You Can Use WordPress
Some ราคาถูก บริการโฮสติ้งs do not ซัพพอร์ต WordPress. Even major hosts such as Lolipop! และ Sakura Rental Server do not allow WordPress on their ราคาถูกest plans.
However, Little Server ซัพพอร์ตs WordPress on every plan. With WordPress, คุณสามารถbuild a multi-page webเว็บไซต์ และ ยังcreate a blog within that webเว็บไซต์.
★ What Is WordPress? The System Used ไปยัง Start a Webเว็บไซต์ และ the Points ไปยัง Watch Out For
You Can Run Multiple Sites
Little Server can host multiple เว็บไซต์s. Even its lowest-cost Mini plan lets คุณcreate up ไปยัง three WordPress installations.
Besides ของคุณcompany webเว็บไซต์, คุณสามารถยังcreate a hobby blog of ของคุณown.
Automatic Backups
Little Serverincludesseven days of automatic แบ็กอัปs.
If คุณhave แบ็กอัปs, คุณสามารถrestore ของคุณwebเว็บไซต์ even if a ความปลอดภัย breach causes problems. You ยังdo not need ไปยัง configure แบ็กอัปs yourself.
If restoration becomes necessary, คุณonly need ไปยัง contact the company operating the service.
You Can Use Email
Little Serverซัพพอร์ตs อีเมล even at this low ราคา. You can create unlimited addresses on ของคุณown โดเมน. That is welcome news สำหรับ companies that want business อีเมล addresses.
★ What Is a Domain? Its Role as an Address on the Internet และ How ไปยัง Register One
The Drawback of Little Server: Its Uptime Is Not Public

Little Serverdoes not disclose its uptime rate. Because of that, users have no way of knowing whether the เซิร์ฟเวอร์ is truly เสถียร.
If the เซิร์ฟเวอร์ is unเสถียร, ของคุณwebเว็บไซต์ display will ยังbe unเสถียร. If ของคุณเว็บไซต์ frequently fails ไปยัง load, that would be a waste given that คุณare paying ไปยัง rent the เซิร์ฟเวอร์. It ยังmeans losing chances ไปยัง expand ของคุณbusiness while people cannot access the เว็บไซต์.
When คุณthink about it that way, uptime is extremely important. Because it is not disclosed here, some uncertainty remains.
★ A Beginner-Friendly Guide ไปยัง Hosting Uptime Rates และ SLAs
Compare Little Server พร้อม Two Similar Services
Value Server
Value Server และ Little Server cost almost the same per ปี. Value Server includes 15 generations of แบ็กอัปs, ดังนั้น it is stronger than Little Server when it comes ไปยัง แบ็กอัป ฟีเจอร์.
However, the Value Server Marutto plan at the ราคา shown below can host เท่านั้น one WordPress เว็บไซต์. If คุณwant ไปยัง build a second เว็บไซต์, คุณneed ไปยัง sign up สำหรับ another เซิร์ฟเวอร์. If คุณplan ไปยัง run multiple เว็บไซต์s, Little Server is the better choice.

Value Server Review [2025 Latest]: Start WordPress at a Bargain Price
Value Server Review [2025 Latest]: Start WordPress at a Bargain Price
serverfield.org
Star Rental Server
Star Rental Server costs a little more than Little Server. However, its storage capacity และ transfer allowance are much larger, ดังนั้น คุณare likely ไปยัง appreciate that difference as ของคุณwebเว็บไซต์ grows และ traffic increases.
That said, Star Rental Server has no automatic แบ็กอัป function. This is one area where Little Server is better. It offers a setup that is kinder ไปยัง people who have never used โฮสติ้ง before หรือ are running a webเว็บไซต์ สำหรับ the first time.

Star Rental Server Review [Latest 2024]: Ultra-Low Pricing และ a Thorough Look at the Real Pros และ Cons
Star Rental Server Review [Latest 2024]: Ultra-Low Pricing และ a Thorough Look at the Real Pros และ Cons
serverfield.org
Six Steps ไปยัง Start a WordPress Webเว็บไซต์ on Little Server Right Now
Let's launch a webเว็บไซต์ พร้อม Little Server.
- STEP.1Visit the official Little Server webเว็บไซต์
Click “Apply สำหรับ a ทดลองใช้ฟรี.”
Agree ไปยัง the terms of use และ the handling of personal information, then click “Yes” สำหรับ the ทดลองใช้ฟรี application.
- STEP.2Apply สำหรับ the ทดลองใช้ฟรี period
Enter ของคุณcustomer information, such as ของคุณname และ address.
Select a plan. The Mini plan is recommended. If คุณlater need more resources, คุณสามารถupgrade ของคุณplan.
Then enter ของคุณเซิร์ฟเวอร์ account information.
- Preferred user ID:Anything is fine. It cannot be changed later.
- Preferred account name:Anything is fine. It cannot be changed later.
- Password:Make it as complex as possible.
Click “Next page” และ confirm the details. If everything is correct, click “Submit พร้อม the above information.”
A temporary registration อีเมล will arrive at ของคุณcontact อีเมล address. Then คุณwill receive an authentication อีเมล titled “Application accepted.” Click the authentication URL. Once the authentication is complete, the ทดลองใช้ฟรี registration is finished.
- STEP.3Register a custom โดเมน พร้อม MuuMuu Domain และ add it in Little Server
Open the official MuuMuu Domain webเว็บไซต์, enter the string คุณwant ไปยัง use as ของคุณwebเว็บไซต์’s โดเมน in the field สำหรับ searching โดเมนs, และ click “Search.”
★ What Is a Domain? Its Role as an Address on the Internet และ How ไปยัง Register One
You can choose a top-level โดเมน such as “.com” หรือ “.co.jp”. The acquisition fee และ renewal fee vary depending on the top-level โดเมน. If คุณare unsure, a company should choose “.co.jp” whenever possible. For individuals, “.com” หรือ “.net” is recommended. These are familiar ไปยัง many people, ดังนั้น visitors are less likely ไปยัง find them suspicious และ are more likely ไปยัง click through.
Confirm again that it is the โดเมน คุณwant. If it is correct, proceed ไปยัง the application page.
Create a new MuuMuu ID. Enter ของคุณID (อีเมล address) และ password, then click “Agree ไปยัง the terms และ proceed ไปยัง identity verification.”
Complete the identity verification by SMS.
Next comes the application สำหรับ โดเมน settings และ other options. Set the โดเมน options like this:
- WHOIS disclosure:If คุณare a company, publish the information. If คุณare an individual, “Use the provider’s proxy information” is recommended.
- Name เซิร์ฟเวอร์ (DNS):Use name เซิร์ฟเวอร์s other than GMO Pepabo’s.
If คุณmake WHOIS information public, the name, address, และ other details of the person who registered the โดเมน become public.Because that exposes personal information, anyone other than a company หรือ sole proprietor may prefer proxy disclosure.
Little Server uses the following two name เซิร์ฟเวอร์s.Specify both of them.
- Name เซิร์ฟเวอร์ 1: ns1.lsv.jp
- Name เซิร์ฟเวอร์ 2: ns2.lsv.jp
You do not need ไปยัง apply สำหรับ linked services, optional services, หรือ MuuMuu Mail. If a company wants ไปยัง use อีเมล, Little Server can provide อีเมล service.
Pay by credit card หรือ another method. Click “Next step,” skip the advertisements, และ enter ของคุณuser information. After คุณcorrectly enter ของคุณname, address, และ the rest, proceed ไปยัง “Next step.”
Review the application details, check “I agree ไปยัง the terms of use,” และ click “Register.” At that point, ของคุณโดเมน has been acquired.
Now add the โดเมน คุณobtained at MuuMuu Domain ดังนั้น that it can be used พร้อม Little Server.
Return ไปยัง the Little Server control panel. Log in พร้อม the user ID และ password คุณregistered สำหรับ the ทดลองใช้ฟรี.
Click “Domain settings” under the settings menu. Enter the โดเมน name, check “Create a directory named after the โดเมน และ use it as the path,” และ click “Add โดเมน.”
That completes the custom โดเมน setup in Little Server.
- STEP.4Install WordPress
In the Little Server control panel, click “Easy Install” under “Settings.”For WordPress, choose the installation option marked as ultra-easy และ beginner-friendly.That choice saves คุณfrom having ไปยัง create the database manually.
★ What Is a Database? An Essential Management System สำหรับ WordPress
Enter ของคุณWordPress information.
- Database ไปยัง use:Leave it as it is.
- Install destination:Leave it as it is.
- Display address:มันคือแนะนำ ไปยัง leave the checkbox checked.
- Site name:Anything is fine. You can change it later very easily.
- User name:Anything is fine, แต่ changing it later is troublesome.
- Password:Make it as complex as possible. You can change it later quite easily.
- Email address:Use the อีเมล address คุณnormally use. For companies, the administrator’s business อีเมล is recommended.
The user name และ password are used when คุณlog in ไปยัง WordPress. Be sure ไปยัง write them down.
Check “I agree” และ click “Ultra Easy Install!” Your login information will then be displayed. Click the displayed login page และ sign in.
- STEP.5Initial WordPress setup
On the WordPress login screen that appears, enter the user name และ password คุณset during installation และ click “Log in.”
If คุณsee a warning saying the เว็บไซต์ cannot be reached, the DNS settings have not propagated yet. In that case, all คุณสามารถdo is wait และ try logging in again every few hours.
★ What Are DNS และ Name Servers?
After logging in ไปยัง WordPress, set up ของคุณpermalinks. In the WordPress admin screen, go ไปยัง “Settings” และ then “Permalinks.” Choose “Post name,” และ then click “Save changes.”
When คุณselect “Post name,” คุณสามารถenter any string คุณlike in the URL when publishing articles. Short strings that help readers imagine the article content are แนะนำ เพราะthey are easier สำหรับ visitors ไปยัง understand. If a URL is too long, some people may feel uneasy และ think, “Is thเป็นdangerous เว็บไซต์?”
- STEP.6Install plugins
Go back ไปยัง the WordPress admin screen, open “Plugins,” then “Add New,” และ install the plugins คุณneed.
When คุณfind a plugin คุณwant through search, click “Install Now,” then “Activate.” After that, follow the instructions provided สำหรับ each plugin.
Be sure ไปยัง install plugins สำหรับ ความปลอดภัย และ แบ็กอัปs.
- Five WordPress Plugins ไปยัง Strengthen Security และ How ไปยัง Choose One
- Five Powerful WordPress Backup Plugins That Help You Recover Your Data
Once คุณhave installed ของคุณplugins, ของคุณWordPress webเว็บไซต์ is ready ไปยัง go.
สรุป
Little Serverเป็นbudget rental เซิร์ฟเวอร์. Even among paid บริการโฮสติ้งs, excluding ฟรี เซิร์ฟเวอร์s, it is one of the ราคาถูกest options สำหรับ individuals. Even so, it uses NVMe SSDs ไปยัง improve ความเร็ว.
Free setup fee until September 30, 2025, 20% off Little Plan เซิร์ฟเวอร์ fees, และ a 20-day ทดลองใช้ฟรี
Little Serverเป็นbudget บริการโฮสติ้ง. Although it has some ข้อเสีย, even the ราคาถูกest Mini plan includes the ฟีเจอร์ needed ไปยัง launch a WordPress webเว็บไซต์. Give it a try.
Complete Comparison of 32 WordPress Hosting Services: Best Choices สำหรับ Individuals, Companies, และ International Use

If คุณsearch สำหรับ “WordPress recommendation” เพราะคุณwant ไปยัง start WordPress, คุณwill find every kind of article, จาก personal และ corporate โฮสติ้ง ไปยัง overseas เซิร์ฟเวอร์s และ ราคาถูก plans. Honestly, don’t คุณend up thinking:
- Which เว็บไซต์ should I trust?
- I just want ไปยัง choose a เซิร์ฟเวอร์ in a simple, easy-to-understand way.
- Show me how ไปยัง start WordPress right away.
That is exactly why this article introducescarefully selected recommendations จาก 32 บริการโฮสติ้งs สำหรับ individuals, companies, domestic use, และ international use. มันคือexplained by the SEO lead at an app development company that uses โฮสติ้ง every day.