П’ять WordPress-плагінів для успішної міграції сайту та ключі до правильного виконання

Хочу впевнено мігрувати WordPress.
Перенесення сайту WordPress пов’язане з багатьма ризиками, зокрема втратою даних і падінням позицій у SEO. Однак правильні плагіни допомагають цього уникнути.
У цій статті я представляю п’ять найкращих WordPress-плагінів для міграції, які підійдуть і новачкам, і досвідченим користувачам.
Повне порівняння 32 хостингів WordPress для приватних користувачів, компаній та використання за кордоном

Коли ви думаєте «я хочу почати з WordPress» і шукаєте «рекомендації щодо WordPress», ви знаходите різноманітні статті про хостинг для особистого використання, варіанти для компаній та малого бізнесу, закордонний хостинг та недорогі сервери. Чесно кажучи,
- which site should you trust?
- you may just want a simple and understandable answer.
- you may want to get started with WordPress right away.
That is why this article carefully selects recommended choices from 32 hosting providers for individuals, companies, domestic use, and overseas use. It is explained by the SEO lead at an app development company that uses hosting every day.
П’ять плагінів, які спрощують міграцію WordPress

Duplicator
Duplicator is a plugin that accomplishes migration by packaging the entire site, uploading it to a new hosting environment, and deploying it there.
Its intuitive operation is friendly even to beginners, and it allows easy site backup and migration without requiring complicated settings. In the Pro version, you can use even more advanced features, so it also supports migration of large-scale sites.

1. Install Duplicator and create a package
Install Duplicator
- Log in to the WordPress dashboard.
- Go to “Plugins” > “Add New,” search for “Duplicator,” install it, and activate it.
Create a package
- Go to “Duplicator” > “Packages” and click the “Create New” button.
- Follow the package creation wizard to create a backup of the site. Set a package name along the way and click the “Next” button.
- The system will run checks, and if there are no problems, click the “Build” button. Once it finishes, the installer file and the archive file will be generated.
- Download the “Installer” and the “Archive.”
2. Перенесіть сайт на новий сервер
Upload the files
- Підключіться до нового сервера через FTP та завантажте скановані файли «Installer» та «Archive».
Create a new database
- За допомогою інструментів адміністрування нового сервера, таких як cPanel або Plesk, створіть нову базу даних та користувача бази даних. Запишіть ці дані.
3. Run the installer
Start the installer
- Перейдіть за URL-адресою нового домену або сервера та відкрийте інсталяційний файл, наприклад
http://yournewdomain.com/installer.php. - The installer script will start. Enter the database information and click the “Next” button.
Configure the database
- Enter the information for the new database you created earlier, including the host name, database name, user name, and password, then click the “Test Database” button to confirm the connection. If there are no problems, click the “Next” button.
Deploy the data
- A confirmation screen for the installation destination will appear. If everything is fine, click the “Next” button. Importing the data into the database will then begin.
Set the new URL
- Check the settings for the new URL and path, and revise them if necessary. Then click the “Next” button.
Finish the installation
- When the installation completion screen appears, review each step and click the “Log in to site” button to log in to the new site.
4. Check after migration
Update permalink settings
- Log in to the WordPress dashboard on the new site and go to “Settings” > “Permalinks.”
- Click the “Save Changes” button to refresh the permalink settings.
Check site operation
- Check each page and function of the site to confirm that the migration was carried out correctly.
All-in-One WP Migration
This plugin lets you gather the site’s content into a single file by using import and export functions, then migrate it to a new site.
Особливо привабливими є простота його використання та преміум-опція, яка дозволяє переносити файли без обмежень за розміром. Він ідеально підходить для випадків, коли ви плануєте перехід на новий домен або перенесення сайту між різними серверами.

1. Встановіть All-in-One WP Migration та експортуйте сайт
Встановіть All-in-One WP Migration
- Log in to the WordPress dashboard.
- Перейдіть у меню «Plugins» (Плагіни) > «Add New» (Додати новий), знайдіть «All-in-One WP Migration», встановіть та активуйте його.
Export the site data
- Перейдіть у «All-in-One WP Migration» > «Export».
- Click the “Export To” button, choose “File,” and start the export.
- When the export is complete, download the backup file that was created.
2. Перенесіть сайт на новий сервер
Встановіть All-in-One WP Migration
- Увійдіть у WordPress на новому сервері та встановіть і активуйте плагін «All-in-One WP Migration» таким самим чином.
3. Import the site data
Import the site data
- Перейдіть у «All-in-One WP Migration» > «Import».
- Click the “Import From” button, choose “File,” and upload the backup file you exported earlier.
- Once the upload is complete, click the “Proceed” button to finish the import process.
Restore the site
- When the import is complete, a message will appear telling you that the import succeeded. Click “Finish.”
4. Check after migration
Update permalink settings
- Log in to the WordPress dashboard on the new site and go to “Settings” > “Permalinks.”
- Click the “Save Changes” button to refresh the permalink settings.
Check site operation
- Check each page and function of the site to confirm that the migration was carried out correctly.
5. Verify site operation and optimize it
Check the theme and plugins
- Переконайтеся, що тема та плагіни працюють належним чином на новому сервері.
- Перевірте налаштування плагіна ще раз та оновіть їх за потреби.
Check images and links
- Confirm that the images in the media library display correctly.
- Переконайтеся, що внутрішні посилання перенаправляють правильно на URL нового домену або сервера.
UpdraftPlus
UpdraftPlus is a plugin specialized in backup and restoration, but it also supports migration to a new site by using those backup files.
It offers rich options for automatic backups and cloud storage, allowing you to keep your site data safe even during the migration process. Because it can also protect the site through regular backups after the migration, it delivers two benefits at once.

1. Install UpdraftPlus and create a backup
Install UpdraftPlus
- Log in to the WordPress dashboard.
- Go to “Plugins” > “Add New,” search for “UpdraftPlus,” install it, and activate it.
Create a backup
- Перейдіть у «Налаштування» > «Резервні копії UpdraftPlus».
- Натисніть кнопку «Backup Now» (Створити резервну копію), щоб розпочати процес копіювання.
- Поставте прапорці для пунктів «Backup database» (Резервне копіювання бази даних) та «Backup files» (Резервне копіювання файлів), після чого натисніть кнопку «Backup Now» (Створити резервну копію).
- Після завершення створення резервної копії перейдіть на вкладку «Backup / Restore» (Резервне копіювання / Відновлення) та завантажте створену копію. Необхідні файли: «Database» (База даних), «Plugins» (Плагіни), «Themes» (Теми), «Uploads» (Завантаження) та «Others» (Інше).
2. Перенесіть сайт на новий сервер
Install UpdraftPlus
- Увійдіть у WordPress на новому сервері та встановіть і активуйте плагін «UpdraftPlus» таким самим чином.
3. Upload the backup files and restore them
Upload the backup files
- У панелі керування WordPress на новому сервері перейдіть до розділу «Settings» (Налаштування) > «UpdraftPlus Backups» (Резервні копії UpdraftPlus).
- Перейдіть на вкладку «Backup / Restore» (Резервне копіювання / Відновлення) та натисніть кнопку «Upload backup files» (Завантажити файли резервної копії).
- Upload each of the backup files you downloaded earlier one by one.
Restore the site data
- Після завершення завантаження виберіть резервну копію у розділі «Наявні резервні копії» (Existing Backups) та натисніть кнопку «Відновити» (Restore).
- Select the components to restore, such as the database, plugins, themes, uploads, and others, and click the “Next” button.
- Wait until the restore process finishes. When it is done, you will see a “Restore successful” message.
4. Check after migration
Update permalink settings
- Log in to the WordPress dashboard on the new site and go to “Settings” > “Permalinks.”
- Click the “Save Changes” button to refresh the permalink settings.
Check site operation
- Check each page and function of the site to confirm that the migration was carried out correctly.
5. Verify site operation and optimize it
Check the theme and plugins
- Переконайтеся, що тема та плагіни працюють належним чином на новому сервері.
- Перевірте налаштування плагіна ще раз та оновіть їх за потреби.
Check images and links
- Confirm that the images in the media library display correctly.
- Переконайтеся, що внутрішні посилання перенаправляють правильно на URL нового домену або сервера.
WP Migrate DB
WP Migrate DB specializes in database migration.
It can automatically replace database values to match the new URL and makes export and import easy. It is ideal for developers and users with a more technical background, and it allows detailed database customization and migration.

1. Install WP Migrate DB and export the database
Install WP Migrate DB
- Log in to the WordPress dashboard.
- Go to “Plugins” > “Add New,” search for “WP Migrate DB,” install it, and activate it.
Export the database
- Go to “Tools” > “Migrate DB.”
- Enter the new site’s URL and path into the “Find what:” and “Replace with:” fields.
- Click the “Export Database” button and download the exported database file.
2. Перенесіть сайт на новий сервер
Підготуйте новий сервер
- Встановіть WordPress на новий сервер.
- Create a new database and note the database information, including the host name, database name, user name, and password.
Migrate the existing files
- Завантажте папку «wp-content» зі старого сервера та завантажте її у те саме місце на новому сервері. Це легко зробити за допомогою FTP-клієнта.
3. Import the database
Import the database
- Увійдіть у phpMyAdmin на новому сервері та виберіть нову базу даних.
- Click the “Import” tab, upload the database file you exported earlier, and import it.
4. Edit the wp-config.php file
Edit wp-config.php
- Відредагуйте файл «wp-config.php» на новому сервері. Оновіть назву бази даних, ім'я користувача, пароль та ім'я хоста відповідно до параметрів нової бази даних.
Copy the PHP codedefine('DB_NAME', 'new_database_name'); define('DB_USER', 'new_database_user_name'); define('DB_PASSWORD', 'new_database_password'); define('DB_HOST', 'new_database_host_name');
5. Check after migration
Update permalink settings
- Log in to the WordPress dashboard on the new site and go to “Settings” > “Permalinks.”
- Click the “Save Changes” button to refresh the permalink settings.
Check site operation
- Check each page and function of the site to confirm that the migration was carried out correctly.
6. Verify site operation and optimize it
Check the theme and plugins
- Переконайтеся, що тема та плагіни працюють належним чином на новому сервері.
- Перевірте налаштування плагіна ще раз та оновіть їх за потреби.
Check images and links
- Confirm that the images in the media library display correctly.
- Переконайтеся, що внутрішні посилання перенаправляють правильно на URL нового домену або сервера.
Migrate Guru
Migrate Guru спеціалізується на великих сайтах і може автоматично перенести сайт, зводячи навантаження на сервер до мінімуму.
Its proprietary technology greatly speeds up the migration process, making it possible to finish moving even larger WordPress sites easily and quickly.

1. Install Migrate Guru
Install Migrate Guru
- Log in to the WordPress dashboard.
- Go to “Plugins” > “Add New,” search for “Migrate Guru,” install it, and activate it.
2. Prepare for the migration
Prepare the destination
- Попередньо встановіть WordPress на цільовий сервер.
- Перевірте інформацію про цільовий сервер, включаючи дані FTP, ім'я хоста, ім'я користувача та пароль.
3. Configure Migrate Guru and start the migration
Start Migrate Guru
- У панелі керування WordPress перейдіть до розділу «Migrate Guru» > «Migrate Site» (Перенести сайт).
- Select the type of destination, such as cPanel, FTP, SFTP, or WebHost Manager.
Enter the destination information
- Введіть інформацію про цільовий сервер. Наприклад, якщо ви використовуєте FTP, вкажіть ім'я хоста, ім'я користувача FTP та пароль FTP.
- Enter the destination URL and click the “Migrate” button.
Confirm the migration
- Migrate Guru starts the migration process and displays its progress. Wait until the migration is complete.
4. Check after migration
Confirm completion of the migration
- When the migration finishes, you will receive a notification from Migrate Guru. Access the destination site and confirm that it was migrated correctly.
Update permalink settings
- Log in to the WordPress dashboard on the new site and go to “Settings” > “Permalinks.”
- Click the “Save Changes” button to refresh the permalink settings.
5. Verify site operation and optimize it
Check the theme and plugins
- Переконайтеся, що тема та плагіни працюють належним чином на новому сервері.
- Перевірте налаштування плагіна ще раз та оновіть їх за потреби.
Check images and links
- Confirm that the images in the media library display correctly.
- Переконайтеся, що внутрішні посилання перенаправляють правильно на URL нового домену або сервера.
Additional advice for successful WordPress migration

Prepare thoroughly
Before starting the migration, it is important to update plugins and themes and clean out unnecessary data.
Testing is essential
Before the migration, test the process in a staging site or local environment and confirm that there are no problems.
Protect SEO
If the URL structure changes during the migration, set appropriate redirects and update the sitemap so that you can prevent a decline in SEO rankings.
Check performance
Після перенесення на новий сервер переконайтеся у відсутності негативного впливу на швидкість сайту або досвід користувачів і виконайте оптимізацію за потреби.
Server-company migration is recommended over WordPress-plugin migration
Використання плагінів WordPress для перенесення сайту неминуче викликає впевнене занепокоєння. Замість того, щоб зазнати невдачі під час міграції та витратити час і зусилля даремно, я рекомендую скористатися послугами серверної компанії, яка надає інструменти для міграції або недорогу підтримку при перенесенні.
XServer бізнес
If you are a corporation, I recommend XServer Business. Він здійснює перенесення вашого сервера безкоштовно. Оскільки перенесення виконує сама хостинг-компанія, ризик невдалої міграції WordPress виключений. Якщо ваша компанія має відповідний бюджет, краще скористатися послугою XServer Business, ніж витрачати власний час та зусилля на самостійне перенесення.
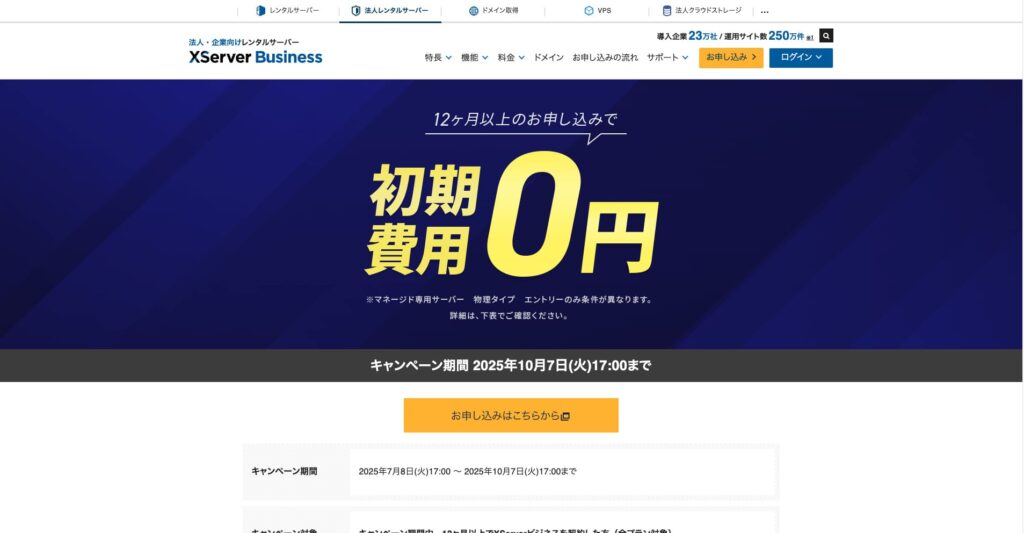
«XServer Business» — це корпоративний сервер від компанії Xserver Inc., що має найбільшу частку ринку в Японії. За нашими вимірюваннями, він посів 2-ге місце за швидкістю відображення сторінок. Це один із найкращих варіантів як цільовий сервер для міграції. Перенесення сайту також є безкоштовним.
До 7 жовтня 2025 року плата за підключення (яка зазвичай становить від 16 500 єн до 385 000 єн) не стягується, а послуга перенесення сервера також надається безкоштовно.
Xсервер
XServer — це сервер для приватних користувачів, який постачається з інструментами міграції. Ви можете перенести WordPress за допомогою функції «Easy WordPress Migration» (Просте перенесення WordPress).
I have actually used that function myself to migrate WordPress. The move went smoothly.
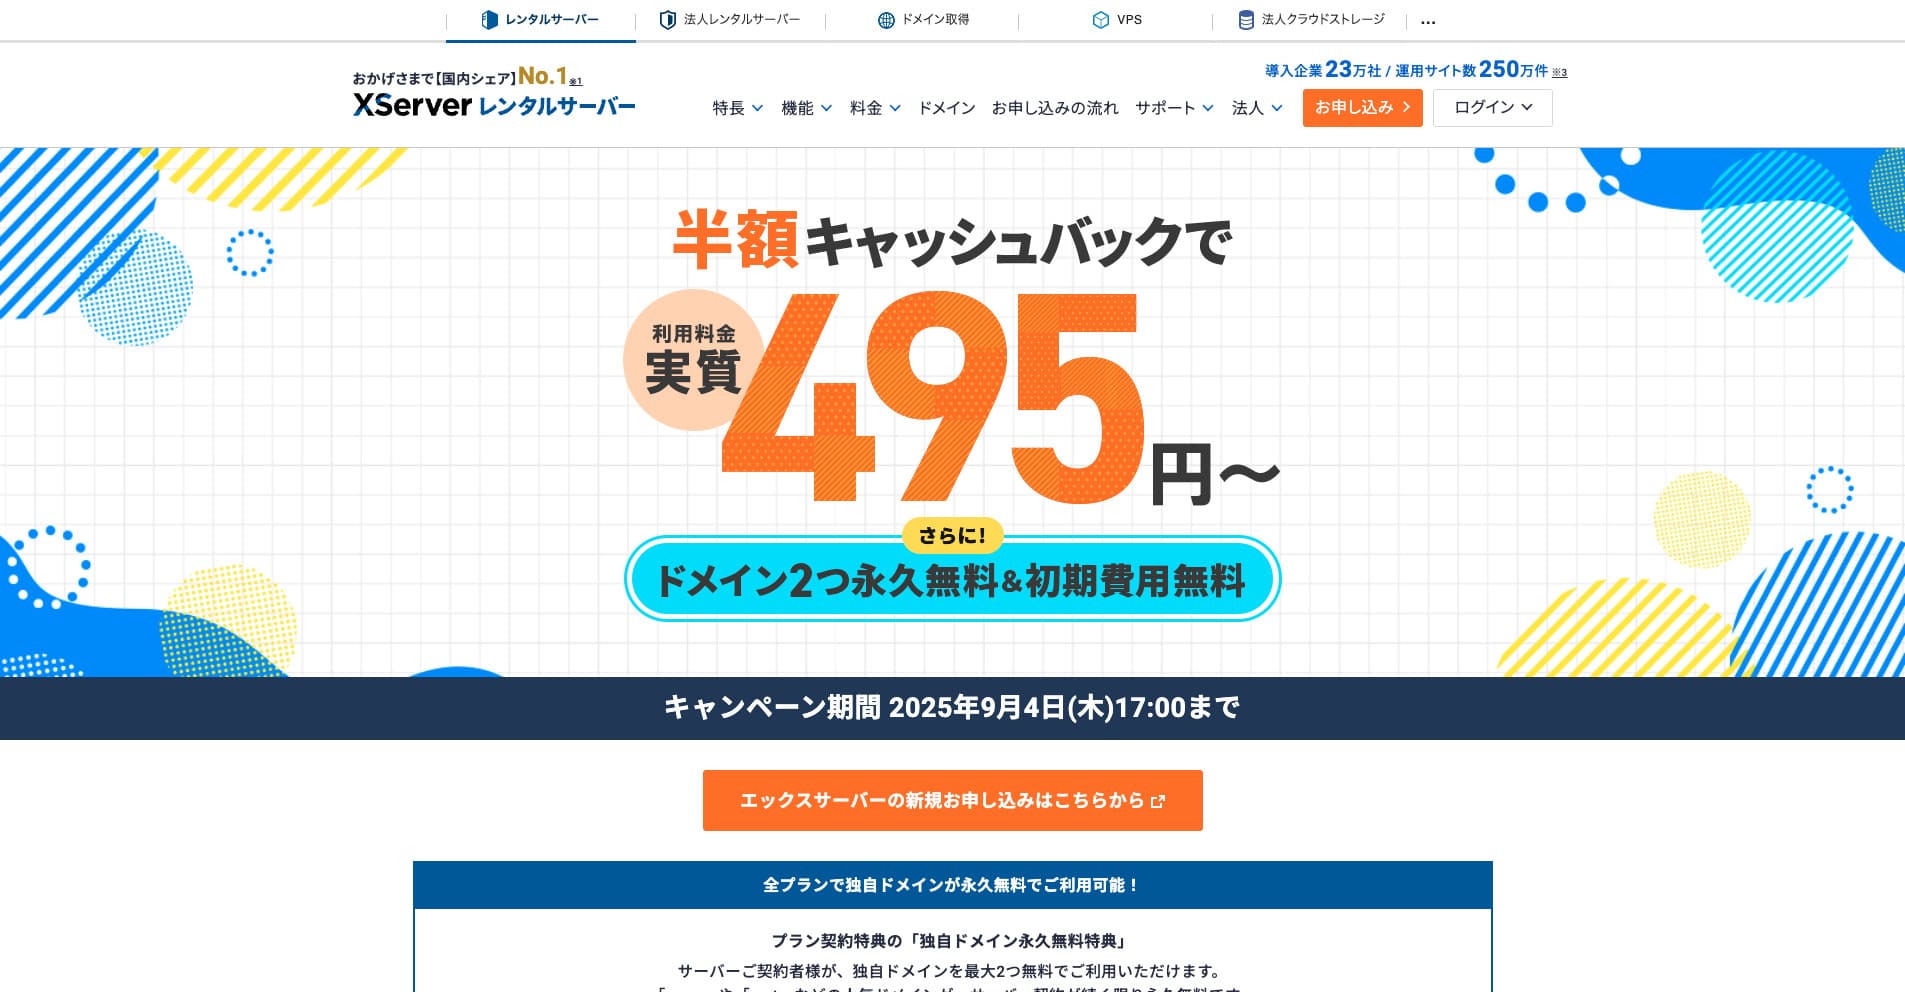
«Xserver» — це відомий високошвидкісний орендований сервер, який посідає 1-ше місце за часткою на ринку Японії. Він користується популярністю як серед приватних осіб, так і серед компаній. Чесно кажучи, він не має суттєвих недоліків, а його стабільність, функції та підтримка є відмінними. З урахуванням кешбеку ним можна користуватися за ціною від 495 єн.
Until September 34, 2025, it offers half-price cashback and a 10-day free trial.
★ Репутація Xserver та запуск WordPress завдяки потужній системі підтримки
ConoHa WING
ConoHa WING — це сервер з функцією міграції WordPress, який також використовується цим сайтом. Завдяки опції «Easy WordPress Setup» (Просте налаштування WordPress) будь-хто може перенести сайт без складних налаштувань.

«ConoHa WING» — це високошвидкісний сервер від GMO Internet Group, кількість користувачів якого стрімко зростає. Оскільки WordPress попередньо встановлюється під час реєстрації, кожен може з легкістю розпочати роботу. Він пропонує чудовий баланс ціни та якості, і наша компанія також використовує його.
До 5 серпня 2025 року діють знижки до 53% на послуги сервера, два домени надаються безкоштовно назавжди, а перший місяць використання — безкоштовний.
ColorfulBox
ColorfulBox — це сервер, який дозволяє використовувати панель керування cPanel з інтегрованими функціями міграції сайту. Наразі послуга перенесення WordPress надається безкоштовно. Оскільки компанія-провайдер виконує міграцію самостійно, ви можете переносити WordPress абсолютно спокійно.

«ColorfulBox» — це надійний сервер із відмінною системою автоматичного резервного копіювання за регіонами. Він пропонує вісім тарифних планів, дозволяючи використовувати потрібну вам продуктивність без зайвих витрат. Це також один із небагатьох орендованих серверів, який надає цілодобову підтримку.
До 31 серпня 2025 року діють знижки до 50% на послуги сервера, ви можете отримати подарункову карту Amazon на суму до 10 000 єн, а також надається 30-денний безкоштовний пробний період.
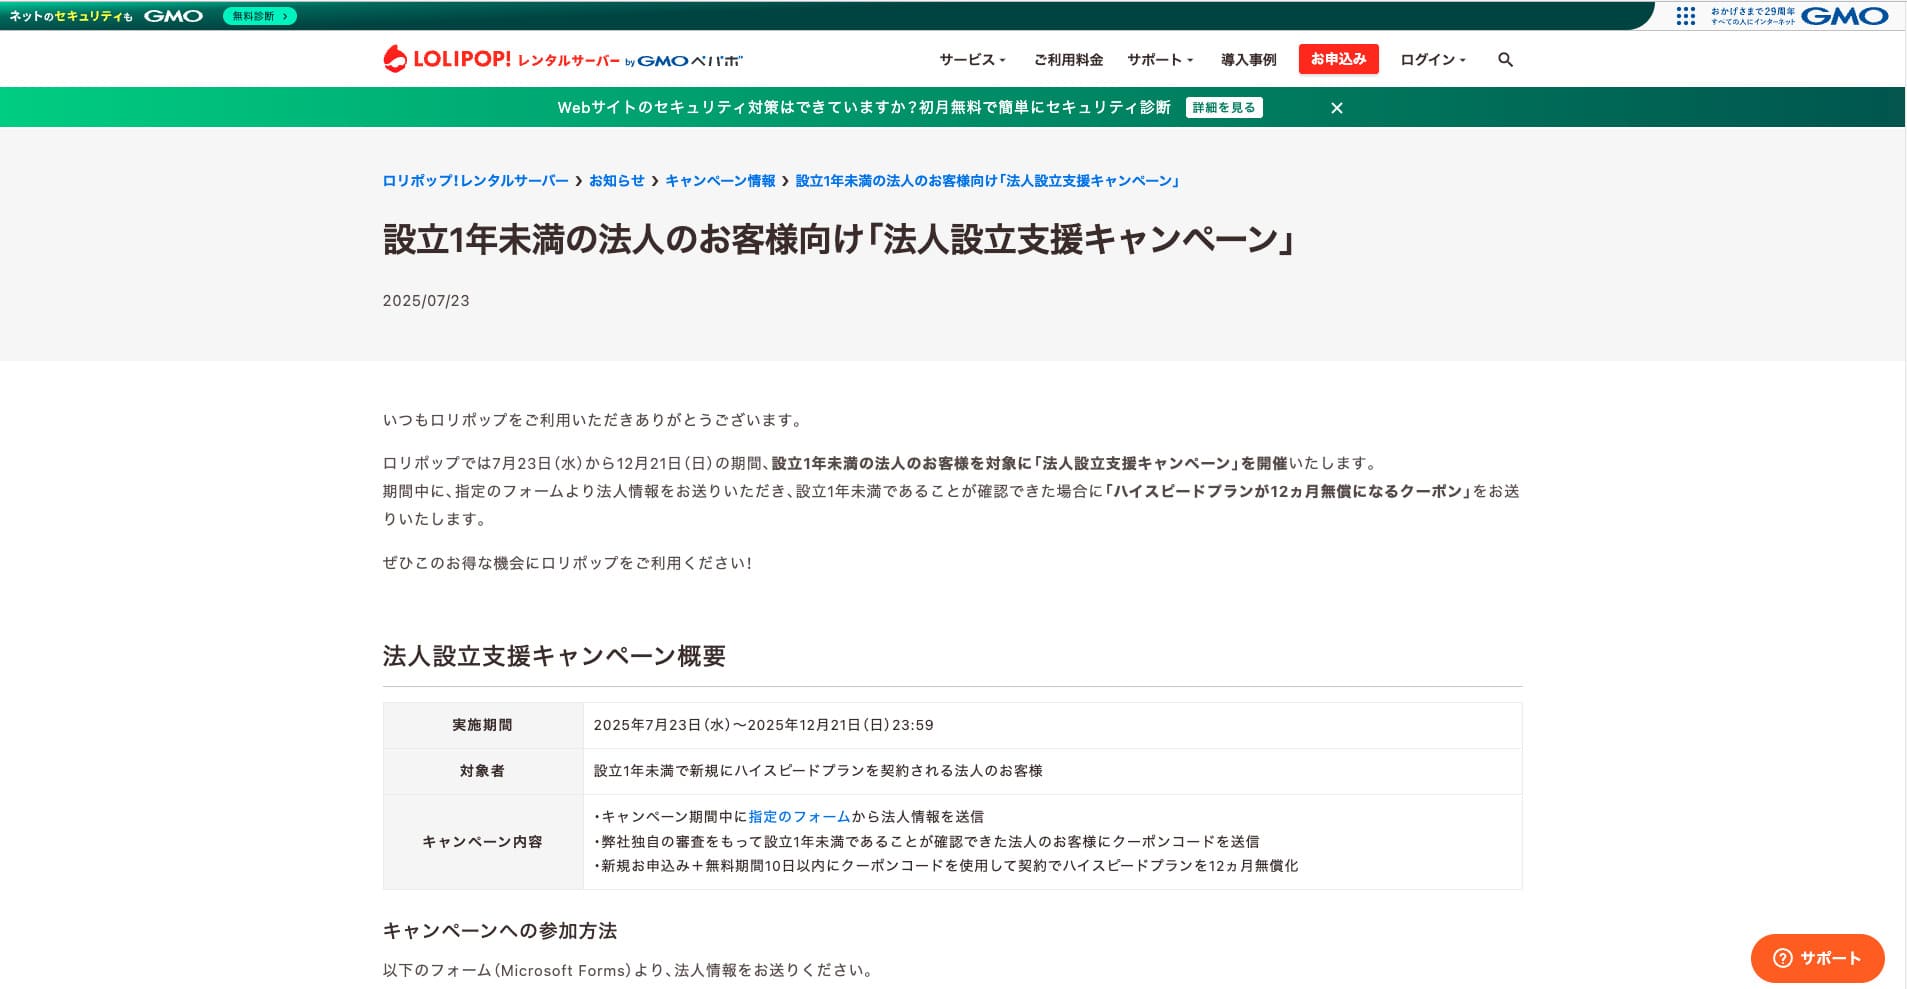
Lolipop!
LOLIPOP — це недорогий та простий у використанні сервер, який підтримує функцію міграції WordPress. Його опція «Easy WordPress Move (Server Migration)» (Просте перенесення WordPress) доступна на тарифному плані Lite та вище.
I have also migrated WordPress with Lolipop! myself. The move completed without any problem.
«Lolipop!» — це популярний хостинг із довгою історією, доступний за низькою ціною. Незважаючи на показник доступності (uptime) 99.99%, тарифним планом Lite з підтримкою WordPress можна користуватися від 264 єн на місяць. Кожен план демонструє високу вигідність.
До 21 грудня юридичні особи, зареєстровані менше року тому, можуть безкоштовно використовувати тарифний план High Speed протягом 12 місяців, а при укладенні контракту на 12 місяців або більше надається один безкоштовний домен назавжди разом із 10-денним безкоштовним пробним періодом.
★ Bad evaluations are a thing of the past: four reviews of Lolipop! and how to start WordPress with it
Підсумок
Migrating a WordPress site can be made far easier and safer through the right plugins and proper preparation in advance.
By making use of the plugins introduced in this article and putting the additional advice into practice, you can move your own site smoothly into a new environment. When you migrate a site, be sure to make use of these tools and techniques.
Однак, якщо ви турбуєтеся про міграцію WordPress, використовуйте сервер, який надає інструменти міграції або підтримку міграції.
Повне порівняння 32 хостингів WordPress для приватних користувачів, компаній та використання за кордоном
Коли ви думаєте «я хочу почати з WordPress» і шукаєте «рекомендації щодо WordPress», ви знаходите різноманітні статті про хостинг для особистого використання, варіанти для компаній та малого бізнесу, закордонний хостинг та недорогі сервери. Чесно кажучи,
- which site should you trust?
- you may just want a simple and understandable answer.
- you may want to get started with WordPress right away.
That is why this article carefully selects recommended choices from 32 hosting providers for individuals, companies, domestic use, and overseas use. It is explained by the SEO lead at an app development company that uses hosting every day.