Cinq extensions WordPress pour reussir une migration de serveur et les points clefs pour bien la mener

Je veux migrer WordPress en toute confiance.
Migrer un site WordPress implique de nombreux risques, notamment la perte de donnees et une baisse du classement SEO. Cependant, avec les bonnes extensions, il est possible de limiter ces risques au minimum et de mener la migration efficacement.
Dans cet article, je presente les cinq meilleures extensions WordPress de migration, utilisables aussi bien par les debutants que par les utilisateurs avances, ainsi que les raisons pour lesquelles elles sont utiles.
Comparatif complet de 32 services d’hébergement WordPress pour particuliers, entreprises et usages à l’étranger

Quand vous vous dites « je veux commencer avec WordPress » et cherchez « recommandations WordPress », vous trouvez toutes sortes d’articles couvrant l’hébergement personnel, les options pour les entreprises et petites structures, l’hébergement à l’étranger et les serveurs à bas prix. Franchement,
- à quel site faut-il faire confiance ?
- vous voulez peut-être simplement une réponse claire et facile à comprendre.
- vous voulez peut-être démarrer avec WordPress tout de suite.
C’est pourquoi cet article sélectionne soigneusement des options recommandées parmi 32 hébergeurs pour les particuliers, les entreprises, un usage national et un usage à l’étranger. Les explications sont données par le responsable SEO d’une société de développement d’applications qui utilise l’hébergement au quotidien.
Cinq extensions qui rendent la migration WordPress plus fluide

Duplicator
Duplicator permet de migrer un site en empaquetant l'ensemble du site, en le televersant vers un nouvel environnement d'hebergement puis en le depliant la-bas.
Son fonctionnement intuitif convient meme aux debutants et permet de sauvegarder puis migrer facilement un site sans reglages compliques. La version Pro ajoute des fonctions encore plus avancees, ce qui aide aussi pour les sites de grande taille.

1. Installer Duplicator et creer un package
Installer Duplicator
- Connectez-vous au tableau de bord WordPress.
- Ouvrez "Plugins" puis "Add New", cherchez "Duplicator", installez-le et activez-le.
Creer un package
- Ouvrez "Duplicator" puis "Packages" et cliquez sur "Create New".
- Suivez l'assistant pour creer une sauvegarde complete du site.
- Une fois la construction terminee, telechargez les fichiers "Installer" et "Archive".
- Download the “Installer” and the “Archive.”
2. Migrer vers le nouveau serveur
Upload the files
- Connect to the new server by FTP and upload the downloaded “Installer” and “Archive” files.
Create a new database
- Using the new server’s administration tools such as cPanel or Plesk, create a new database and database user. Make a note of that information.
3. Run the installer
Start the installer
- Access the URL of the new domain or server and open the installer file, for example
http://yournewdomain.com/installer.php. - The installer script will start. Enter the database information and click the “Next” button.
Configure the database
- Enter the information for the new database you created earlier, including the host name, database name, user name, and password, then click the “Test Database” button to confirm the connection. If there are no problems, click the “Next” button.
Deploy the data
- Installez et activez l'extension depuis le tableau de bord WordPress.
Set the new URL
- Installez la meme extension sur le nouveau serveur.
Finish the installation
- Ouvrez "Import" puis importez le fichier exporte precedemment.
4. Verifier apres la migration
Update permalink settings
- Log in to the WordPress dashboard on the new site and go to “Settings” > “Permalinks.”
- Click the “Save Changes” button to refresh the permalink settings.
Check site operation
- Check each page and function of the site to confirm that the migration was carried out correctly.
All-in-One WP Migration
Il offre de nombreuses options de sauvegarde automatique et de stockage cloud, ce qui permet de proteger les donnees du site meme pendant la migration. Comme il reste utile ensuite pour les sauvegardes regulieres, il apporte deux benefices en un.
Its ease of use and its premium option, which makes it possible to migrate files beyond size limits, are especially attractive. It is particularly well suited to cases where you are planning a move to a new domain or transferring a site between servers.

1. Install All-in-One WP Migration and export the site
Install All-in-One WP Migration
- Installez UpdraftPlus sur le nouveau serveur.
- Go to “Plugins” > “Add New,” search for “All-in-One WP Migration,” install it, and activate it.
Export the site data
- Chargez chaque fichier de sauvegarde sur le nouveau site via l'onglet de restauration.
- Lancez la restauration des composants necessaires puis attendez le message de succes.
- When the export is complete, download the backup file that was created.
4. Verifier apres la migration
Install All-in-One WP Migration
- Log in to WordPress on the new server and install and activate the “All-in-One WP Migration” plugin there in the same way.
3. Import the site data
Import the site data
- Go to “All-in-One WP Migration” > “Import.”
- Click the “Import From” button, choose “File,” and upload the backup file you exported earlier.
- Once the upload is complete, click the “Proceed” button to finish the import process.
Restore the site
- When the import is complete, a message will appear telling you that the import succeeded. Click “Finish.”
1. Installer WP Migrate DB et exporter la base
Update permalink settings
- Log in to the WordPress dashboard on the new site and go to “Settings” > “Permalinks.”
- Click the “Save Changes” button to refresh the permalink settings.
Check site operation
- Check each page and function of the site to confirm that the migration was carried out correctly.
5. Verify site operation and optimize it
Check the theme and plugins
- Mettez a jour le nom de base, l'utilisateur, le mot de passe et l'hote dans wp-config.php.
- Review plugin settings again and update them if necessary.
Check images and links
- Rafraichissez les permaliens puis verifiez le fonctionnement du site.
- Confirm that internal links are redirecting properly to the URL of the new domain or server.
UpdraftPlus
UpdraftPlus is a plugin specialized in backup and restoration, but it also supports migration to a new site by using those backup files.
Migrate Guru

1. Install UpdraftPlus and create a backup
Install UpdraftPlus
- Log in to the WordPress dashboard.
- Go to “Plugins” > “Add New,” search for “UpdraftPlus,” install it, and activate it.
Create a backup
- Go to “Settings” > “UpdraftPlus Backups.”
- Click the “Backup Now” button to start the backup.
- Check both “Backup database” and “Backup files,” then click the “Backup Now” button.
- Once the backup is complete, go to the “Backup / Restore” tab and download the backup you created. The necessary files are “Database,” “Plugins,” “Themes,” “Uploads,” and “Others.”
2. Migrate to the new server
Install UpdraftPlus
- Ouvrez "Migrate Site", choisissez le type de destination puis saisissez les informations du serveur et l'URL cible.
4. Verifier apres la migration
Upload the backup files
- In the WordPress dashboard on the new server, go to “Settings” > “UpdraftPlus Backups.”
- Go to the “Backup / Restore” tab and click the “Upload backup files” button.
- Upload each of the backup files you downloaded earlier one by one.
Restore the site data
- After the uploads are complete, select the backup shown in the “Existing Backups” section and click the “Restore” button.
- Select the components to restore, such as the database, plugins, themes, uploads, and others, and click the “Next” button.
- Wait until the restore process finishes. When it is done, you will see a “Restore successful” message.
4. Check after migration
Update permalink settings
- Log in to the WordPress dashboard on the new site and go to “Settings” > “Permalinks.”
- Click the “Save Changes” button to refresh the permalink settings.
Check site operation
- Check each page and function of the site to confirm that the migration was carried out correctly.
5. Verify site operation and optimize it
Check the theme and plugins
- Confirm that the theme and plugins are operating properly on the new server.
- Review plugin settings again and update them if necessary.
Check images and links
- Confirm that the images in the media library display correctly.
- Confirm that internal links are redirecting properly to the URL of the new domain or server.
WP Migrate DB
La migration prise en charge par l'hebergeur est recommandee plutot qu'une migration par extension
Utiliser des extensions WordPress pour migrer laisse inevitablement une certaine inquietude. Plutot que de rater la migration et de perdre du temps, je recommande d'utiliser un hebergeur qui propose des outils de migration ou un support de migration a faible cout.

Si vous etes une entreprise, je recommande
Install WP Migrate DB
- Log in to the WordPress dashboard.
- Go to “Plugins” > “Add New,” search for “WP Migrate DB,” install it, and activate it.
Export the database
- Go to “Tools” > “Migrate DB.”
- Enter the new site’s URL and path into the “Find what:” and “Replace with:” fields.
- Click the “Export Database” button and download the exported database file.
2. Migrate to the new server
Prepare the new server
- Install WordPress on the new server.
- Create a new database and note the database information, including the host name, database name, user name, and password.
Migrate the existing files
- Download the “wp-content” folder from the original server and upload it to the same location on the new server. This is easy if you use an FTP client.
3. Import the database
Import the database
- Log in to phpMyAdmin on the new server and select the new database.
- Click the “Import” tab, upload the database file you exported earlier, and import it.
4. Edit the wp-config.php file
ColorfulBox
- Edit the “wp-config.php” file on the new server. Update the database name, user name, password, and host name with the information for the new database.
Copy the PHP codedefine('DB_NAME', 'new_database_name'); define('DB_USER', 'new_database_user_name'); define('DB_PASSWORD', 'new_database_password'); define('DB_HOST', 'new_database_host_name');
*
Update permalink settings
- Log in to the WordPress dashboard on the new site and go to “Settings” > “Permalinks.”
- Click the “Save Changes” button to refresh the permalink settings.
Check site operation
- Check each page and function of the site to confirm that the migration was carried out correctly.
*
Check the theme and plugins
- Confirm that the theme and plugins are operating properly on the new server.
- Review plugin settings again and update them if necessary.
Check images and links
- Confirm that the images in the media library display correctly.
- Confirm that internal links are redirecting properly to the URL of the new domain or server.
Migrate Guru
Migrate Guru is specialized for large sites and can carry out site migration automatically while keeping the server load to a minimum.
Its proprietary technology greatly speeds up the migration process, making it possible to finish moving even larger WordPress sites easily and quickly.

1. Install Migrate Guru
Install Migrate Guru
- Log in to the WordPress dashboard.
- Go to “Plugins” > “Add New,” search for “Migrate Guru,” install it, and activate it.
2. Prepare for the migration
Prepare the destination
- Install WordPress on the destination server in advance.
- Confirm the destination server information, including the FTP information, host name, user name, and password.
3. Configure Migrate Guru and start the migration
Start Migrate Guru
- In the WordPress dashboard, go to “Migrate Guru” > “Migrate Site.”
- Select the type of destination, such as cPanel, FTP, SFTP, or WebHost Manager.
Enter the destination information
- Enter the information for the destination server. For example, if you are using FTP, enter the host name, FTP user name, and FTP password.
- Enter the destination URL and click the “Migrate” button.
Confirm the migration
- Migrate Guru starts the migration process and displays its progress. Wait until the migration is complete.
4. Check after migration
Confirm completion of the migration
- When the migration finishes, you will receive a notification from Migrate Guru. Access the destination site and confirm that it was migrated correctly.
Update permalink settings
- Log in to the WordPress dashboard on the new site and go to “Settings” > “Permalinks.”
- Click the “Save Changes” button to refresh the permalink settings.
5. Verify site operation and optimize it
Check the theme and plugins
- Confirm that the theme and plugins are operating properly on the new server.
- Review plugin settings again and update them if necessary.
Check images and links
- Confirm that the images in the media library display correctly.
- Confirm that internal links are redirecting properly to the URL of the new domain or server.
Additional advice for successful WordPress migration

Prepare thoroughly
Before starting the migration, it is important to update plugins and themes and clean out unnecessary data.
Testing is essential
Before the migration, test the process in a staging site or local environment and confirm that there are no problems.
Protect SEO
If the URL structure changes during the migration, set appropriate redirects and update the sitemap so that you can prevent a decline in SEO rankings.
Check performance
After moving to the new server environment, confirm that there is no negative effect on site speed or user experience and optimize as needed.
Server-company migration is recommended over WordPress-plugin migration
Using WordPress plugins for migration inevitably leaves some anxiety. Rather than failing the migration and wasting time and effort, I recommend using a server company that provides migration tools or low-cost migration support.
XServer Business
If you are a corporation, I recommend XServer Business. It migrates your server free of charge. Because the move is done by the server company itself, there is no risk of failing the WordPress migration. If your company has the budget, use XServer Business rather than spending extra time and effort on the move yourself.

“XServer Business” is the corporate server from Xserver Inc., which holds the No. 1 domestic share. In our measurements, it ranked No. 2 for display speed. It is one of the best choices as a migration destination. Server migration is also free.
Until October 7, 2025, the initial fee (normally from 16,500 yen to 385,000 yen) is free, and server migration service is also free.
Xserver
XServer is a server for individuals that comes with migration tools. You can migrate WordPress by using its “Easy WordPress Migration” feature.
I have actually used that function myself to migrate WordPress. The move went smoothly.
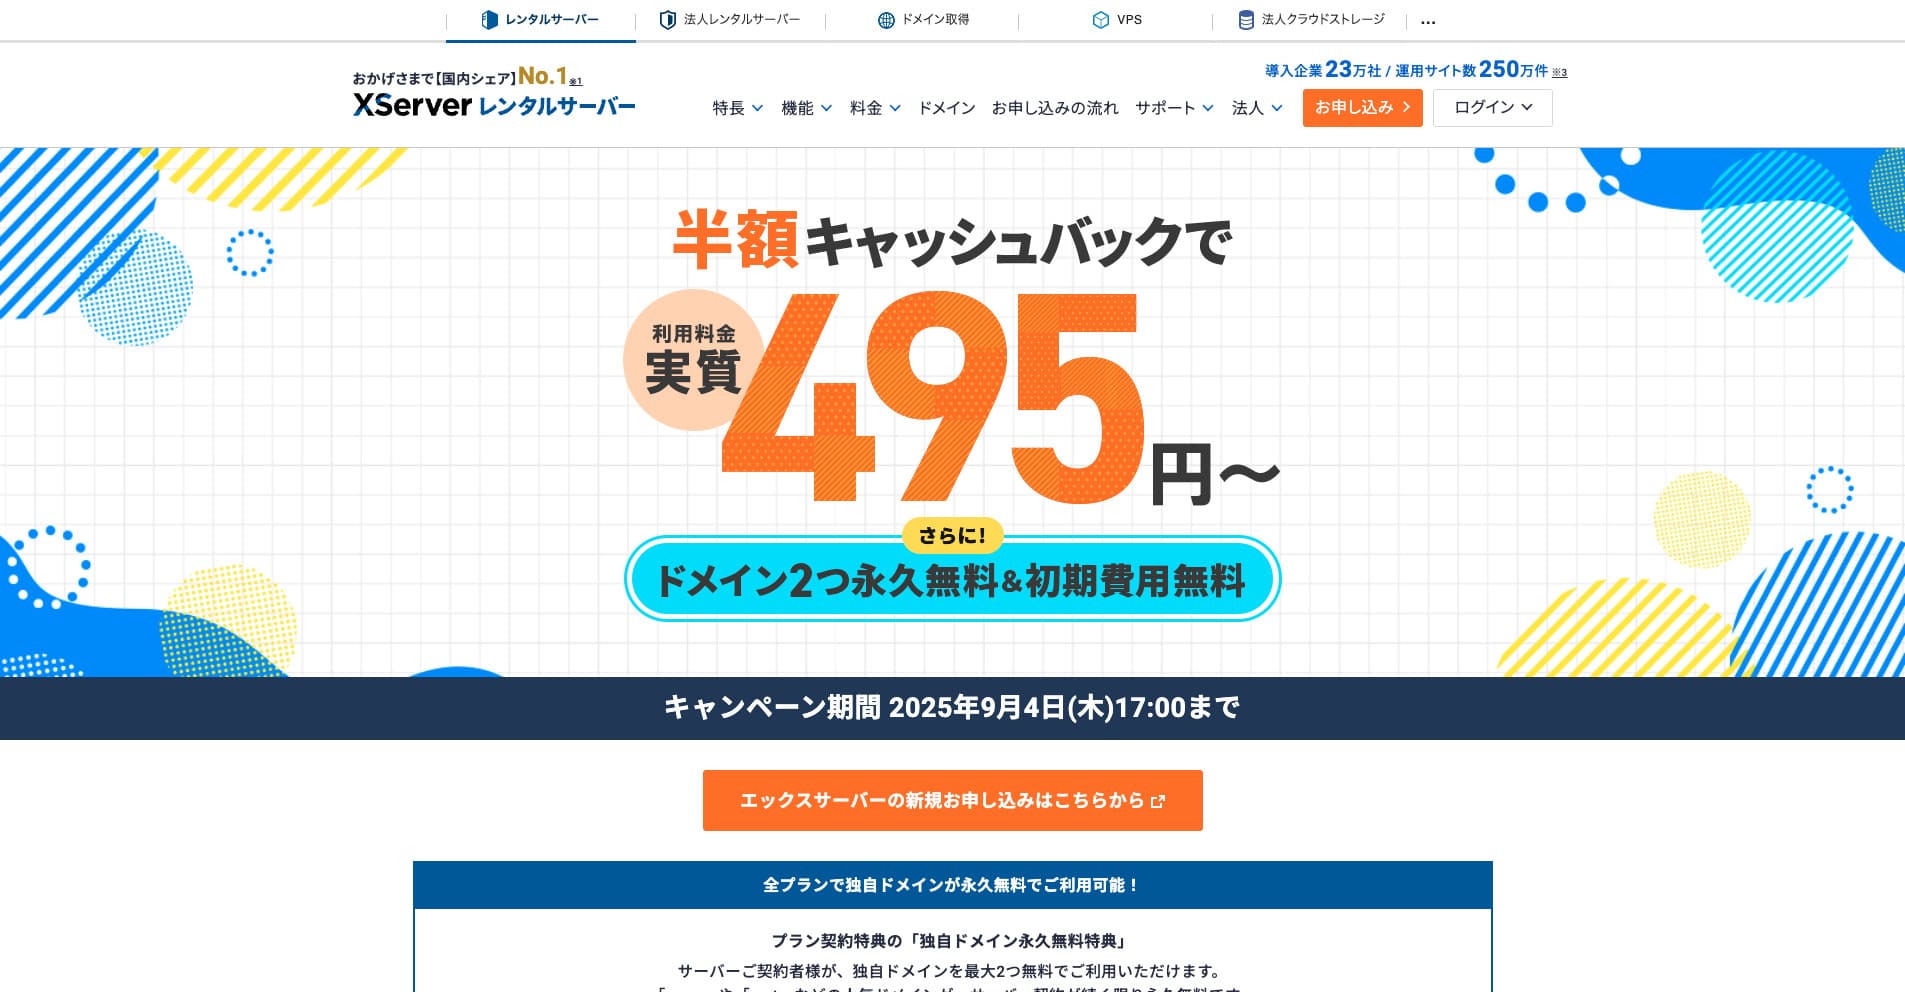
“Xserver” is a long-established high-speed rental server with the No. 1 domestic market share. It is popular with both individuals and companies. Honestly, it has no real drawbacks, and its stability, features, and support are all excellent. With cashback, you can use it from an effective 495 yen.
Until September 34, 2025, it offers half-price cashback and a 10-day free trial.
★ Xserver’s reputation and how to start WordPress with its strong support system
ConoHa WING
ConoHa WING is a server that includes WordPress migration functionality and is also used by this site. If you use “Easy WordPress Setup,” anyone can migrate WordPress without difficult settings.

“ConoHa WING” is a high-speed server from the GMO Internet Group, and its number of users is rapidly increasing. Because WordPress is preinstalled when you sign up for the server, anyone can get started easily. It offers a good balance between cost and performance, and our company uses it as well.
Until August 5, 2025, server fees are up to 53% off, two domains are free forever, and the first month is free.
★ How to launch a homepage in 10 minutes: ConoHa WING’s reputation and how to start WordPress with it
ColorfulBox
ColorfulBox is a server that lets you use the cPanel management panel, which includes site migration functions. Right now, WordPress migration service is free. Because the server company performs the migration for you, you can move WordPress with confidence.

“ColorfulBox” is a reassuring server with excellent region-based automatic backups. It offers eight plans, allowing you to use the performance you need without waste. It is also one of the few rental servers that offers support around the clock.
Until August 31, 2025, server fees are up to 50% off, you can receive an Amazon gift card worth up to 10,000 yen, and there is also a 30-day free trial.
Lolipop!
LOLIPOP is an inexpensive and easy-to-use server that has WordPress migration functionality. Its “Easy WordPress Move (Server Migration)” feature can be used on the Lite plan and above.
I have also migrated WordPress with Lolipop! myself. The move completed without any problem.
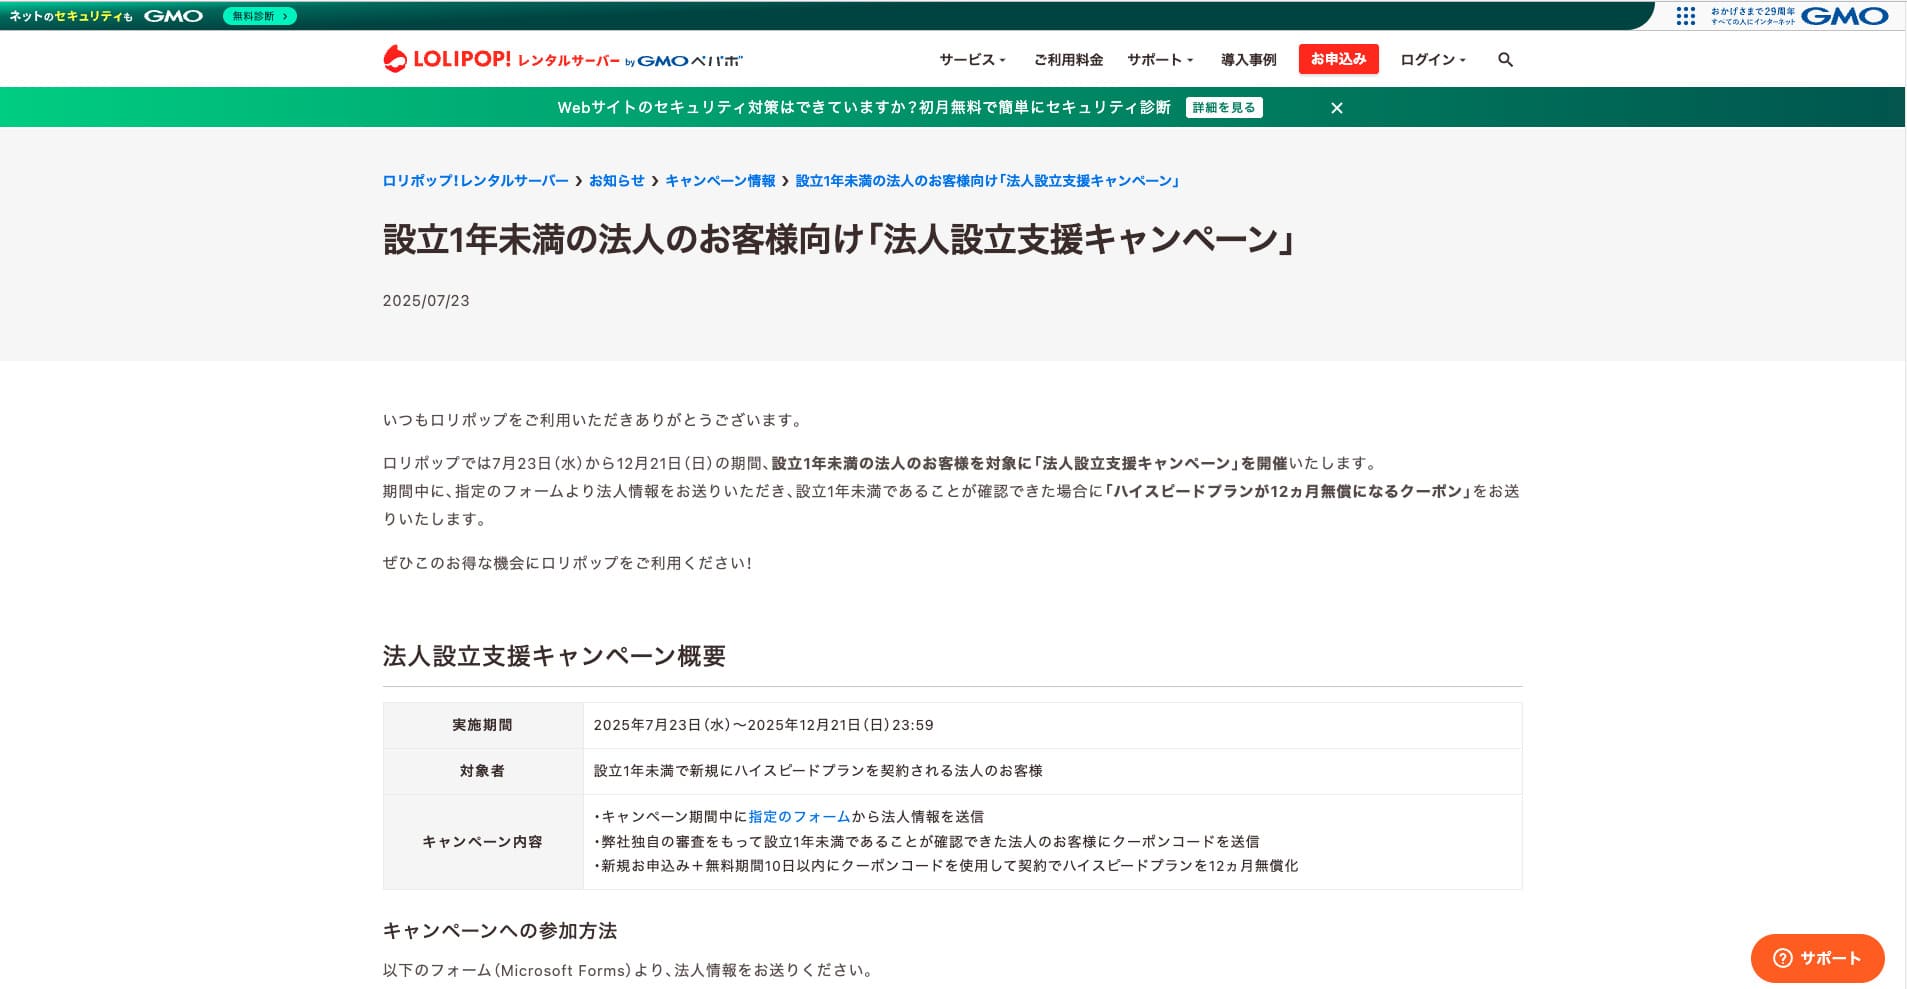
“Lolipop!” is a popular long-established rental server available at a low price. Even with its 99.99% uptime, the Lite plan that supports WordPress can be used from 264 yen per month. Every plan offers strong cost performance.
Until December 21, corporations established less than one year ago can use the High Speed plan free for 12 months, and contracts of 12 months or longer receive one domain for free forever, along with a 10-day free trial.
★ Bad evaluations are a thing of the past: four reviews of Lolipop! and how to start WordPress with it
Summary
Migrating a WordPress site can be made far easier and safer through the right plugins and proper preparation in advance.
By making use of the plugins introduced in this article and putting the additional advice into practice, you can move your own site smoothly into a new environment. When you migrate a site, be sure to make use of these tools and techniques.
However, if you are worried about WordPress migration, use a server that provides migration tools or migration support.
Complete Comparison of 32 WordPress Hosting Services for Individuals, Companies, and Overseas Use
When you think, “I want to start WordPress,” and search for “WordPress recommendations,” you find all kinds of articles covering personal hosting, options for companies and small businesses, overseas hosting, and low-cost servers. Honestly,
- which site should you trust?
- you may just want a simple and understandable answer.
- you may want to get started with WordPress right away.
That is why this article carefully selects recommended choices from 32 hosting providers for individuals, companies, domestic use, and overseas use. It is explained by the SEO lead at an app development company that uses hosting every day.