

この記事に広告・アフィリエイトリンクはありません。定義と技術仕様はRFC、IANA、ISC BIND、Googleの公式資料を優先しています。実際の設定では、契約中のレジストラ、DNS事業者、メール・ホスティング事業者の手順も確認してください。
結論から言うと、DNS変更で重要なのは「48時間待つ」ことではなく、権威DNS・キャッシュDNS・実サービスを分けて確認することです。DNSの正規データが誤っている場合や、ネームサーバー委任・DNSSECに不整合がある場合は、時間だけでは直りません。
DNSは名前とサービスをつなぐ仕組み。変更後は3段階で確認する
DNSはIPアドレスだけでなく、メール配送先、委任先、認証情報、証明書発行制御なども扱います。変更後は、正規データを返す権威DNS、利用者側のキャッシュ、Web・HTTPS・メールの実動作を順番に確認します。
| DNSとは | 名前に対応するIPアドレス、メール配送先、委任先、認証情報などを分散管理・検索する仕組み |
|---|---|
| 主なレコード | A、AAAA、CNAME、MX、TXT、NS、SOA、CAA、PTR、SRV、SVCB、HTTPS |
| 変更時の要点 | 現行ゾーンを保存し、対象差分だけを変更。旧環境と切り戻し手順を残す |
| 反映確認 | 全権威DNS → 複数の再帰リゾルバー → Web・HTTPS・メールの順で確認 |
| 代表的な確認手段 | dig、PowerShell Resolve-DnsName、nslookup、Google Admin Toolbox Dig |
| 最終確認日 | 2026年7月29日 |
DNSとは何か
DNS(Domain Name System)は、階層化されたドメイン名の空間と分散データベースを使い、名前に対応するIPアドレス、メール配送先、委任先、検証情報などを問い合わせる仕組みです。
たとえばブラウザへ https://example.com/guide/ と入力した場合、DNSが主に扱うのはホスト名の example.com です。/guide/ というパスやページ内容はDNSの担当ではなく、名前解決後に接続したWebサーバーが処理します。
DNSがなければ、利用者はWebサイトやメールサーバーへ接続するたびにIPアドレスを覚える必要があります。さらに、サービス側がサーバーを移転してIPアドレスを変更すると、利用者へ新しい接続先を個別に案内しなければなりません。DNSが名前と接続先を分離することで、サービス運営者は名前を維持したまま構成を変更できます。
DNSが答えること
WebのIPアドレス、メール配送先、ゾーンの権威ネームサーバー、ドメイン所有確認、証明書発行の許可先などです。答えは問い合わせるレコード種類で変わります。
DNSだけでは保証しないこと
接続先にWebサイトが存在するか、TLS証明書が有効か、アプリが正常か、メールが受信できるかは別の確認です。DNSが正しくても500エラーや証明書エラーは起こります。
「DNSサーバー」と「ネームサーバー」は役割まで確認する
一般会話ではどちらも幅広く使われますが、正規データを返す権威ネームサーバーと、利用者の代わりに検索して結果をキャッシュする再帰リゾルバーでは、見るべき設定も障害原因も異なります。「どの名前を、どの種類で、どのサーバーへ問い合わせたか」を明確にしてください。
DNSの名前解決はどう進む?
端末が毎回すべてのDNSサーバーへ直接問い合わせるわけではありません。通常は、OSのスタブリゾルバーが社内DNS、通信事業者、パブリックDNSなどの再帰リゾルバーへ質問します。キャッシュに有効な答えがあればそこで完了し、なければ再帰リゾルバーがDNSの階層をたどります。
URLを入力
ブラウザがホスト名のIPアドレスを必要とします。
端末から問い合わせ
OSやアプリが設定済みの再帰リゾルバーへ質問します。
階層をたどる
キャッシュがなければルート、TLD、権威DNSの順に探します。
答えを返す
権威DNSの回答を再帰リゾルバーが端末へ返します。
サーバーへ接続
ブラウザが取得した接続先へHTTPS通信を開始します。
名前解決に関わる主な5つの役割
.com や .jp などのTLDを担当するサーバーを案内します。キャッシュヒットなら、ルートから毎回たどらない
再帰リゾルバーが有効な回答を持っていれば、権威DNSへ再問い合わせせずキャッシュを返します。この仕組みがDNSの負荷と待ち時間を減らす一方、変更直後に利用者ごとで新旧の答えが混在する理由にもなります。
主なDNSレコードの種類と役割
DNS変更で重要なのは、「ドメインの設定を変える」という曖昧な表現をやめ、どのFQDNの、どのレコード種類を、何から何へ変えるかを明確にすることです。Web移行でMXやTXTを消す、メール移行でWeb用Aを上書きするといった事故は、ゾーン全体を見ずに作業したときに起こります。
表は横にスクロールして用途・注意点・確認方法を比較できます。
| 種類 | 主な役割 | 設定時の注意点 | 変更後の確認 |
|---|---|---|---|
| A | ホスト名をIPv4アドレスへ対応付けます。 | WebやAPIの接続先が変わります。CDN・ロードバランサー指定では事業者の値を使います。 | Aの答え、HTTP応答、HTTPS証明書、仮想ホストを確認。 |
| AAAA | ホスト名をIPv6アドレスへ対応付けます。 | Aだけ変更してAAAAが旧環境を向くと、IPv6利用者だけ旧サイトや障害へ到達します。 | AAAAを個別に問い合わせ、IPv6経路でも実通信を確認。 |
| CNAME | 名前を別の正規名へ対応付けます。 | 最終到達先まで解決できる必要があります。同じ名前へ他種類のデータを通常は共存させられません。 | CNAMEだけでなく、連鎖先のA・AAAAとサービス動作を確認。 |
| MX | メールを受け取るサーバー名と優先度を示します。 | 配送先には通常ホスト名を指定し、配送先名のA・AAAAも必要です。古い環境を急停止しません。 | 優先度、配送先名、実際の送受信、遅延・バウンスを確認。 |
| TXT | 所有確認、SPF、DKIM、DMARCなど用途別の文字列を保持します。 | 同一名に複数用途があり得ます。管理画面で既存TXTを一括置換しないよう注意します。 | ホスト名と文字列を完全一致で確認し、メール認証結果も確認。 |
| NS | ゾーンの権威ネームサーバーを示します。 | 親ゾーンの委任と、子ゾーン内のNSは分けて確認します。変更はゾーン全体へ影響します。 | 親の委任、各権威NSの応答、SOAシリアル、全レコードを確認。 |
| SOA | ゾーンの管理情報、シリアル、負のキャッシュに関係する値を示します。 | 複数の権威サーバーへ更新が配布されたかを判断する材料になります。 | 各権威NSのSOAシリアルとNXDOMAIN応答内のSOAを確認。 |
| CAA | 証明書を発行してよい認証局を制限します。 | 誤設定すると正規の証明書発行・更新が失敗します。サービス指定値をそのまま使います。 | CAA応答と証明書更新ログ、ACMEエラーを確認。 |
| PTR | IPアドレスから名前を引く逆引きに使います。 | 通常はIPアドレスの保有者・クラウド事業者側で設定します。自分の通常ゾーンだけでは完結しません。 | dig -x などで逆引きし、メール用途では正引きとの整合も確認。 |
| SRV | サービスの接続先ホスト、ポート、優先度、重みを示します。 | サービス固有の名前形式を使います。対応していないアプリは参照しません。 | SRVの値と、接続先ホストのA・AAAA、実クライアント動作を確認。 |
| SVCB / HTTPS 新しい接続情報 | 代替エンドポイントやALPN、ポート、IPヒントなど、サービス接続に必要な情報をまとめて示します。 | HTTPSレコードはHTTP向けのSVCB互換型です。HTTP/3やECHなどに関係しますが、クライアントと事業者の対応が前提です。 | HTTPS・SVCB応答、A・AAAA、ALPN、実際のHTTPS接続を一体で確認。 |
ルートドメインのCNAMEに注意
標準的なCNAMEは同じ名前へ他のデータを共存させられないため、SOAやNSが必要なゾーン頂点には通常設定できません。DNS事業者が提供するALIAS、ANAME、CNAME flatteningは、標準CNAMEとは異なる機能です。表示名だけで判断せず、応答として何が返るかを確認してください。
TTLと「DNSの反映時間」を正しく理解する
TTL(Time to Live)は、再帰リゾルバーなどがDNSレコードをキャッシュできる時間です。変更後、世界中で必ずその秒数以内に更新されるという完了保証ではありません。 旧値をいつ取得したかはキャッシュごとに異なるため、変更直後は新旧の答えが併存します。
旧TTLが基準
変更後にTTLを短くしても、すでに旧値を長いTTLで取得したキャッシュには直ちに効きません。
負のキャッシュもある
存在しない名前やデータの回答も一定時間キャッシュされます。追加直後にNXDOMAINが残る場合があります。
待っても直らない例
権威DNSの誤値、NS委任ミス、DNSSEC不整合、権威サーバー間の差異は時間だけでは解決しません。
なぜ「最大48〜72時間」と言われるのか
これは、事業者の処理時間、親ゾーンの委任、各地のキャッシュ、端末やルーターの保持を含めた安全側の案内として使われることがあります。しかし、診断では時間だけを基準にせず、権威DNSが何を返すか、再帰リゾルバーが何を返すか、残りTTLはいくつかを記録します。
予定変更では、旧TTLが失効する前に準備する
TTLを下げるなら、切り替え直前ではなく、少なくとも変更前のTTLが一度経過するより前に実施します。たとえば旧TTLが86,400秒なら、切り替えの24時間以上前に短縮しなければ、旧値を取得済みのキャッシュには長い保持時間が残ります。作業後は安定運用に適したTTLへ戻します。
DNS設定を確認する方法
変更確認は「Webツールで新しいIPが見えた」で終わらせず、正規データ → 外部キャッシュ → 実サービスの3段階で行います。これにより、設定ミスなのか、キャッシュ待ちなのか、DNS以外の障害なのかを切り分けられます。
権威ネームサーバーを直接確認する
委任先の全サーバーへ同じ名前・同じレコード種類を問い合わせ、値、TTL、SOAシリアルが一致するか確認します。ここが誤っていれば待つのではなく修正します。
複数の再帰リゾルバーを比較する
通常利用しているDNSと、Google Public DNSなど別経路を比較します。旧値なら残りTTL、NXDOMAINなら負のキャッシュ、SERVFAILならDNSSECや権威応答を調べます。
Web・HTTPS・メールを実際に使って確認する
主要ページ、ログイン、フォーム、API、証明書、メール送受信を試します。AとAAAA、ルートとwww、必要なサブドメインを分けて確認します。
macOS・Linuxで使えるdigの基本例
# WebのIPv4 / IPv6
dig example.com A
dig example.com AAAA

# メール、認証、証明書、最新のHTTPS情報
dig example.com MX
dig example.com TXT
dig example.com CAA
dig example.com HTTPS

# 委任先と反復問い合わせの経路
dig example.com NS +short
dig +trace example.com

# 特定の再帰リゾルバーを比較
dig @8.8.8.8 example.com A
dig @1.1.1.1 example.com A

# 特定の権威ネームサーバーへ直接問い合わせ
dig @ns1.example-dns.net example.com A +noall +answer +authoritystatus、ANSWER SECTION、TTL、SERVER、問い合わせた名前と種類を記録します。NOERRORでもANSWERが空なら、名前は存在するがその種類のデータがない「NODATA」の可能性があります。
Windowsで確認する場合
# PowerShell
Resolve-DnsName example.com -Type A
Resolve-DnsName example.com -Type MX -Server 8.8.8.8

# nslookup
nslookup -type=A example.com 8.8.8.8
nslookup -type=MX example.com 8.8.8.8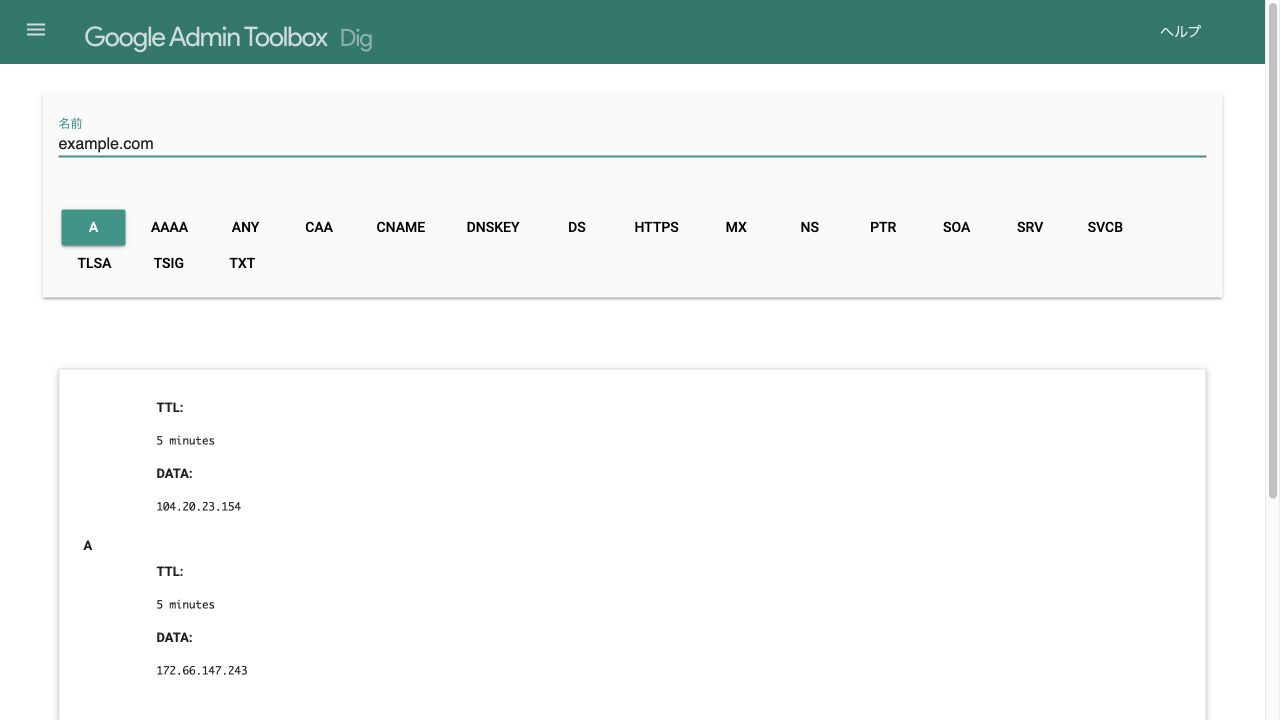
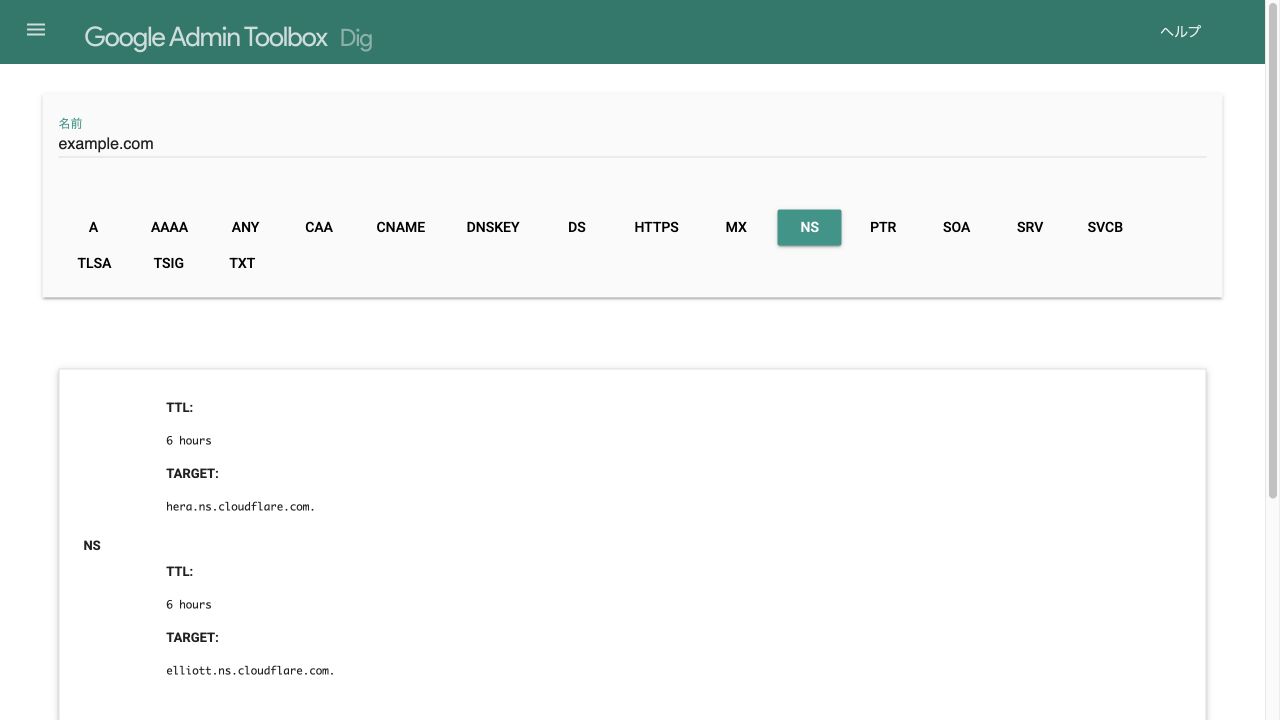
確認結果は6点セットで残す
確認時刻、問い合わせ元、問い合わせ先、名前、レコード種類、答えとTTLを一緒に保存します。「自分のPCでは見えた」「海外チェックでは古かった」だけでは、どの層に問題があるか判断できません。
DNSを安全に変更する手順
DNS変更は入力作業よりも、変更前の退避、依存関係の確認、受け入れ条件、切り戻し判断が重要です。単一レコード変更とネームサーバー変更では影響範囲が大きく異なります。
現行ゾーンをエクスポートする
A、AAAA、CNAME、MX、TXT、NS、CAAなど全レコード、TTL、SOA、権威NSを保存します。管理画面の画像だけでなく、コピーできるテキストでも残します。
Web・メール・認証の依存関係を整理する
どのレコードがWeb、メール、CDN、SaaS所有確認、証明書、サブドメインに使われるかを一覧化します。担当者と連絡経路も決めます。
新環境をDNS切り替え前に試験する
プレビューURL、hostsファイル、ロードバランサーのテスト手段などを使い、Web、API、HTTPS、メールを先に確認します。
必要なら十分前にTTLを短縮する
事業者の許容範囲で短縮し、旧TTLが経過してから切り替えます。変更後に短縮しても、既存キャッシュの寿命は短くなりません。
対象の差分だけを変更する
FQDN、種類、値、優先度、TTLを二重確認します。@、空欄、末尾ドット、相対名の扱いは管理画面ごとに異なるため、事業者の記法を優先します。
権威DNS・再帰DNS・実サービスを監視する
変更時刻と結果を記録し、新旧の経路で重要機能を試します。キャッシュが残る間は旧環境を停止しません。
切り戻し条件に達したら戻す
権威DNSが誤値を返す、主要機能が失敗する、DNSSEC検証が失敗する場合は、単なる待機ではなく旧値へ戻すか事業者へ連絡します。
変更の種類ごとに影響範囲が違う
| 変更 | 主な影響範囲 | 最優先で確認すること | 旧環境の維持 |
|---|---|---|---|
| A / AAAA | Web、API、サブドメインの接続先 | IPv4・IPv6、HTTPS、主要画面、フォーム、API | キャッシュ収束とログ確認まで維持 |
| MX | 受信メールの配送先 | 新旧両方向の送受信、SPF、DKIM、DMARC | 配送再試行を考慮し十分に維持 |
| NS | ゾーン全体のWeb、メール、認証情報 | 新ゾーンの全レコード、親委任、グルー、DNSSEC | 新旧DNSを並行稼働して内容を一致 |
| TXT / CAA | サービス認証、メール認証、証明書発行 | 既存値を消していないか、指定値の完全一致 | 不要と確定するまで旧値を安易に削除しない |
ネームサーバー移行ではDNSSECを先に確認
DNSSECを利用中に、親側のDSレコードと新しいゾーンの署名が一致しないと、検証する再帰リゾルバーでSERVFAILになり、ドメイン全体が見えなくなる可能性があります。新旧事業者の移行手順に従い、DSの削除・更新、署名開始の順序を決めてください。
DNS障害を症状から切り分ける
DNSのエラー表示だけで原因を断定せず、権威DNSと再帰リゾルバーを分けて確認します。特にSERVFAILは「レコードが存在しない」という意味ではなく、再帰リゾルバーが有効な答えを得られなかった、または検証に失敗したときに返ることがあります。
| 症状・応答 | 考えられること | 最初に確認すること |
|---|---|---|
| NXDOMAIN | 問い合わせた名前が存在しない、委任や入力名が誤っている、古い負のキャッシュが残っている。 | 権威DNSへ直接問い合わせ、名前の綴り、ゾーン、SOA、負のTTLを確認。 |
| NOERRORだが答えが空 | 名前は存在するが、問い合わせた種類のレコードがないNODATAの可能性。 | AとAAAA、MXとTXTなど種類を分け、CNAME連鎖も確認。 |
| SERVFAIL | DNSSEC検証失敗、権威DNSの応答不良、委任不整合、タイムアウト、壊れた応答など。 | 別の再帰DNSと権威DNSを比較し、DS・DNSKEY・RRSIG、NS到達性を確認。 |
| REFUSED | 問い合わせ先がポリシー上応答を拒否している。権威専用サーバーへ再帰問い合わせした場合など。 | 問い合わせ先と再帰フラグ、ACL、想定する役割を確認。 |
| 一部の回線だけ旧IP | 再帰リゾルバー、端末、VPN、ルーターなどに旧キャッシュが残っている。 | 同じ回線で利用中のDNS、残りTTL、A・AAAAの両方を記録。 |
| 権威NSごとに値が違う | ゾーン転送・配布の不整合、片方だけ更新失敗、異なるゾーンを参照している。 | 全権威NSの対象レコードとSOAシリアルを比較。待機ではなく配布を修正。 |
| DNSは正しいがサイトが開かない | Webサーバー、ファイアウォール、仮想ホスト、アプリ、TLS証明書の問題。 | 接続先IPへ到達できるか、HTTPステータス、証明書名、サーバーログを確認。 |
| Webは動くがメールが届かない | MX、配送先A・AAAA、受信設定、SPF・DKIM・DMARC、旧環境停止の問題。 | MXと配送先、実送信のバウンス、受信ログ、認証結果を確認。 |
迷ったときの判断順序
誤値・不一致なら、キャッシュを待つ前にゾーン設定や配布を直します。
残りTTL、負のキャッシュ、DNSSEC検証、問い合わせ先を記録します。
HTTP、TLS、メール、API、データベース、認証などDNS外の層へ進みます。
「DNS伝播中」で調査を止めない
新旧の答えが混在していても、問い合わせ先とTTLを見ればキャッシュ待ちかどうかを説明できます。全権威NSが誤った値を返す、NS委任が間違う、DNSSECで検証できない場合は、時間では直りません。
DNSSEC・暗号化DNS・HTTPSレコードの違い
DNS周辺には「安全にする仕組み」が複数ありますが、守る対象が違います。名前が似ていても代替関係ではありません。
DNSSEC
DNSデータの出所と完全性を署名で検証します。問い合わせ内容を暗号化する仕組みではありません。委任時のDS不整合はSERVFAILにつながります。
DoH / DoT
端末と再帰リゾルバー間のDNS通信をHTTPSまたはTLSで暗号化します。権威DNSに誤ったレコードがあれば、暗号化しても答えは誤ったままです。
SVCB / HTTPS
代替接続先、ALPN、ポートなどをDNSで事前に示す新しいレコードです。HTTP/3や、2026年に標準化されたECH設定の配布にも利用できます。
2026年時点で知っておきたいECH
ECH(Encrypted ClientHello)は、TLS接続時に送るClientHelloの一部を暗号化し、従来は平文で見えやすかった接続先名の保護を強化する仕組みです。RFC 9848では、SVCBまたはHTTPSレコードの ech パラメーターを使って、クライアントが必要な設定情報を取得する方法が定められました。
ただし、DNS事業者・CDN・ブラウザ・サーバーの対応がそろって初めて機能します。一般的なサイト運営者が推測でレコードを作成するのではなく、利用サービスが提示する設定を使い、HTTPSレコードと実接続を一体で検証してください。
最新レコードを追加すれば自動的に高速・安全になるわけではない
対応していないクライアントは従来のA・AAAAなどを使います。誤ったSVCB・HTTPS設定は接続失敗を招く場合があるため、サービス提供者の正式な手順、フォールバック構成、監視を優先します。
DNSに関するよくある質問
DNSとネームサーバーは同じものですか?
同じではありません。DNSは、名前に対応する情報を分散管理・検索する仕組み全体です。ネームサーバーはDNS問い合わせへ応答するサーバーです。さらに、正規データを持つ権威ネームサーバーと、利用者の代わりに検索・キャッシュする再帰リゾルバーでは役割が異なります。
DNS変更は何時間で反映されますか?
一律では決まりません。変更前のTTL、各キャッシュが旧値を取得した時刻、負のキャッシュ、親ゾーンの委任、事業者の処理で変わります。まず全権威DNSが正しい値を返すか確認し、その後に複数の再帰リゾルバーを比較してください。
Aレコードを変更するとメールも止まりますか?
MXレコードが別ホストを指し、その配送先のA・AAAAが変わらなければ、Web用Aの変更だけで必ず止まるわけではありません。ただしMXの配送先が変更対象名へ依存する構成、Webサーバー上でメールも動かす構成、SPF・DKIM・DMARCを伴う移行では影響します。実送受信まで確認してください。
CNAMEはルートドメインにも設定できますか?
標準的なCNAMEは、同じ名前にSOAやNSなど別データを共存させられないため、通常はゾーン頂点へ設定できません。DNS事業者のALIAS、ANAME、CNAME flatteningなどは標準CNAMEと異なる機能です。利用サービスとDNS事業者の手順に従ってください。
Webツールで新しいIPが表示されれば変更完了ですか?
まだ完了とは限りません。全権威ネームサーバーの回答、複数の再帰リゾルバー、Web・HTTPS・メールなど実際の機能を順に確認します。一つのWebツールは一つの問い合わせ元・問い合わせ先から見た結果です。
DNSSECとDNS over HTTPSは同じものですか?
異なります。DNSSECはDNSデータの出所と改ざんの有無を検証します。DNS over HTTPSやDNS over TLSは、主に端末と再帰リゾルバー間の通信を暗号化します。どちらも、Webサーバー自体のTLS証明書やアプリの安全性を直接保証するものではありません。
DNS変更を元の値へ戻せばすぐ復旧しますか?
元へ戻す操作は必要ですが、誤値を取得したキャッシュは残りTTLの間保持される場合があります。旧値を正確に保存し、旧環境を維持し、変更・切り戻し時刻、問い合わせ先、応答、TTLを記録しながら収束を確認します。
確認した一次資料・公式ツール
DNSの定義、用語、キャッシュ、レコード、DNSSEC、SVCB・HTTPS、ECH、確認コマンドは、次の標準資料と公式ドキュメントを基準にしています。実作業では、契約中サービスの最新マニュアルも併せて確認してください。
- RFC 1034 — Domain names: concepts and facilities
- RFC 1035 — Domain names: implementation and specification
- RFC 2308 — Negative Caching of DNS Queries
- RFC 8659 — DNS Certification Authority Authorization (CAA)
- RFC 9364 / BCP 237 — DNS Security Extensions (DNSSEC)
- RFC 9460 — SVCB and HTTPS Resource Records
- RFC 9499 / BCP 219 — DNS Terminology
- RFC 9520 — Negative Caching of DNS Resolution Failures
- RFC 9848 — Bootstrapping TLS Encrypted ClientHello with DNS Service Bindings
- IANA — Domain Name System (DNS) Parameters
- ISC BIND 9 — dig manual page
- Google Admin Toolbox — Dig
- Google Public DNS — Troubleshooting
- Google Public DNS — Flush Cache
- IANA — Example Domains
DNS変更と一緒に確認したい記事
まとめ:DNSは「正規データ・キャッシュ・実サービス」を分けて確認する
DNSはドメイン名とIPアドレスを結ぶだけでなく、メール配送、委任、認証、証明書発行制御、最新の接続情報を扱います。変更前にゾーン全体と旧値を退避し、対象差分だけを更新してください。変更後は、全権威DNS、複数の再帰リゾルバー、Web・HTTPS・メールの順に確認します。旧値なら残りTTLを、誤値や不一致なら修正・切り戻しを選ぶことが安全な運用につながります。

Finite Field 編集部
DNSの標準仕様、最新の用語、TTLと負のキャッシュ、DNSSEC、SVCB・HTTPS、公式確認ツールを照合し、「伝播待ち」と設定不整合を混同しない実務手順として編集しています。