10 күндік тегін сынақ
PR
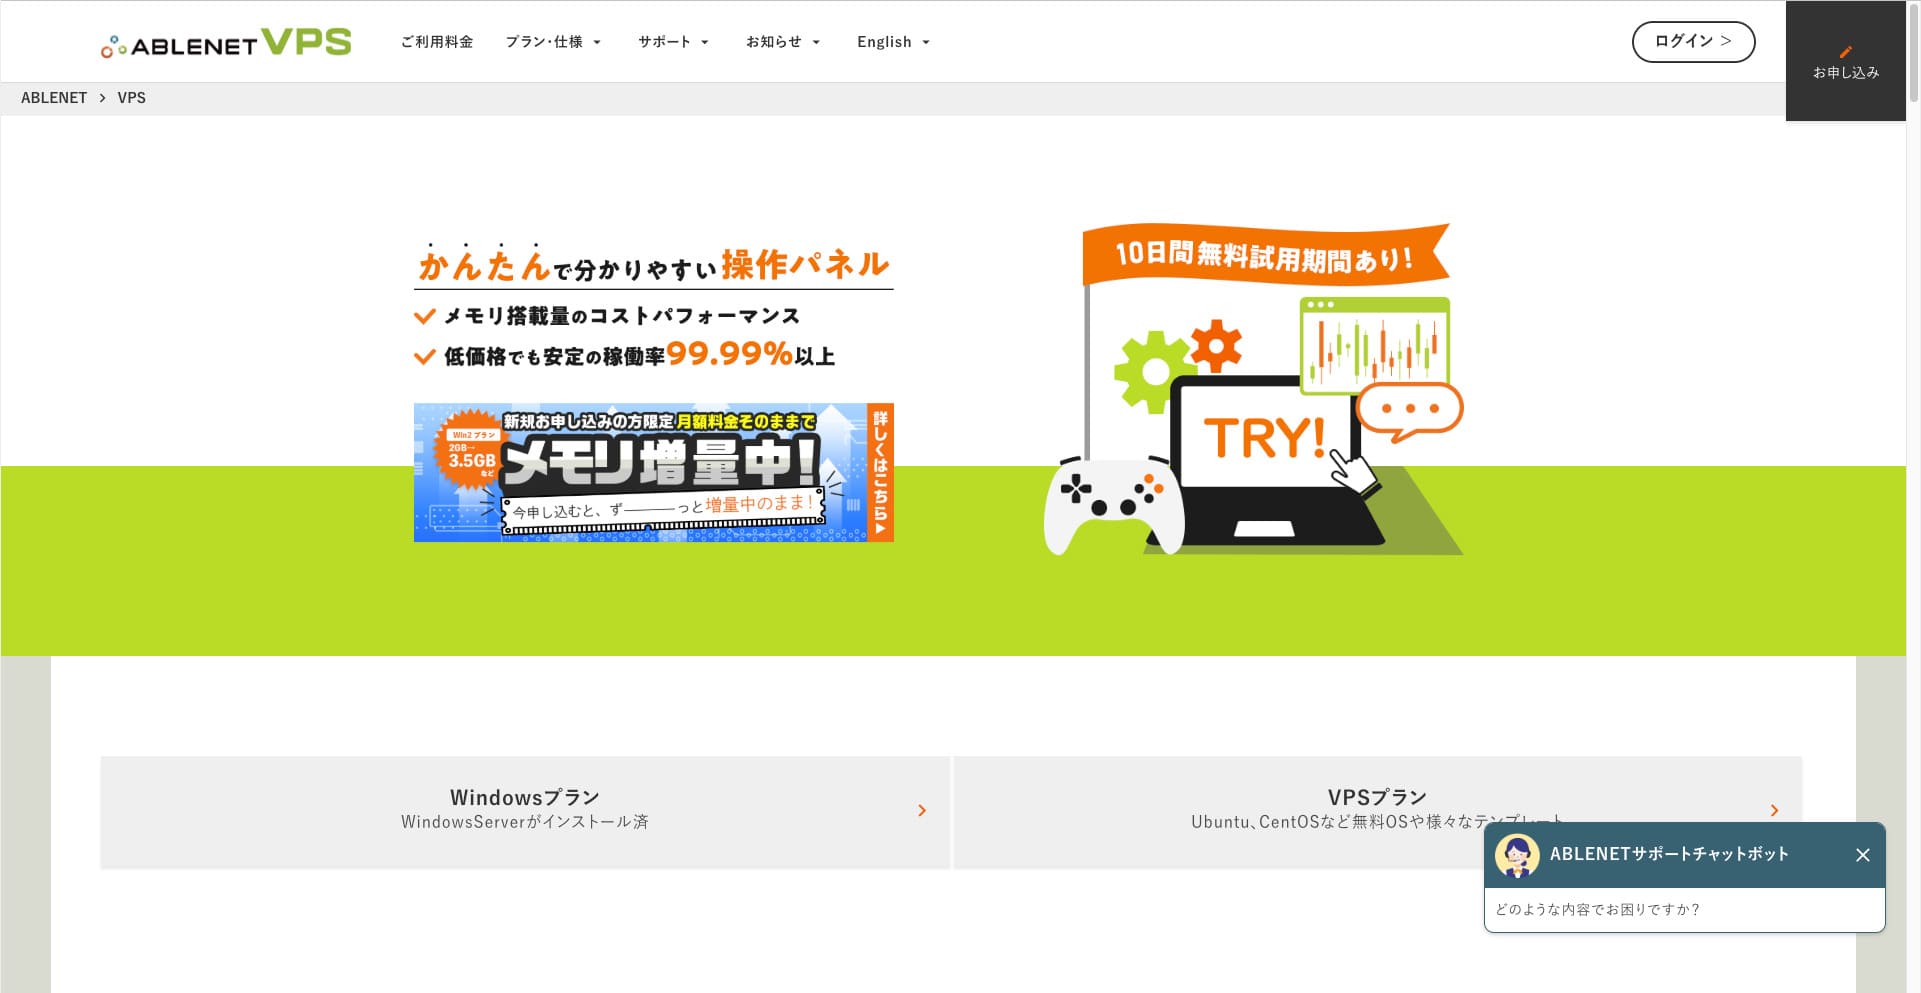
VPS
130 Мбит/с-тан жоғары жылдамдықпен: ABLENET VPS-та Outline VPN құру
Жарияланды: 2025.06.26
Жаңартылды: 2025.06.26
People who want to browse the internet through a VPN are becoming more common.
VPN (Virtual Private Network - виртуалды жеке желі) пайдалану қауіпсіздікті жақсартады, сондай-ақ шетелден тек Жапонияда ғана қолжетімді қызметтер мен мазмұнға қол жеткізуге мүмкіндік береді.
Дегенмен, сіз VPN қосылымының жылдамдығы мен қауіпсіздігі туралы уайымдайтыныңыз заңды.
Қауіпсіз және жылдам VPN қосылымын алудың ең жақсы жолы — жеке VPN ортасын құру. Ол үшін сізге VPN-ге арналған сервер ортасы қажет. Бұл жолы мен келесі қызметтерді пайдаланып VPN ортасын құрдым: ABLENET VPS and Outline VPN.
Why I Recommend ABLENET VPS
The biggest reason I chose ABLENET VPS оның тұрақтылығы болып табылады.
- Operating history: Бұл Жапониядағы 25 жылдан астам уақыт бойы жұмыс істеп келе жатқан ең көне серверлік компаниялардың бірі. Оның VPS қызметі де 2011 жылдан бері ұсынылып келеді.
- Жұмыс уақыты: An uptime of over 99.99% gives you clear, measurable peace of mind.
- Трафик шектеуі: It also offers unlimited data transfer, making it ideal for use as a VPN.
Жапонияда Xserver және Sakura Internet те VPS қызметтерін ұсынады, бірақ ABLENET-тің сенімділігі олардан кем түспейді. Қазіргі уақытта көптеген серверлік компанияларда шектеусіз деректерді тасымалдау стандартты болуы мүмкін, бірақ ABLENET осы саладағы алғашқылардың бірі болды.
Hikaru Ono
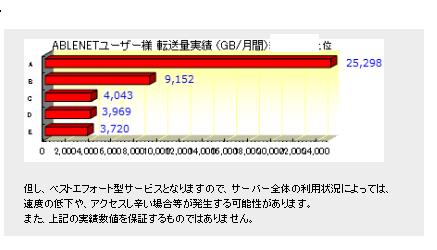
Бұл ақпарат бұрын ресми сайтта жарияланған болатын, бірақ ABLENET-те бір айда 25 ТБ дерек пайдаланған белсенді қолданушы болған сияқты. Сондықтан келесі мәлімдемені сенімді түрде айта аласыз: the data transfer really was unlimited.
So if you expect heavy data usage for things like watching movies and video content or doing programming work, I recommend building your VPN on ABLENET VPS.
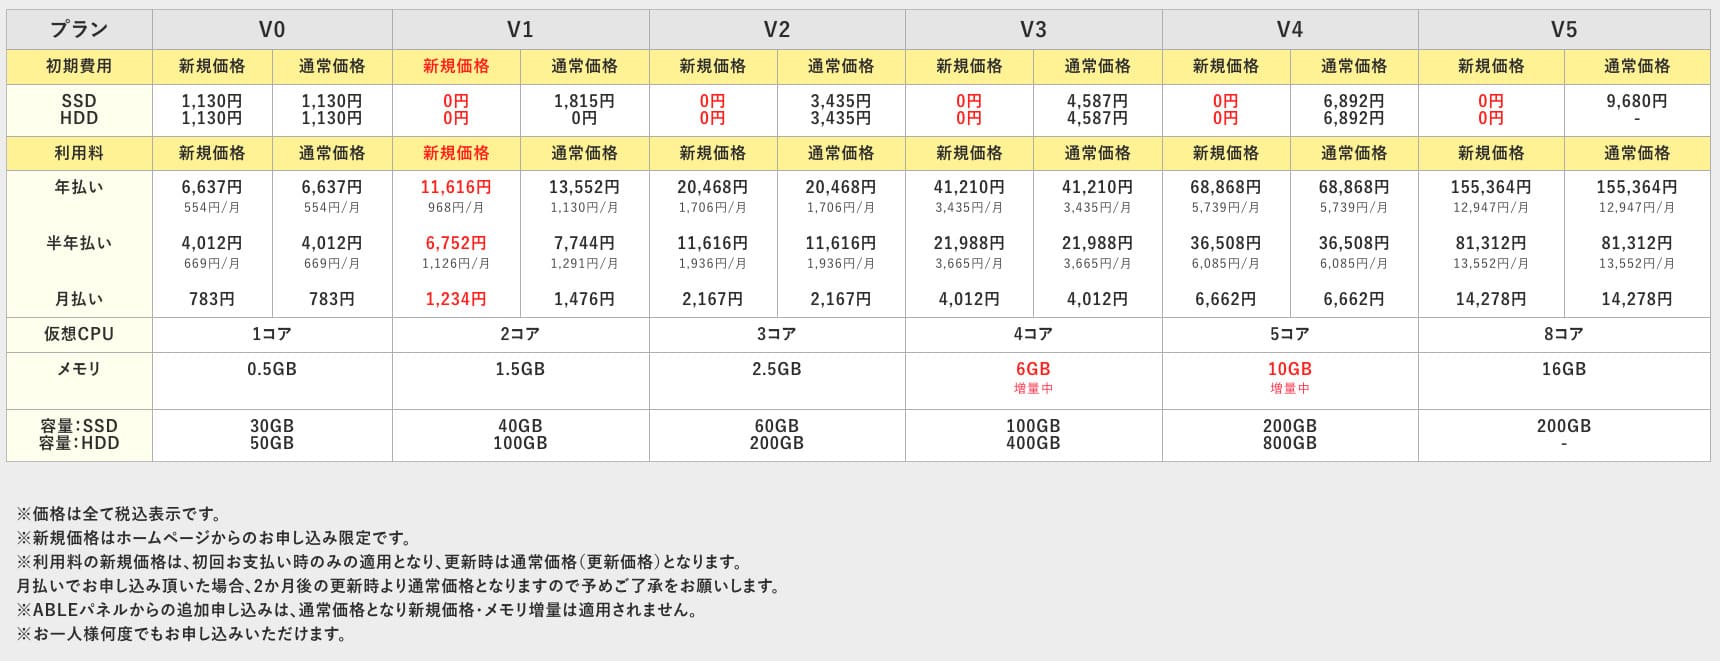
ABLENET VPS — қолжетімді бағасына қарамастан, 99.99% жұмыс уақытын қамтамасыз ететін тұрақты VPS. Ол жады 0.5 ГБ болатын қарапайым V0 жоспарынан бастап жады 16 ГБ болатын жоғары сипаттамалы V5 жоспарына дейінгі кең ауқымды тарифтерді ұсынады, осылайша өз қажеттіліктеріңізге сәйкес келетін ең жақсы нұсқаны таба аласыз.
What Is Outline VPN? A Simple VPN Setup Even Beginners Can Understand
VPN (Virtual Private Network) is a technology that интернет арқылы шифрланған туннель құрады және үшінші тұлғалардың ақпаратты тыңдауы мен бұзуының алдын алады. Трафикті VPN сервері арқылы бағыттау арқылы ол сіздің нақты IP-мекенжайыңызды жасырып, анонимділікті арттыра алады.
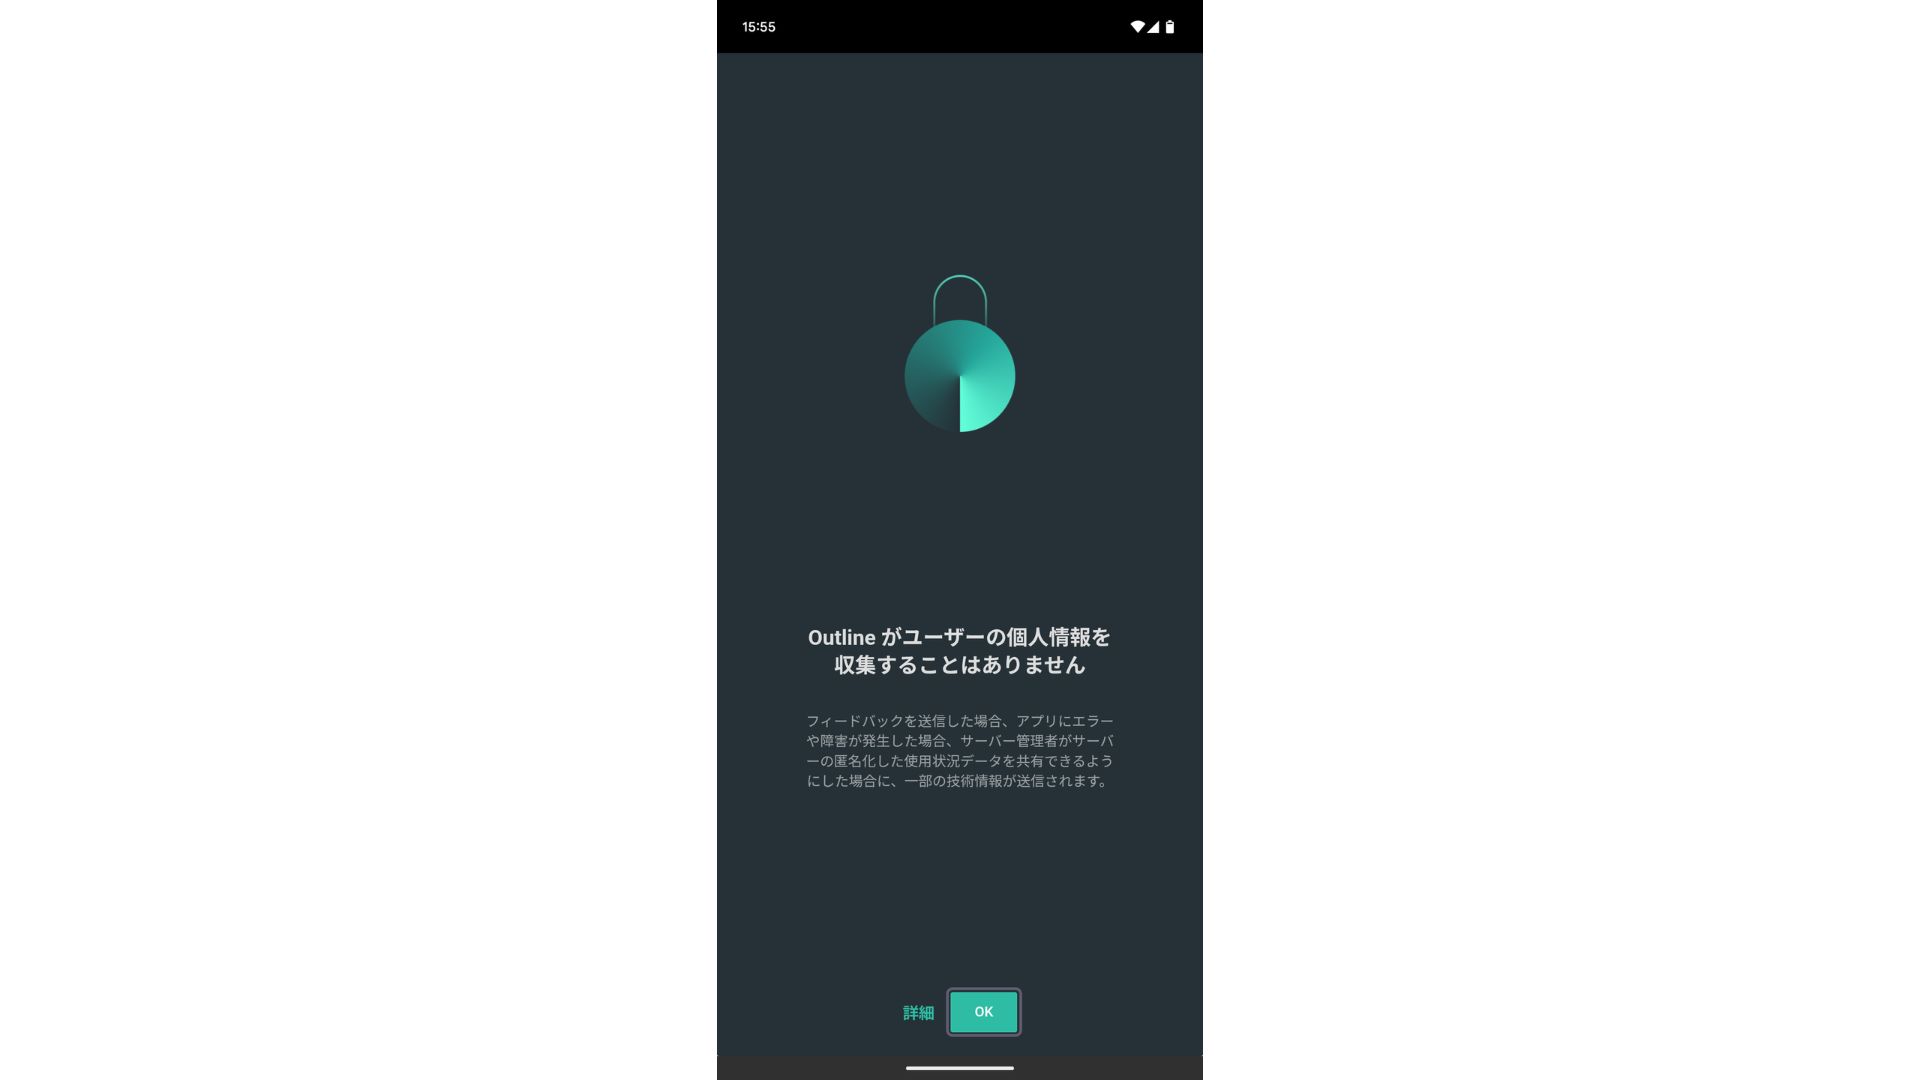
Outline VPN осындай VPN қосылымын барынша қарапайым етуге арналған.
«Outline» — Google жанындағы Jigsaw company-сы ұсынған, VPN арқылы қосылуға мүмкіндік беретін тегін әрі оңай бағдарлама. Егер бұған дейін VPN орнатып көрмеген болсаңыз да, бірнеше рет басу арқылы жұмысты бастай аласыз.
Ресми сайттан жүктеу
Hikaru Ono
This time, I am using Outline VPN so that anyone can build a VPN easily.
ABLENET VPS-та Outline VPN-ді 6 оңай қадаммен орнату
Now, let me walk you through the actual process of building Outline VPN on ABLENET VPS in detail.
1-қадам: ABLENET VPS жұмысын бастау
If you have not yet signed up for ABLENET VPS, take care of that first.
ABLENET VPS жұмысын бастау
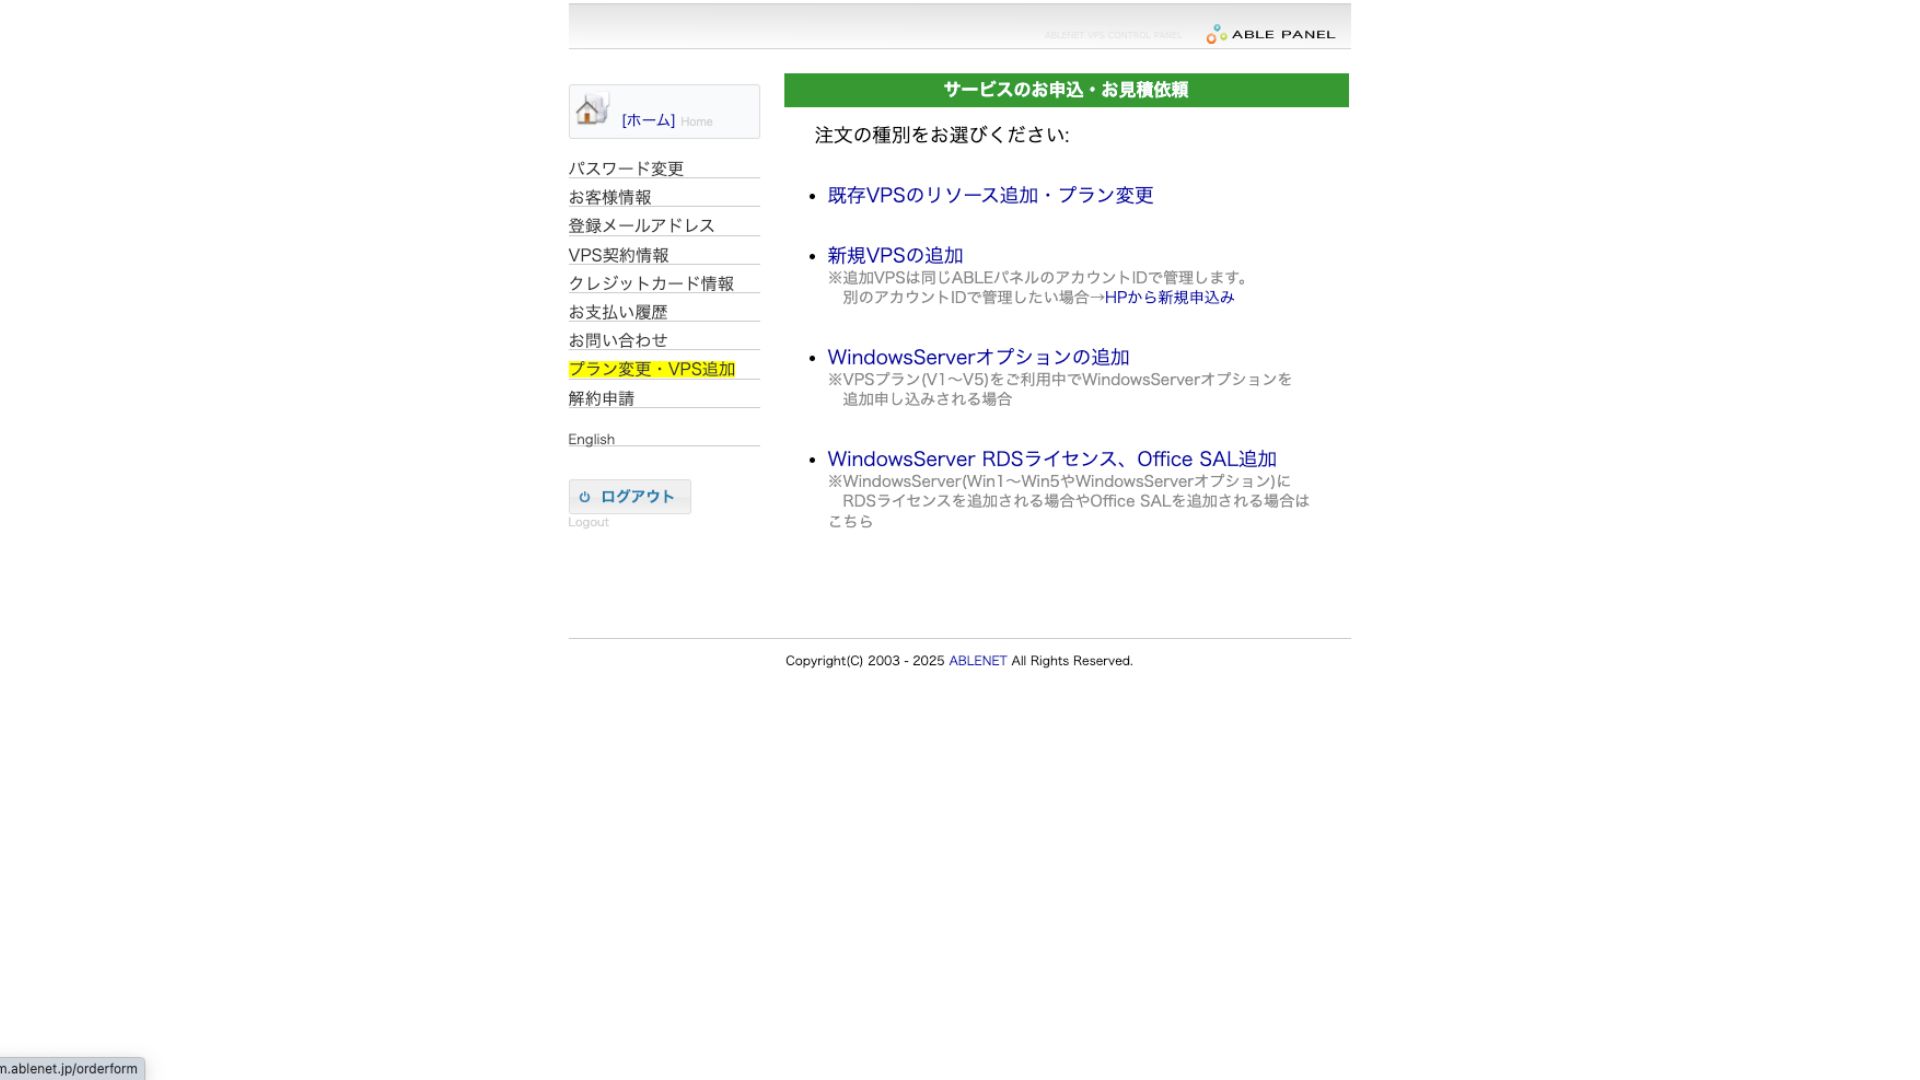
- STEP.1ABLENET VPS-та жоспарды таңдау
Go to ABLENET VPS and click "Apply."
Сіз Windows немесе VPS жоспарын таңдай аласыз. Бұл VPN орнатуы үшін VPS жоспарын пайдаланыңыз. Мен бастапқы жарнасы жоқ және жылдам SSD дискісі бар V1 жоспарын ұсынамын.
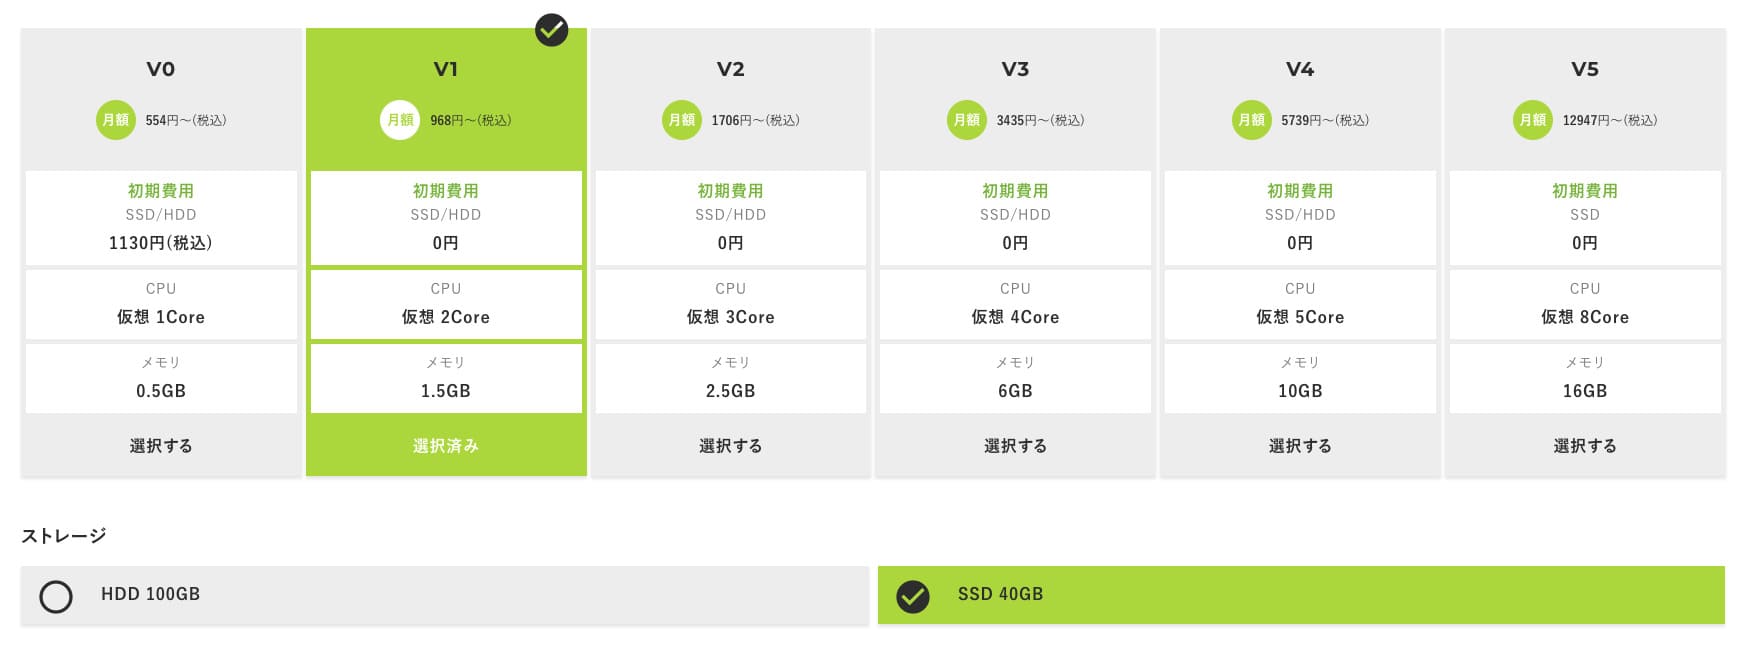
V1 жоспарынан бастаңыз, егер кейінірек сипаттамалары жеткіліксіз болып көрінсе, оны V2 немесе V3 жоспарларына жаңартыңыз. Қызмет басталғаннан кейін сипаттамаларды жаңартуды ABLE панелі арқылы сұрай аласыз.
Төлем әдісі үшін несие картасының сынақ мерзімін пайдалануға болады.

Review the terms of use and check the box.
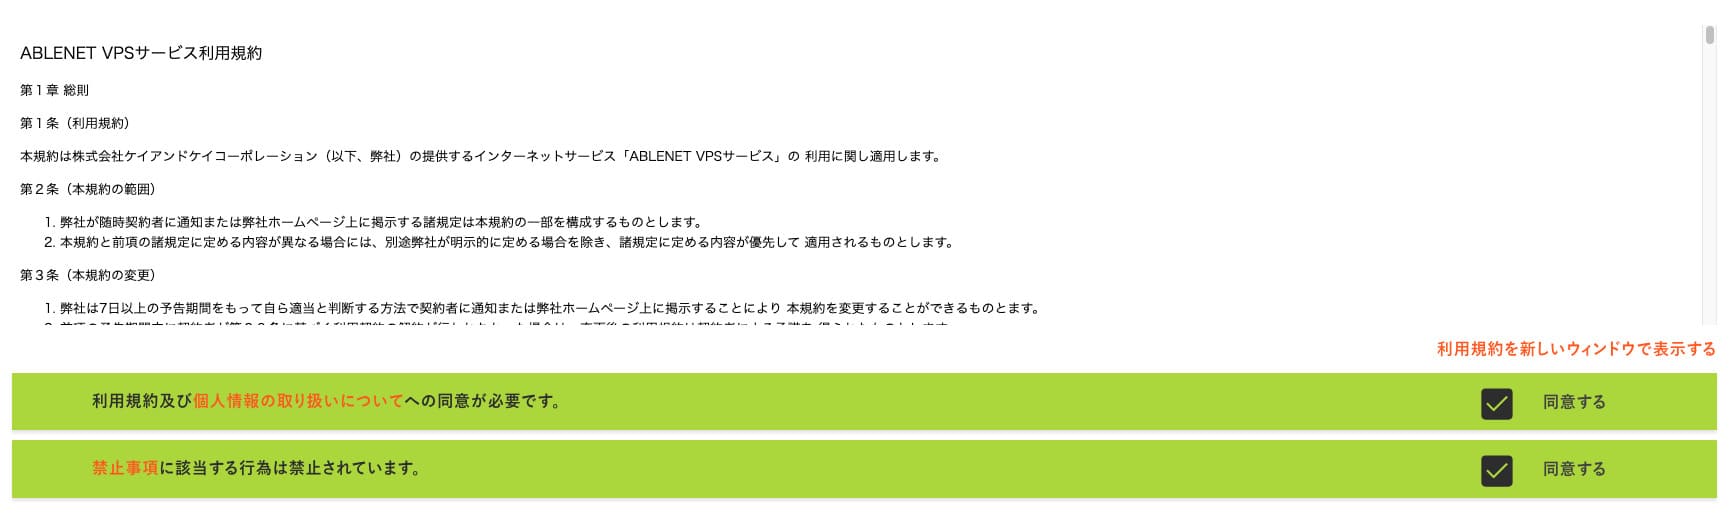
«Келісімшарт мерзімін таңдауға өту» түймесін басыңыз.
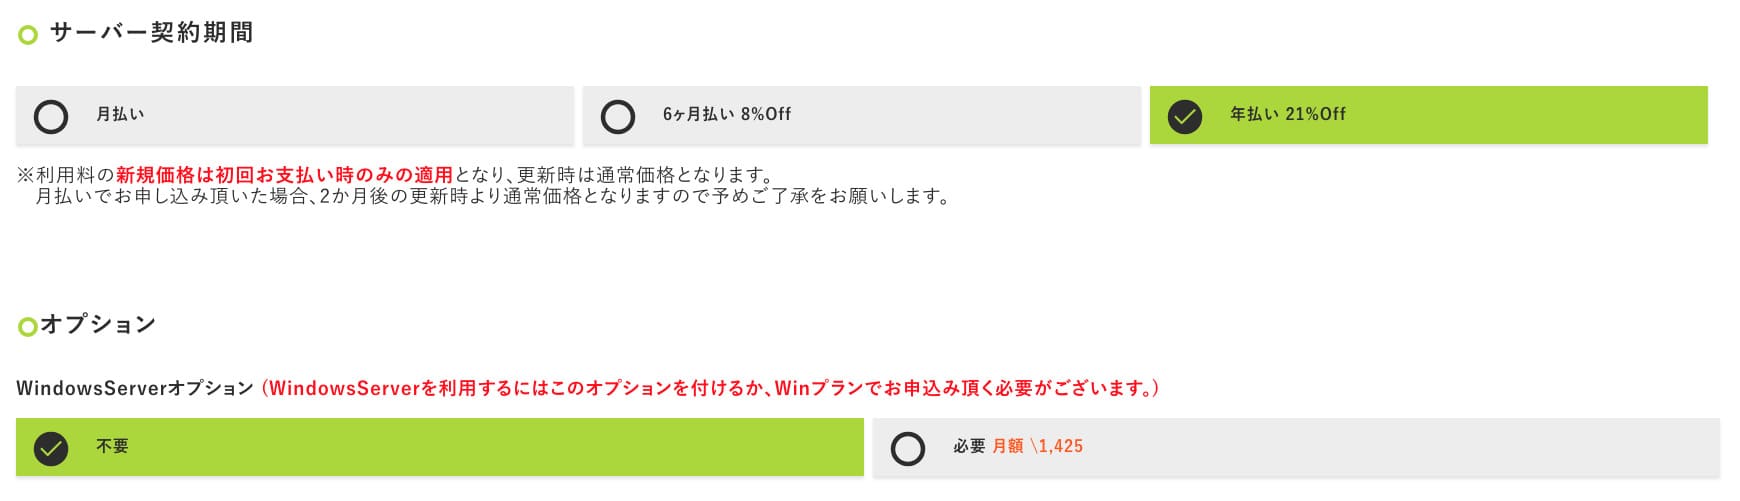
- STEP.2Келісімшарт мерзімін таңдау
Сервер мерзімі үшін жылдық келісімшарт тиімдірек. Бұл жолы VPS жоспарын пайдаланатындықтан, ешқандай қосымша параметрлер қажет емес.
After filling it in, click "Proceed to the estimate screen." Review the estimate, and if everything looks fine, click "Proceed to enter applicant information."
- STEP.3Enter applicant information
Enter your name, address, and other applicant details. Continue to the order review screen and submit the application.
- STEP.4Enter payment information
If you are paying by credit card, enter the cardholder information and other required details. If everything is correct, click "Confirm order" to submit.
VPS ақпараты көрсетілген электрондық хатты алғаннан кейін өтінім толығымен аяқталады.
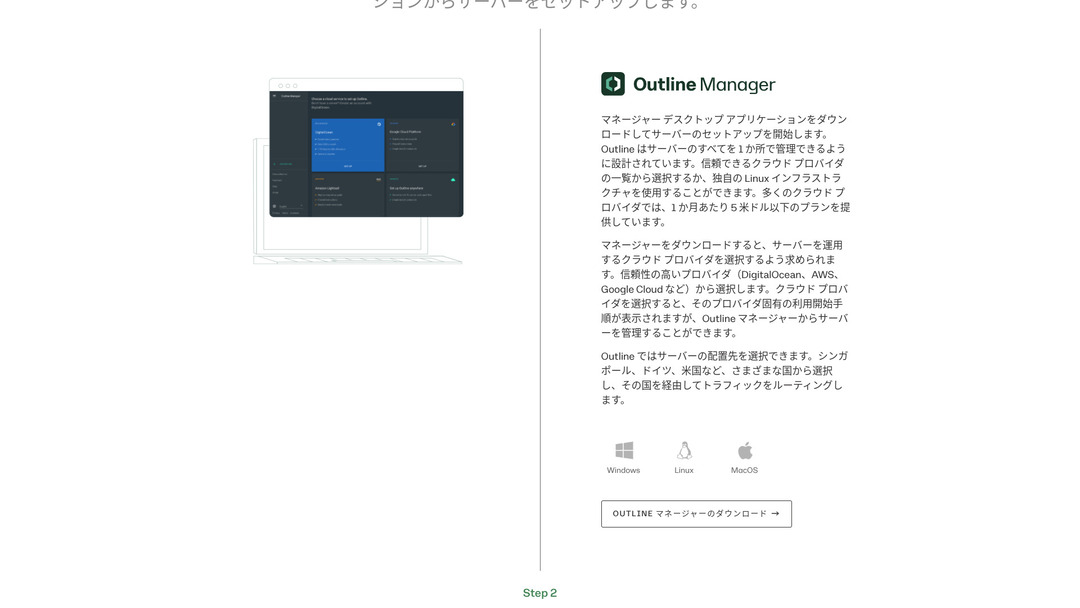
2-қадам: Outline Manager орнату — оңай реттеу
Әрі қарай, VPN серверін конфигурациялау және басқару үшін компьютерге Outline Manager орнатыңыз.
Outline Manager орнату
- STEP.1Ресми Outline сайтына кіру
Go to Outline.
- STEP.2Outline Manager жүктеу
«Get Outline Manager» бөлімінен компьютеріңіздің ОЖ (Windows, macOS немесе Linux) сәйкес келетін Outline Manager нұсқасын жүктеңіз.
- STEP.3Орнату
Жүктелген файлды іске қосып, экрандағы нұсқауларды орындау арқылы Outline Manager орнатыңыз.
3-қадам: Outline Manager арқылы VPS-те Outline серверін құру
Outline серверін келесі серверге орнату үшін Outline Manager бағдарламасын пайдаланыңыз: ABLENET VPS.
Outline Manager арқылы VPS-те Outline серверін құру
- STEP.1Outline Manager бағдарламасын іске қосу
Орнату аяқталғаннан кейін Outline Manager бағдарламасын іске қосыңыз.
- STEP.2«Серверді орнату» түймесін басу
Оны алғаш рет іске қосқан кезде серверді баптау экраны пайда болады. «Серверді орнату» түймесін басыңыз.
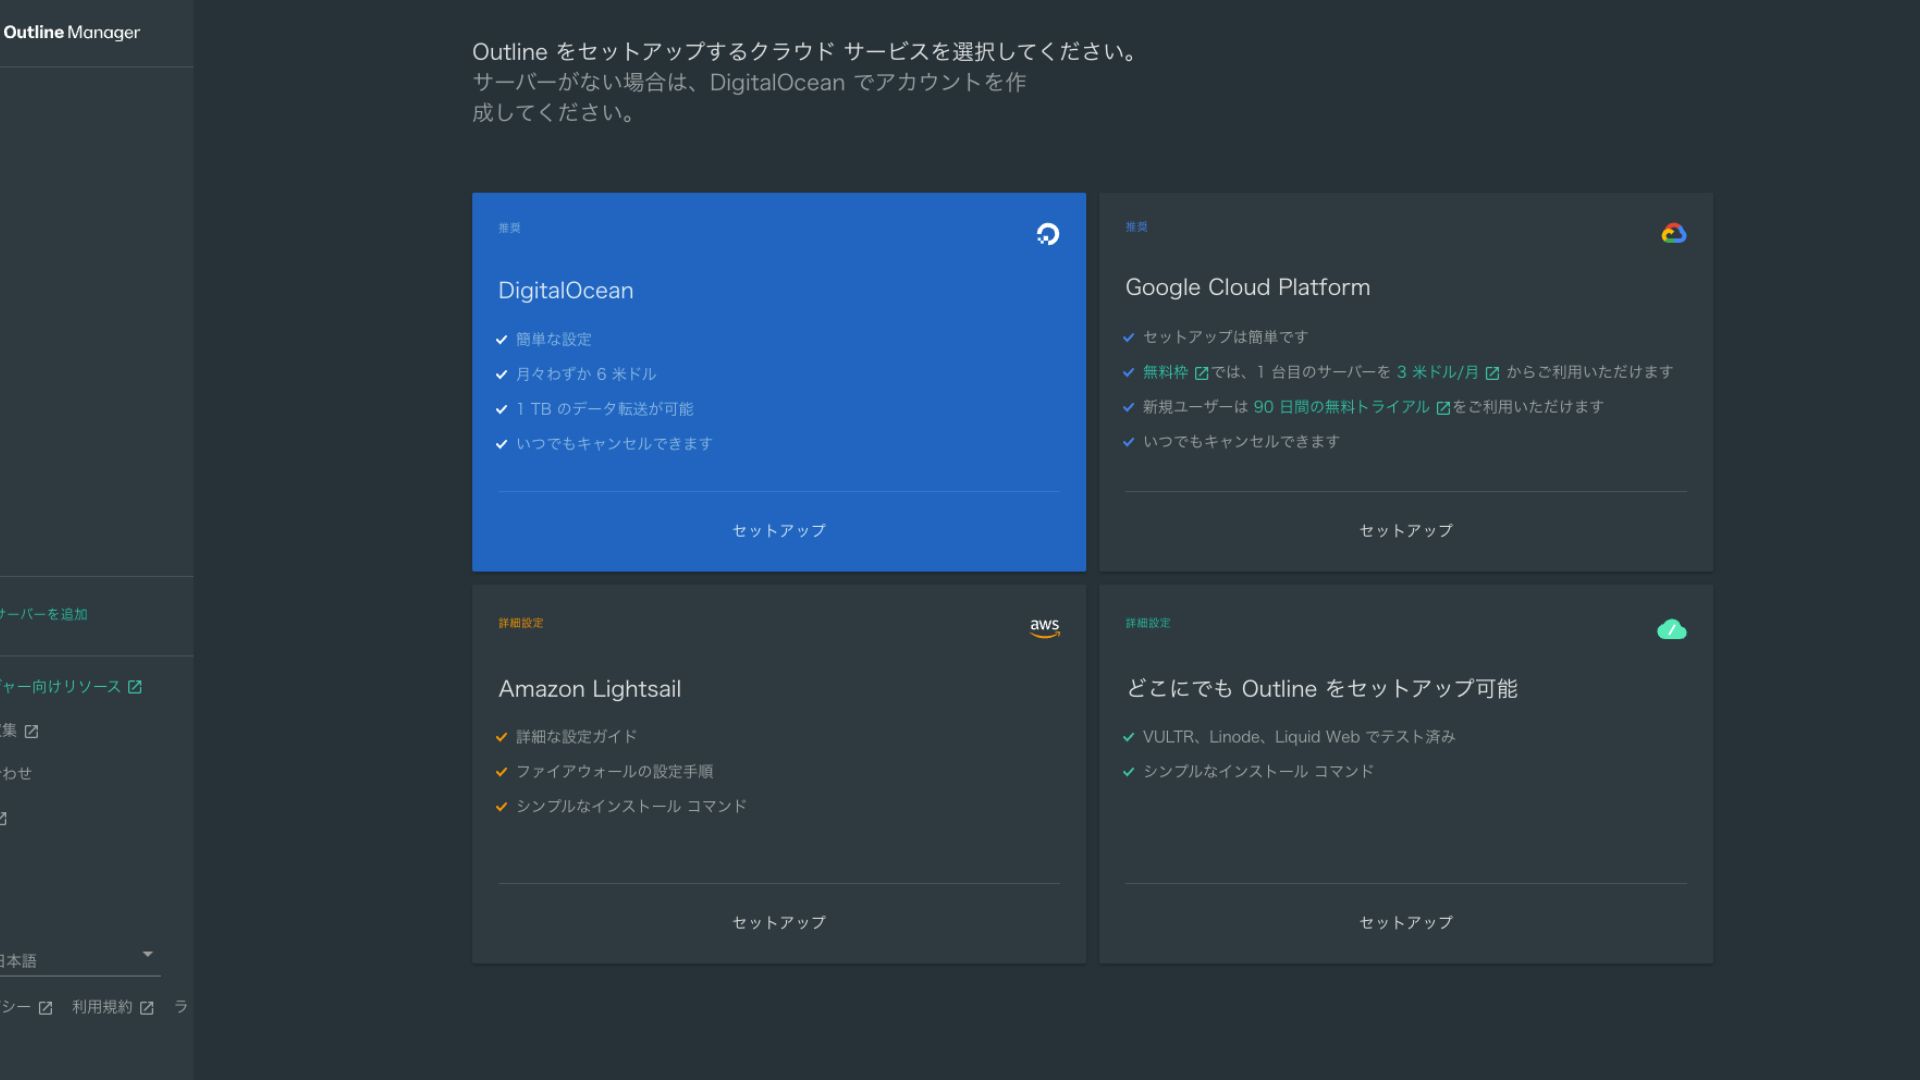
- STEP.3«Outline-ды кез келген жерде орнату» параметрін таңдау
Бұлттық провайдерді таңдау экраны шығады. «Outline-ды кез келген жерде орнату» параметрін таңдаңыз.
- STEP.4Орнату пәрменін енгізу
Экранда Outline серверін VPS-ке орнату үшін пайдаланылатын пәрмен көрсетіледі. Бұл пәрменді қолмен енгізіңіз.
 Hikaru Ono
Because you cannot copy and paste it, be careful not to make any mistakes.
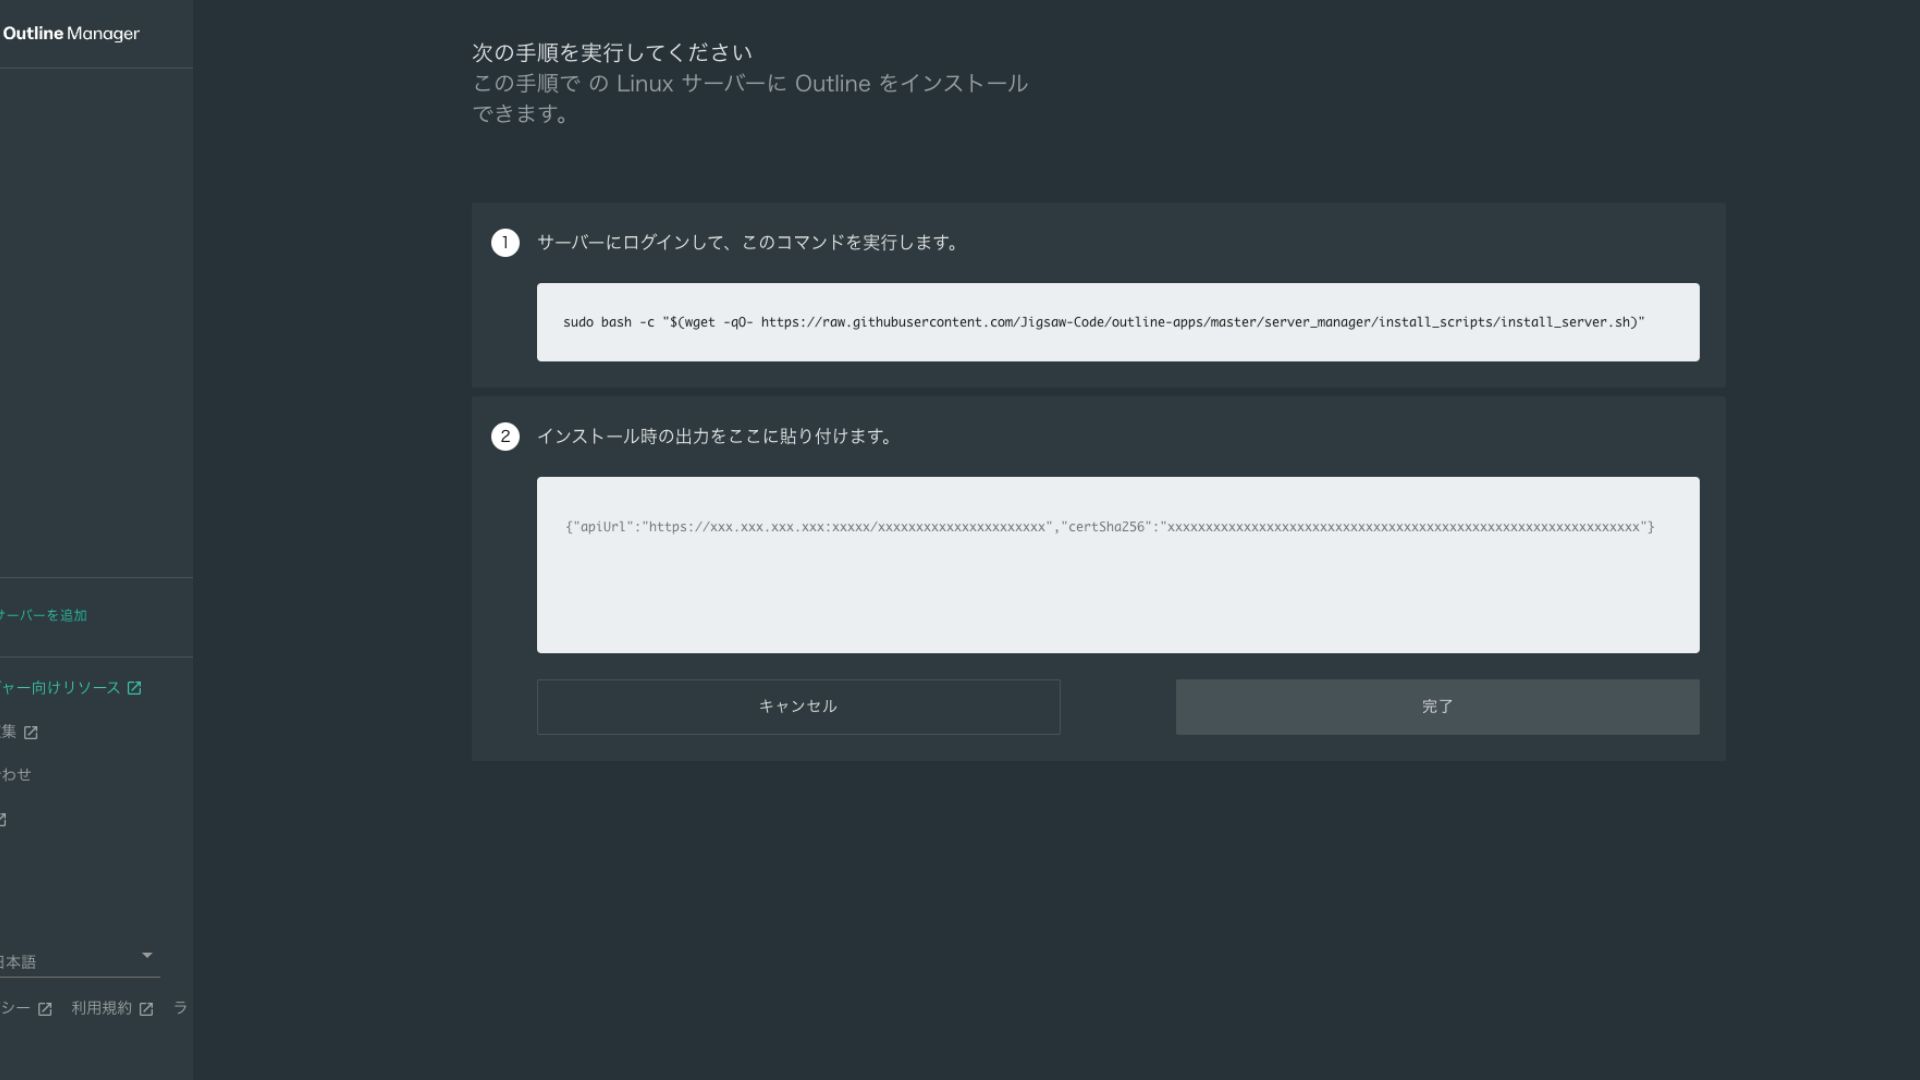
- STEP.5Run the command
- Орнату бірнеше минутқа созылуы мүмкін. Экранда көрсетілген хабарламаларды мұқият қадағалап, ол аяқталғанша күтіңіз.
- You may be asked a few questions along the way, but in most cases pressing Enter to accept the default choice is fine.
- STEP.6Outline Manager бағдарламасына ақпаратты енгізу
Орнату аяқталғаннан кейін Outline Manager-де «Сервер мәліметтері» енгізілетін экран көрсетіледі.
- Admin API URL: VPS-ке орнату кезінде жасалған API URL мекенжайы осында көрсетіледі. Әдетте ол Outline Manager-де автоматты түрде пайда болады, бірақ көрсетілмесе, SSH терминалындағы API URL мекенжайын көшіріп қойыңыз.
- Server location (optional): Сервер орналасқан жерді енгізуге болады (мысалы, Токио, Жапония). Бұл тек басқаруға арналған және қосылымға әсер етпейді.
- STEP.7«Done with server» түймесін басу
Барлық ақпаратты енгізгеннен кейін «Done with server» түймесін басыңыз.
4-қадам: Қолжеткізу кілтін жасау және VPN қосылымдарына рұқсат беру
Outline сервері құрылғаннан кейін, нақты VPN қосылымы үшін қолжеткізу кілтін жасаңыз.
Қолжеткізу кілтін жасау және VPN қосылымдарына рұқсат беру
- STEP.1Outline Manager экранын тексеру
Outline Manager экранында бір әдепкі қолжеткізу кілті көрсетіледі. Мұнда ол Key 0 деп белгіленген.
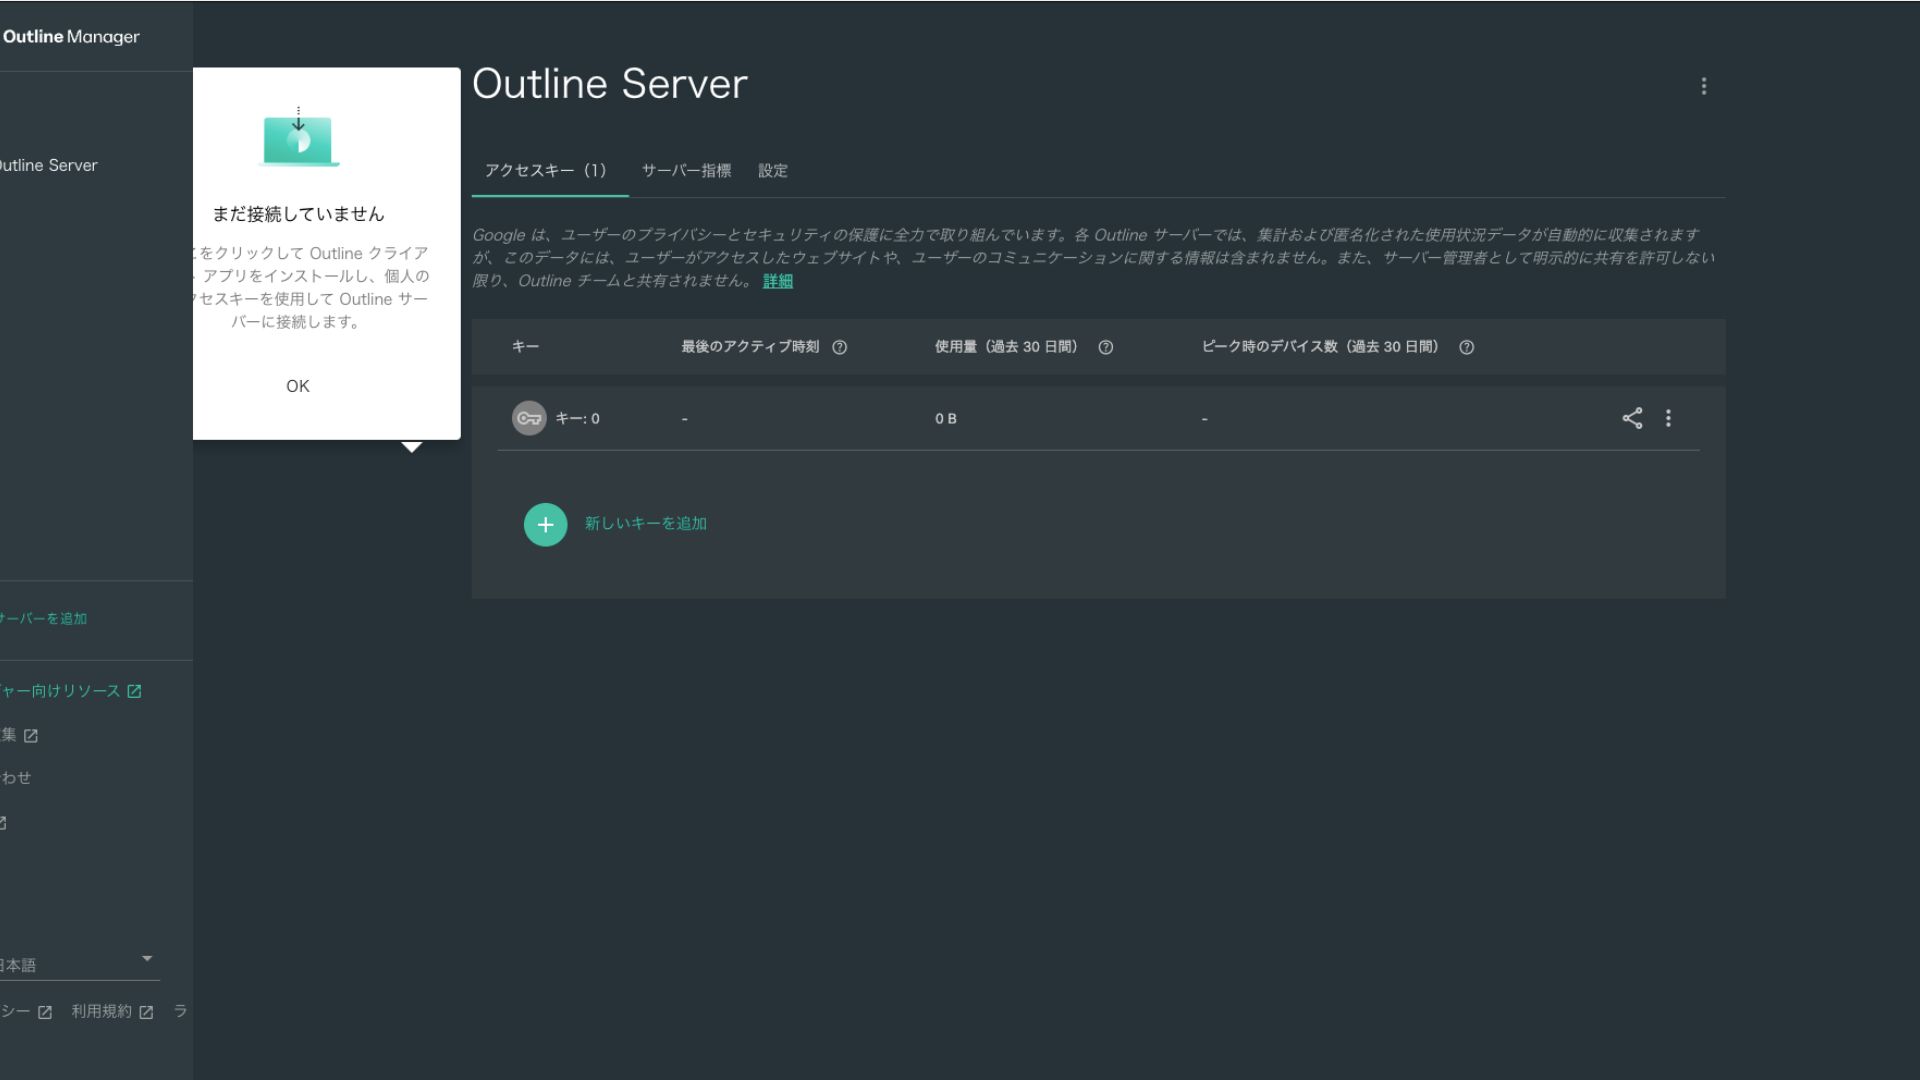
- STEP.2Қолжеткізу кілтімен бөлісу
Сіз жасаған қолжеткізу кілті Outline клиентімен қосылу үшін қажет. Қолжеткізу кілтін таңдаған кезде «Шақыруды бөлісу» деп белгіленген түйме пайда болады.
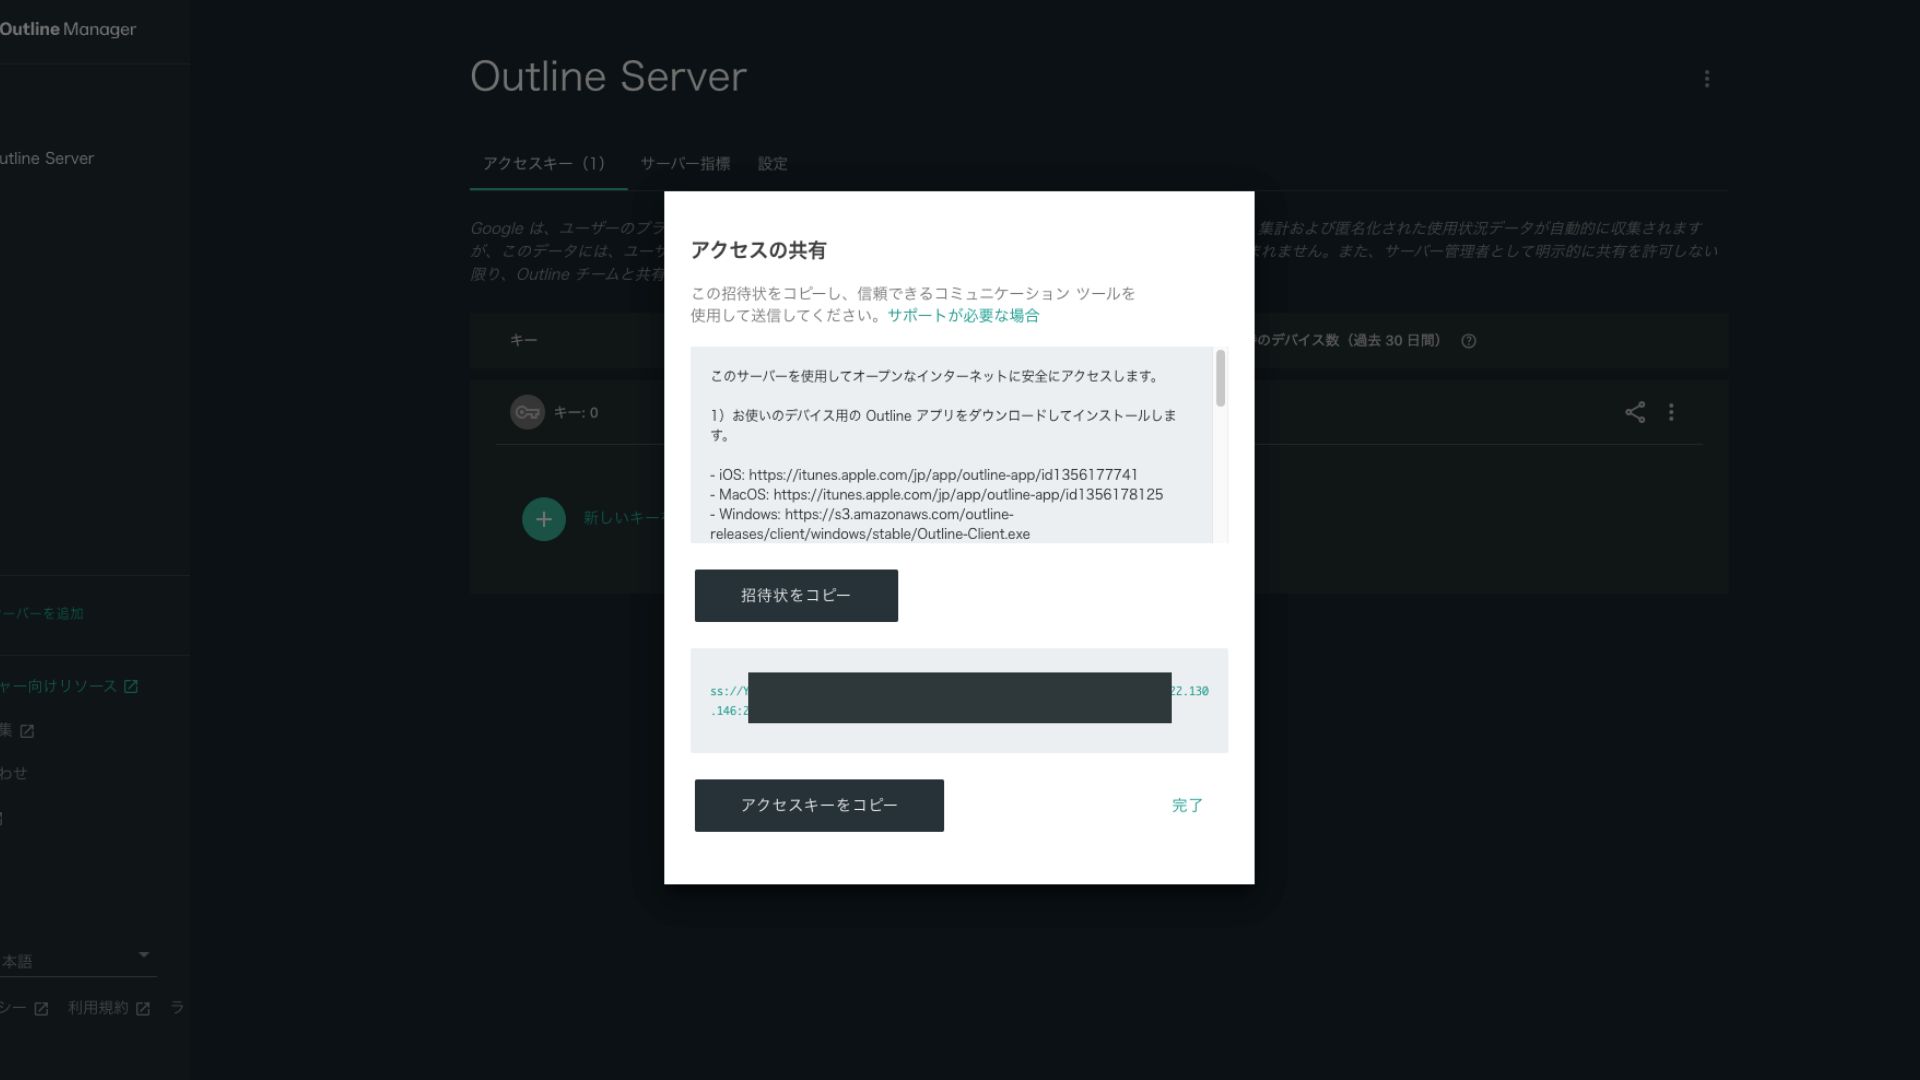
Оны басу қолжеткізу кілтінің URL мекенжайын көшіреді. Бұл URL мекенжайын VPN арқылы қосқыңыз келетін құрылғымен бөлісіңіз.
5-қадам: Outline клиентін орнату және VPN-ге қосылу
VPN қосылымы үшін пайдаланғыңыз келетін құрылғыға (ДК, смартфон, планшет және т.б.) Outline клиентін орнатыңыз. Бұл жолы мен оны Android смартфонына орнаттым.
Берілген қолжеткізу кілтін пайдаланып Outline VPN-ге қосылу
- STEP.1Outline клиентін іске қосу
Орнатылған Outline клиентін іске қосыңыз.
- STEP.2Қолжеткізу кілтін қосу
- On a PC: «Серверді қосу» немесе ұқсас түймені басып, 4-қадамда көшіріп алған қолжеткізу кілтінің URL мекенжайын қойып, «Серверді қосу» түймесін басыңыз.
- On a smartphone or tablet: Қолданбаны ашқан кезде сізден қолжеткізу кілтін енгізу сұралуы мүмкін. 4-қадамда бөлісілген қолжеткізу кілтінің URL мекенжайын көшіріп қойыңыз. Егер QR коды көрсетілсе, оны да сканерлеуге болады.
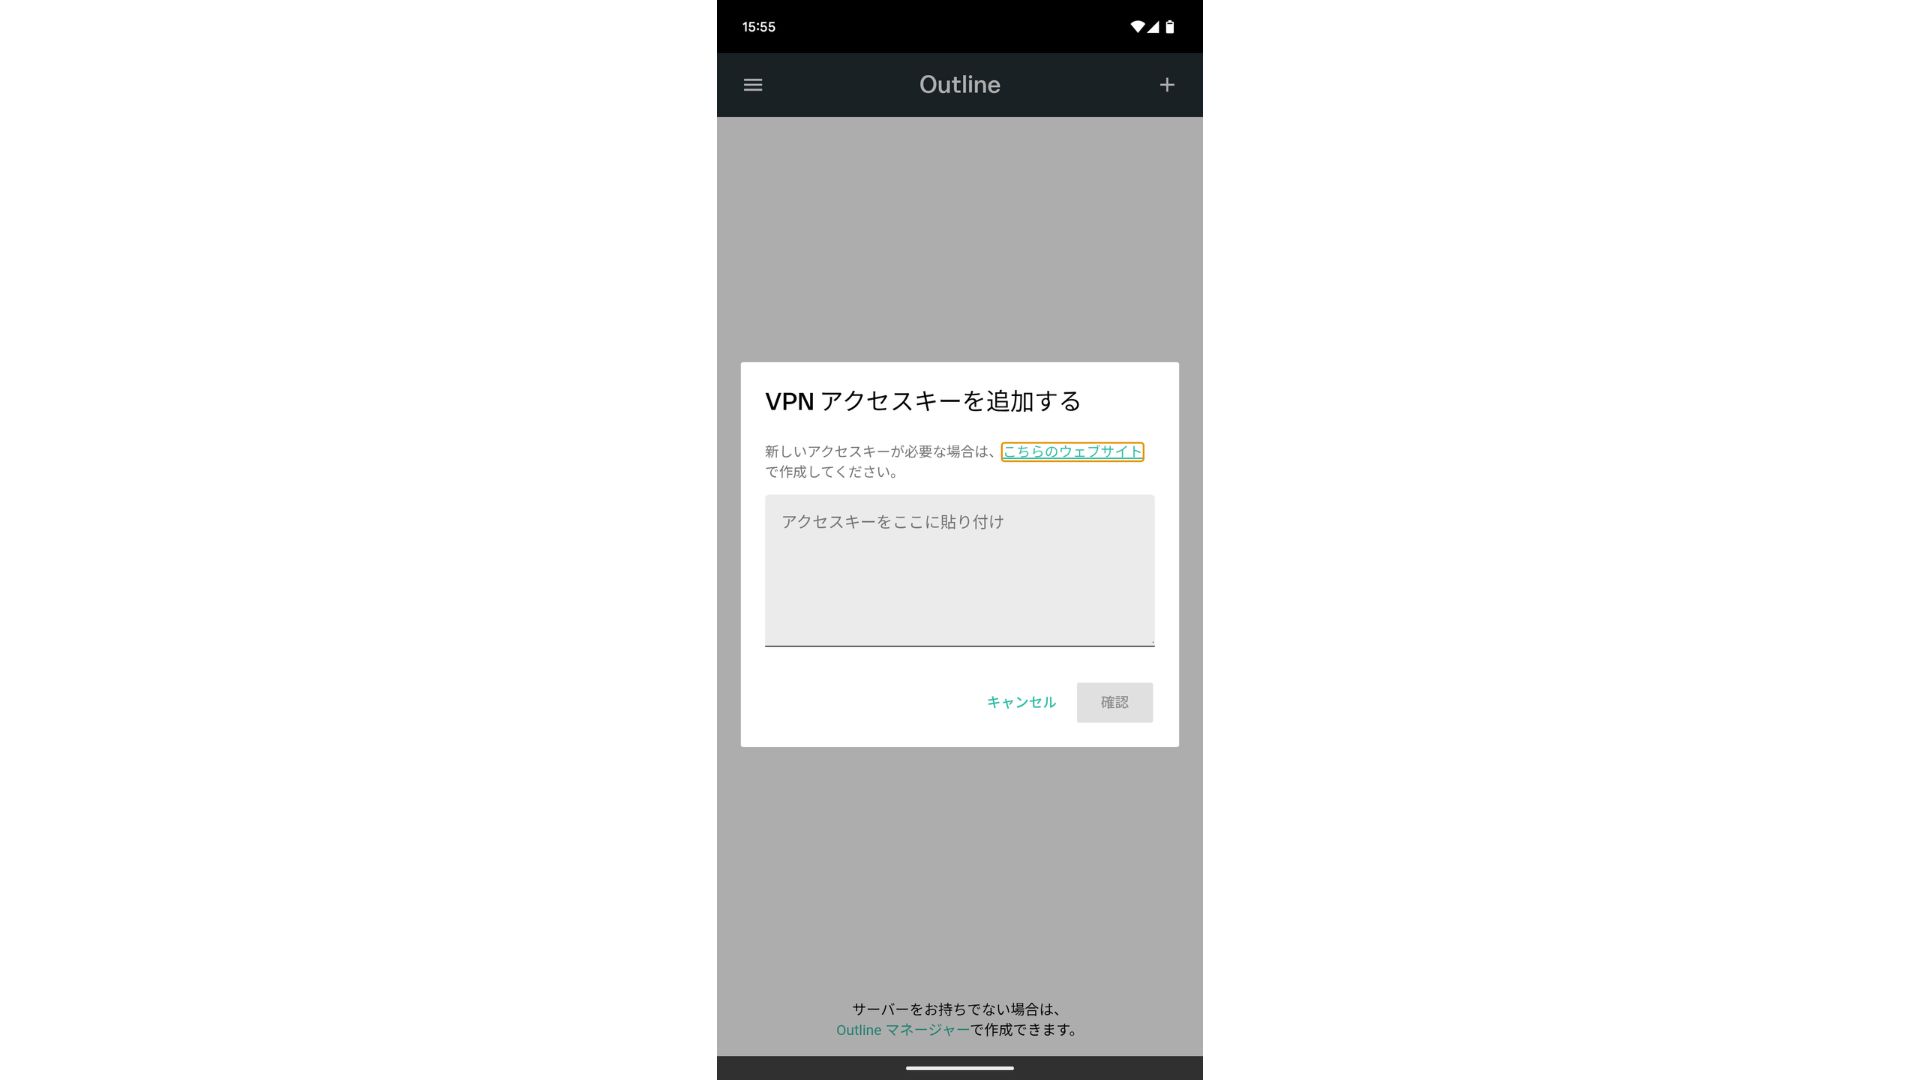
Қолжеткізу кілтін қосқаннан кейін Растау түймесін басыңыз.
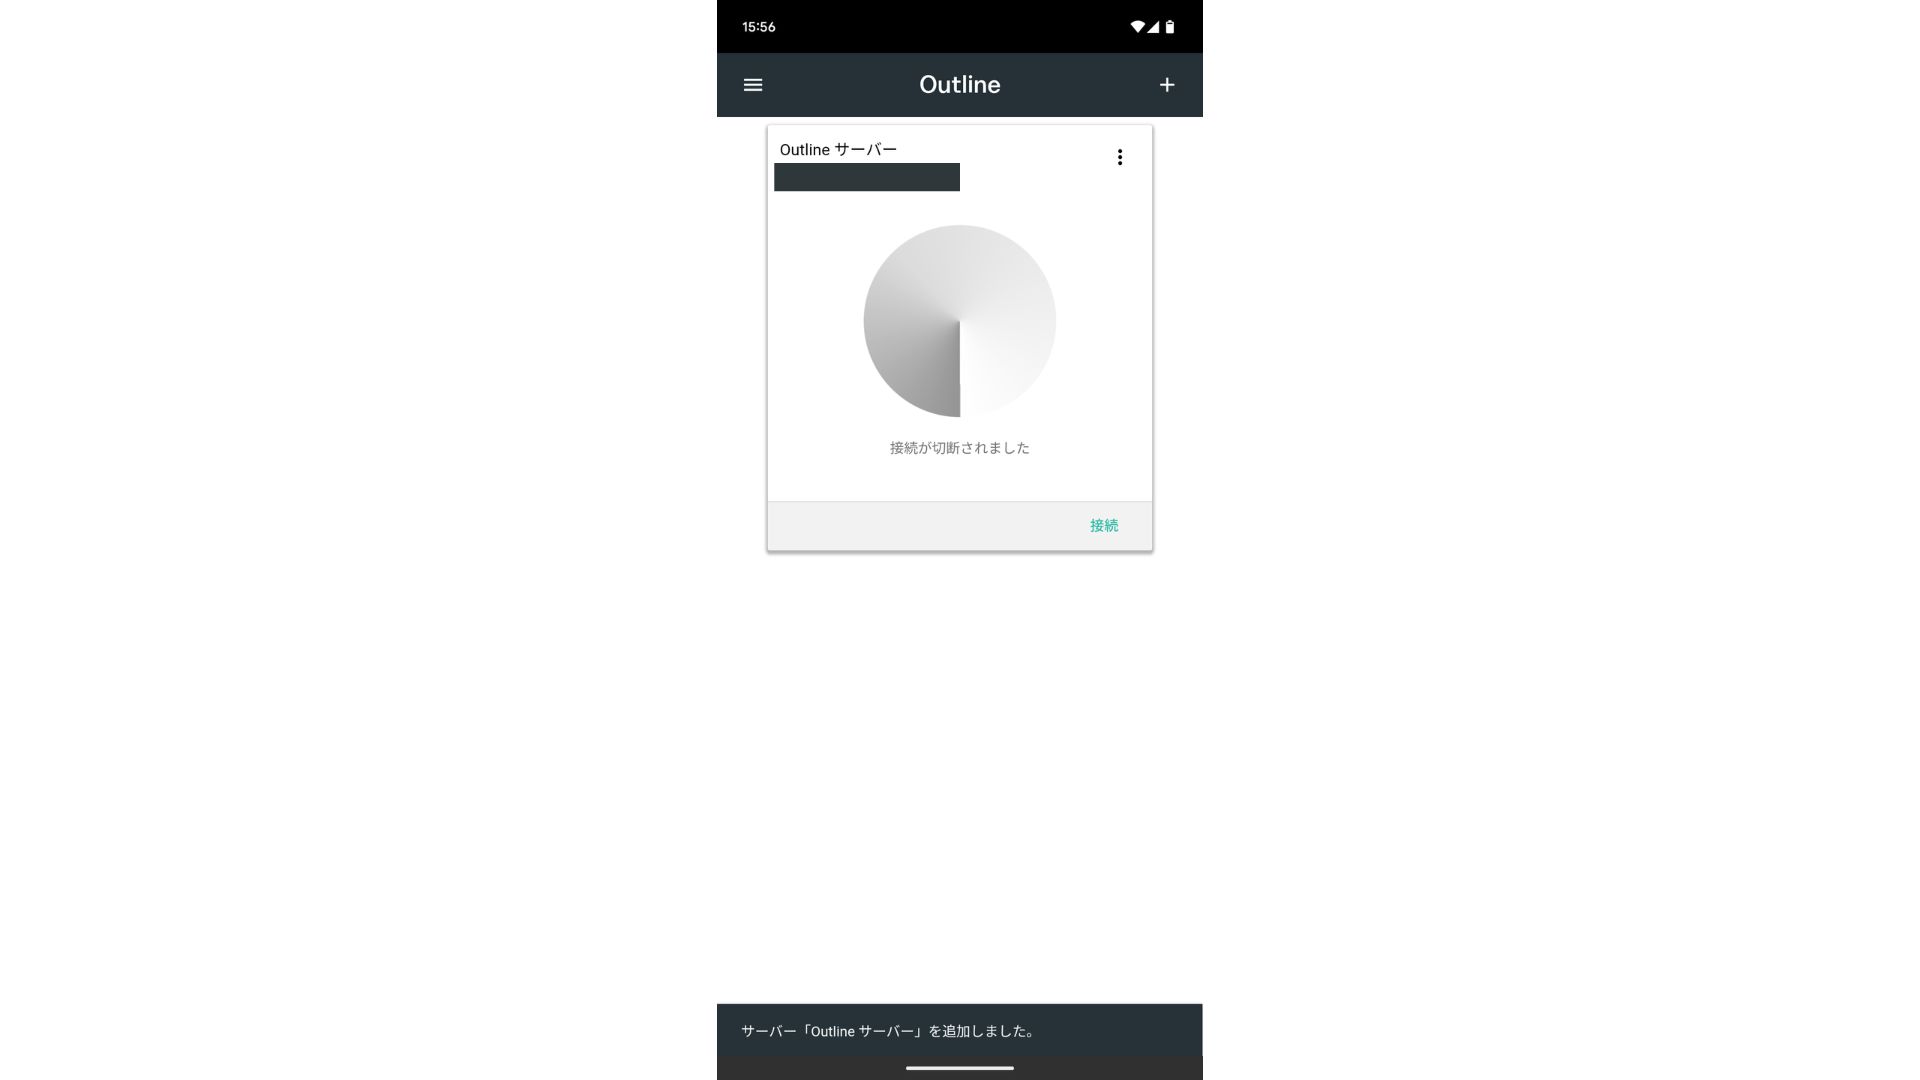
- STEP.3Қосу
Сервер қосылғаннан кейін «Қосылу» түймесін басыңыз.
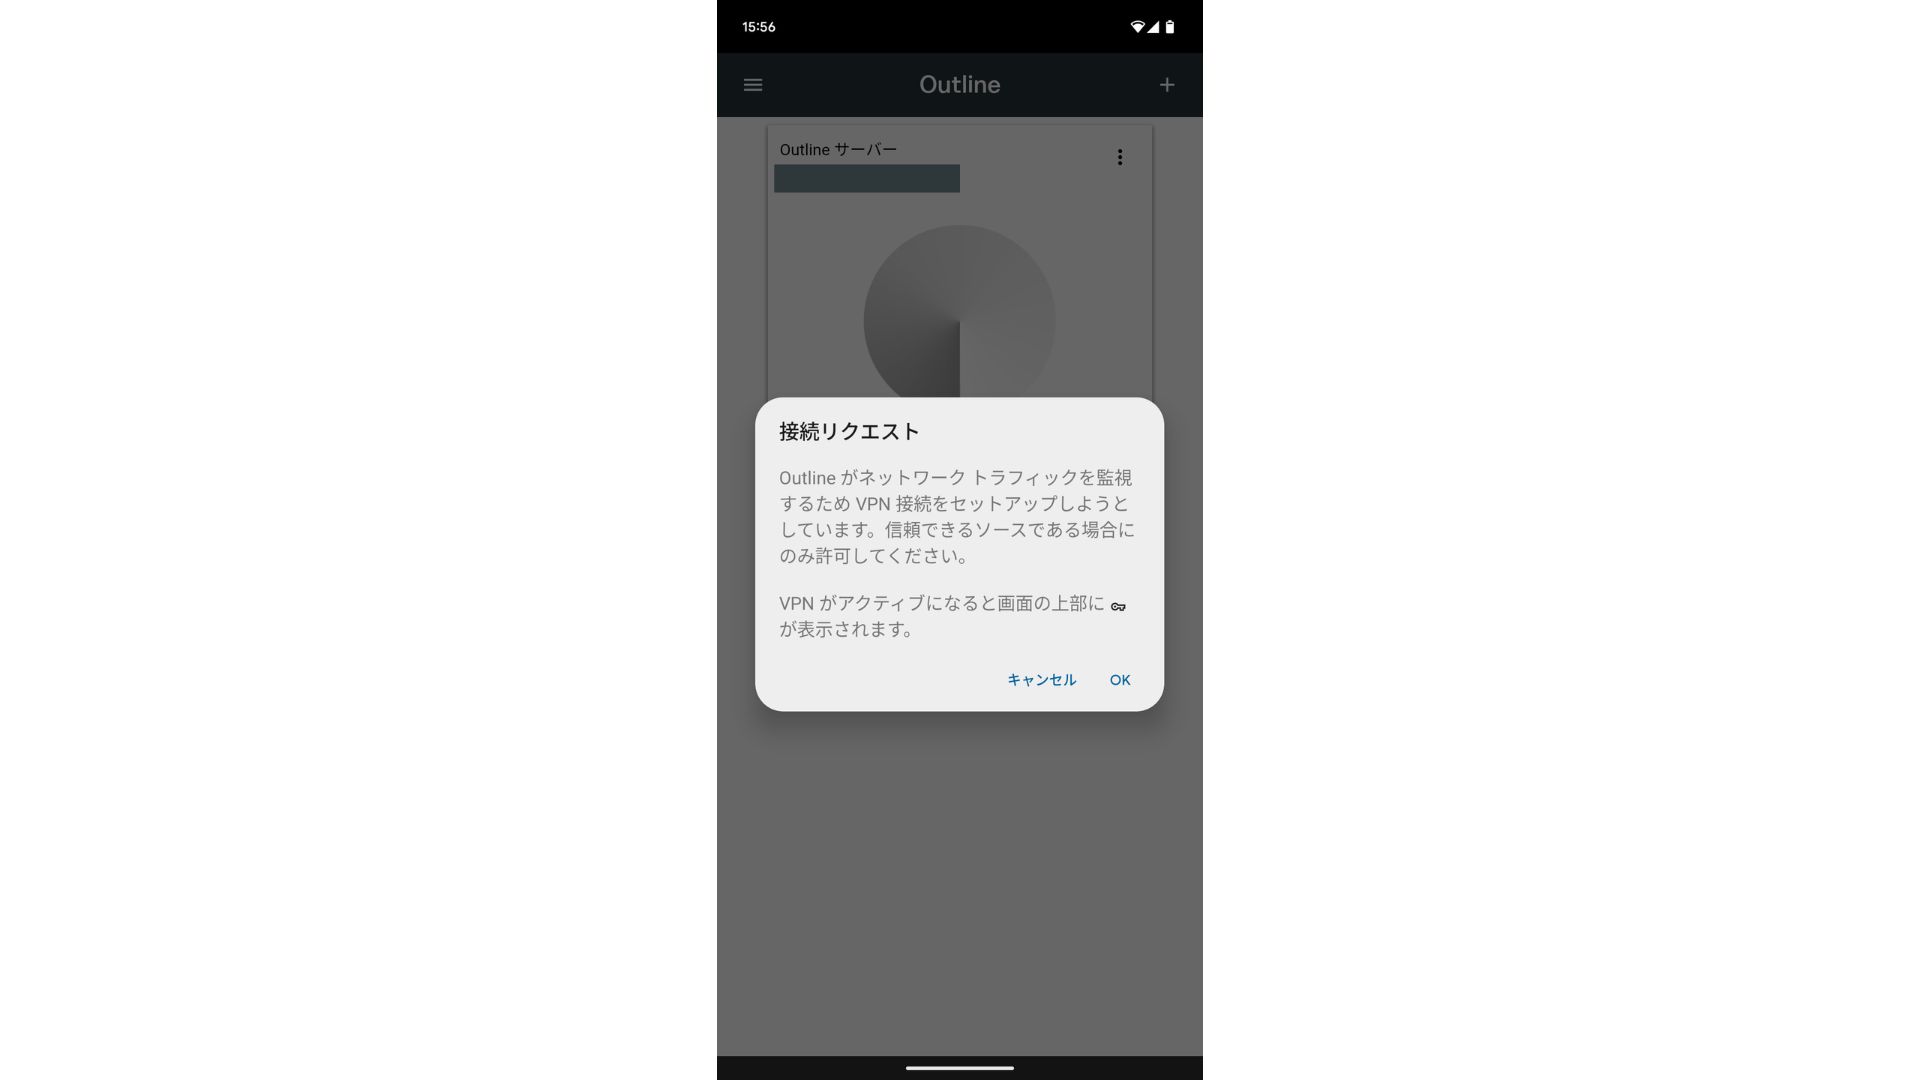
Қосылу сұрауында «OK» түймесін түртіңіз.
Қосылым енді аяқталды.
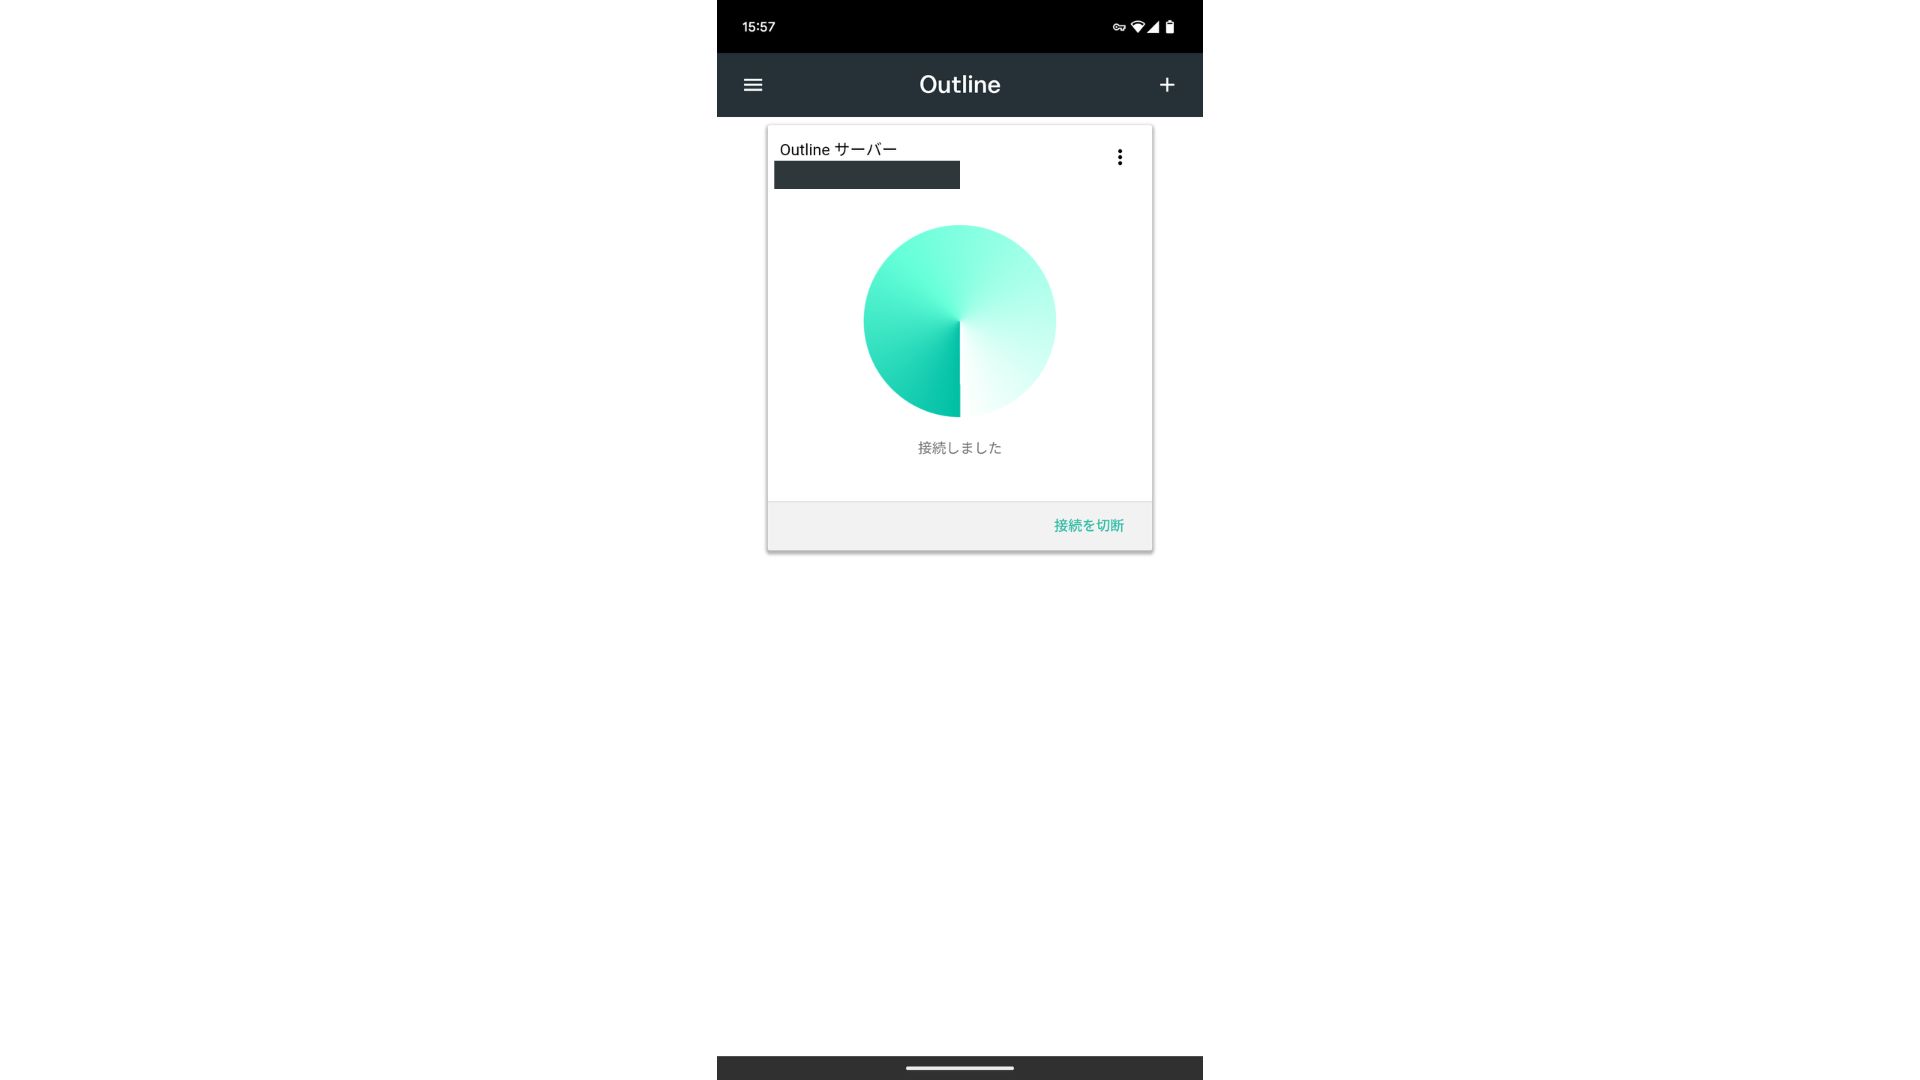
Сервер қосылғаннан кейін «Қосылу» түймесі пайда болады. Бұл түймені басу VPN қосылымын бастайды.
Осымен келесі құралдарды пайдаланатын VPN қосылымыңыз: Outline VPN and ABLENET VPS аяқталды. Интернет-трафигіңіз шифрланып, қауіпсіздік деңгейі артады және ол сіз таңдаған сервер орналасқан жер арқылы бағытталады.
ABLENET VPS және Outline VPN — жылдам әрі ыңғайлы
Адамдар жиі VPN арқылы интернет жылдамдығы баяулайды деп айтады, сондықтан сізді келесі сервердің қаншалықты жылдам екені қызықтыруы мүмкін: ABLENET VPS. Мен оны өлшегенде, ол 130 Мбит/с-қа жетті, бұл ешқандай кедергісіз ыңғайлы өнімділікті қамтамасыз ететінін көрсетті.
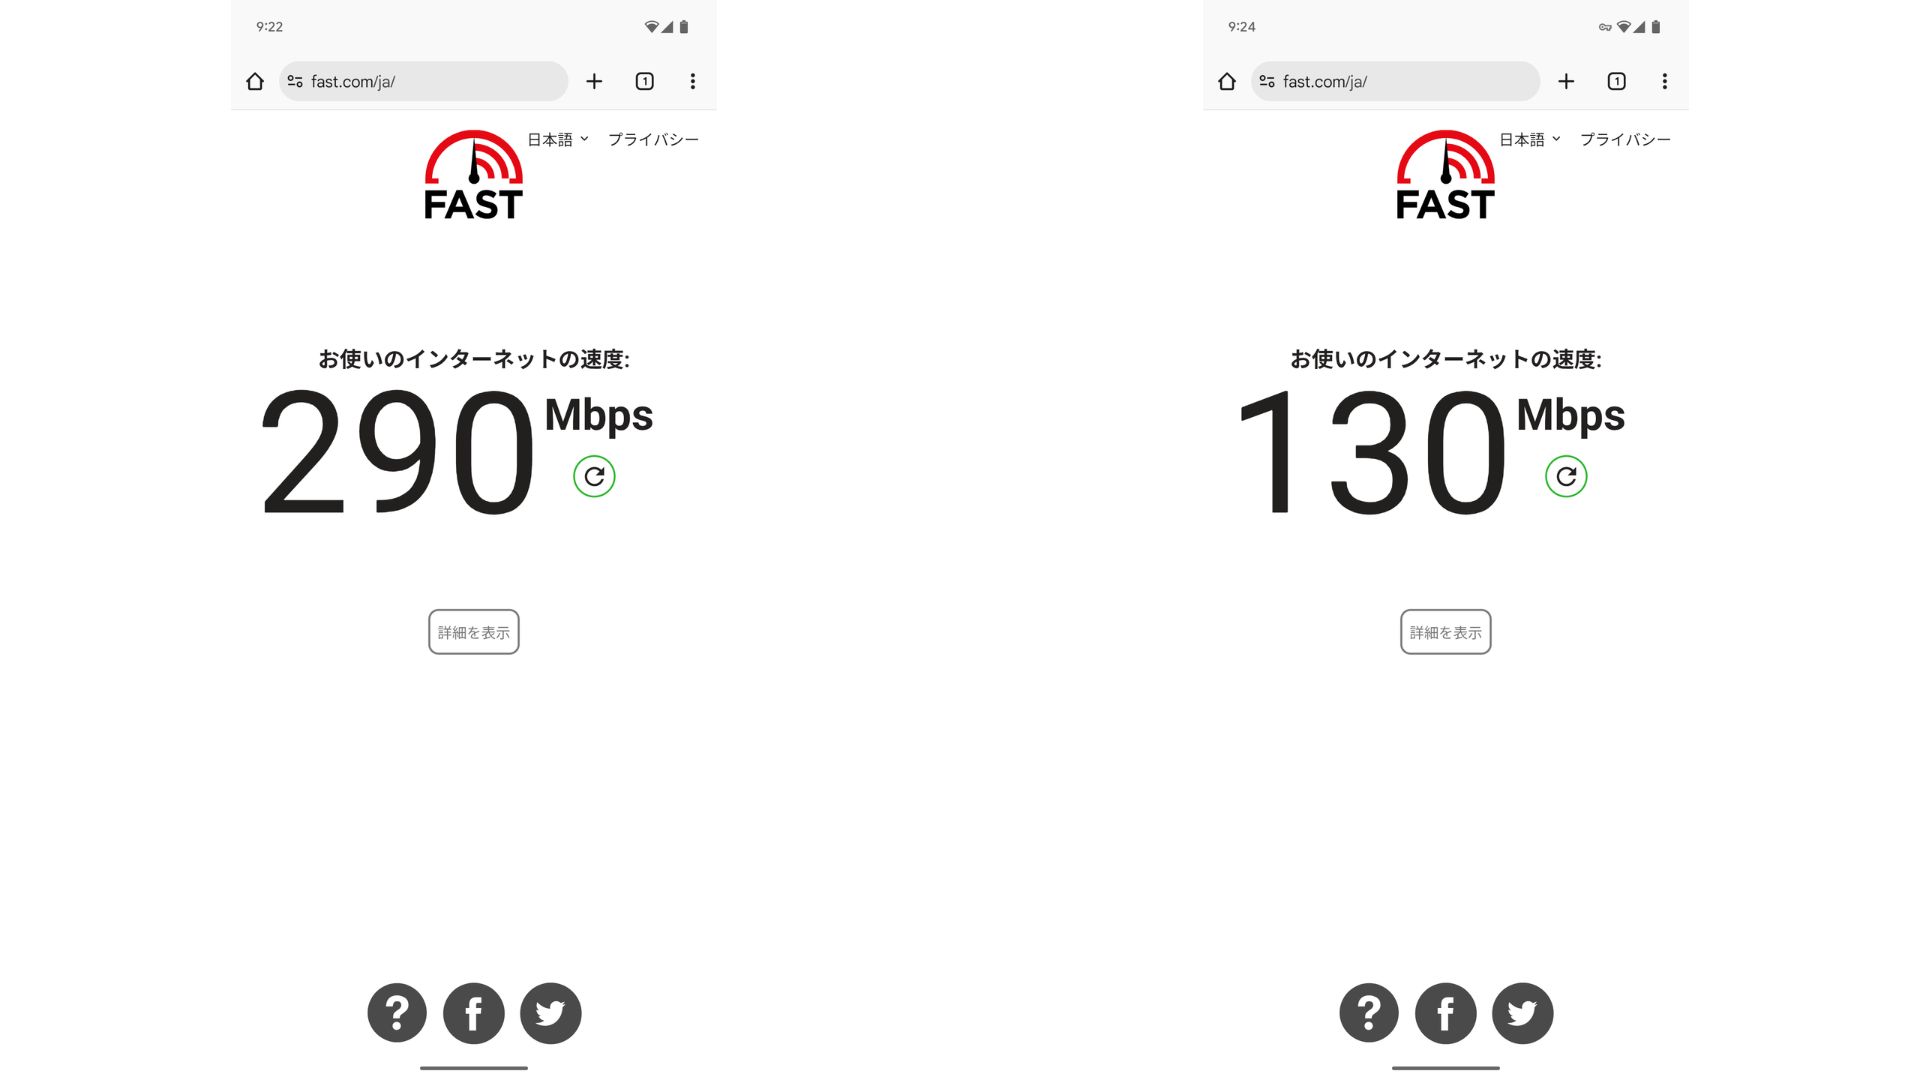
Compared with having no VPN, it keeps roughly half the speed. The reason it can reach this level of performance is that ABLENET VPS uses a shared 200Mbps line. Әдетте 100 Мбит/с жиі кездесетіндіктен, бұл өте жылдам көрсеткіш.

Hikaru Ono
Thanks to ABLENET VPS, I was able to communicate at a very high speed.
ABLENET VPS сипаттамалары мен бағалары
| Server type | VPS |
| Қосылу жылдамдығы | Shared 200Mbps |
| IPv4 | 1 address |
| IPv6 | 65,536 addresses |
| Трафик шектеуі | Unlimited |
| Ұсынылатын жоспар және келісім мерзімі | Жылдық V1 жоспары |
| Виртуалды CPU | 2 cores |
| Жад | 1.5GB |
| Сақтау орны | 40GB SSD or 100GB HDD |
| Сынақ / ақшаны қайтару кепілдігі | 10 күндік тегін сынақ |
| Айлық баға (12 айлық келісім) | 968 yen |
| Бастапқы әкімшілік төлем | Тегін |
| Қолдау | Электрондық пошта |
| Жұмыс уақыты | 99.99% or higher |
| ОЖ | Ubuntu Server 22.04 LTS / Ubuntu Server 20.04 LTS / AlmaLinux 9.5 / AlmaLinux 8.10 / Rocky Linux 9.5 / Rocky Linux 8.10 / Oracle Linux 9.5 / Oracle Linux 8.10 / CentOS Stream8 / CentOS Stream9 / Minecraft Server(ubuntu/java/Integrated)/Rust Server(ubuntu)/Palworld Server(ubuntu)/ARK Server(ubuntu)/7days Server(ubuntu)/Valheim Server(ubuntu)/Ubuntu Desktop 22.04 with MT4/5/Ubuntu Desktop 22.04 with AutoGPT/ CentOS 7.9 and more |
Қорытынды
With Outline VPN, which makes it easy to build a VPN, even people who have never used a VPN before can get started in a short time.
However, because VPNs tend to be slower, I recommend ABLENET VPS, бұл жылдам қосылымды қамтамасыз етеді. Жылдық есеп айырысу кезінде ол айына 1,000 иеннен аз тұрады, сондықтан бұл өте жақсы үнемділікті ұсынады. Ең бастысы, деректерді шектеусіз тасымалдау мүмкіндігі және 99.99%-дан асатын жұмыс уақыты бар тұрақтылығы кедергісіз интернет ортасынан ләззат алуға мүмкіндік береді.
ABLENET VPS — қолжетімді бағасына қарамастан, 99.99% жұмыс уақытын қамтамасыз ететін тұрақты VPS. Ол жады 0.5 ГБ болатын қарапайым V0 жоспарынан бастап жады 16 ГБ болатын жоғары сипаттамалы V5 жоспарына дейінгі кең ауқымды тарифтерді ұсынады, осылайша өз қажеттіліктеріңізге сәйкес келетін ең жақсы нұсқаны таба аласыз.
10 күндік тегін сынақ