Pět pluginů WordPressu pro úspěšnou migraci serveru a klíče k dobrému provedení

Chci migrovat WordPress s jistotou.
Migrace webu WordPressu přináší mnoho rizik, včetně ztráty dat a poklesu pozic v SEO. Použitím správných pluginů však lze tato rizika omezit na minimum a migraci dokončit efektivně.
V tomto článku představuji pět nejlepších migračních pluginů WordPressu, které mohou používat začátečníci i pokročilí uživatelé, a vysvětluji, proč jsou dobré.
Kompletní srovnání 32 hostingů pro WordPress pro jednotlivce, firmy i použití ze zahraničí

Když si řeknete „chci začít s WordPressem“ a hledáte doporučení, najdete mnoho článků o hostingu pro jednotlivce, firmy, malé podniky, zahraniční použití i levné servery. Upřímně,
- kterému webu máte věřit?
- možná chcete jen jednoduchou a srozumitelnou odpověď.
- možná chcete začít s WordPressem hned.
Proto tento článek pečlivě vybírá doporučené možnosti z 32 poskytovatelů hostingu pro jednotlivce, firmy, domácí i zahraniční použití. Vysvětluje je vedoucí SEO v aplikační vývojové firmě, která hosting používá každý den.
Pět pluginů, které usnadní migraci WordPressu

Duplicator
Duplicator is a plugin that accomplishes migration by packaging the entire site, uploading it to a new hosting environment, and deploying it there.
Its intuitive operation is friendly even to beginners, and it allows easy site backup and migration without requiring complicated settings. In the Pro version, you can use even more advanced features, so it also supports migration of large-scale sites.

1. Nainstalujte Duplicator a vytvořte balíček
Nainstalujte Duplicator
- Přihlaste se do administračního panelu WordPressu.
- Přejděte na „Plugins“ > „Add New“, vyhledejte „Duplicator“, nainstalujte jej a aktivujte.
Vytvořte balíček
- Přejděte na „Duplicator“ > „Packages“ a klikněte na tlačítko „Create New“.
- Podle průvodce vytvořením balíčku vytvořte zálohu webu. V průběhu nastavte název balíčku a klikněte na tlačítko „Next“.
- Systém spustí kontroly. Pokud nejsou žádné problémy, klikněte na tlačítko „Build“. Po dokončení se vygeneruje instalační soubor a archiv.
- Stáhněte soubory „Installer“ a „Archive“.
2. Migrujte na nový server
Nahrajte soubory
- Připojte se k novému serveru přes FTP a nahrajte stažené soubory „Installer“ a „Archive“.
Vytvořte novou databázi
- Pomocí administračních nástrojů nového serveru, například cPanel nebo Plesk, vytvořte novou databázi a uživatele databáze. Tyto údaje si poznamenejte.
3. Spusťte instalátor
Spusťte instalátor
- Otevřete URL nové domény nebo serveru a spusťte instalační soubor, například
http://yournewdomain.com/installer.php. - Spustí se instalační skript. Zadejte údaje databáze a klikněte na tlačítko „Next“.
Nakonfigurujte databázi
- Zadejte údaje nové databáze vytvořené dříve, včetně názvu hostitele, názvu databáze, uživatelského jména a hesla. Poté klikněte na „Test Database“ a ověřte připojení. Pokud je vše v pořádku, klikněte na „Next“.
Nasaďte data
- Zobrazí se potvrzovací obrazovka cíle instalace. Pokud je vše v pořádku, klikněte na „Next“. Poté začne import dat do databáze.
Nastavte novou URL
- Zkontrolujte nastavení nové URL a cesty a v případě potřeby je upravte. Poté klikněte na „Next“.
Dokončete instalaci
- Jakmile se zobrazí obrazovka dokončení instalace, projděte jednotlivé kroky a kliknutím na „Log in to site“ se přihlaste do nového webu.
4. Kontrola po migraci
Aktualizujte nastavení trvalých odkazů
- Přihlaste se do administračního panelu WordPressu na novém webu a přejděte na „Settings“ > „Permalinks“.
- Kliknutím na tlačítko „Save Changes“ obnovte nastavení trvalých odkazů.
Zkontrolujte fungování webu
- Zkontrolujte jednotlivé stránky a funkce webu, abyste potvrdili, že migrace proběhla správně.
All-in-One WP Migration
Tento plugin umožňuje pomocí funkcí importu a exportu shromáždit obsah webu do jednoho souboru a migrovat jej na nový web.
Zvlášť atraktivní je snadné použití a prémiová možnost, která umožňuje migrovat soubory nad velikostní limity. Hodí se zejména při přesunu na novou doménu nebo při převodu webu mezi servery.

1. Nainstalujte All-in-One WP Migration a exportujte web
Nainstalujte All-in-One WP Migration
- Přihlaste se do administračního panelu WordPressu.
- Přejděte na „Plugins“ > „Add New“, vyhledejte „All-in-One WP Migration“, nainstalujte jej a aktivujte.
Exportujte data webu
- Přejděte na „All-in-One WP Migration“ > „Export“.
- Klikněte na tlačítko „Export To“, vyberte „File“ a spusťte export.
- Po dokončení exportu stáhněte vytvořený záložní soubor.
2. Migrate to the new server
Install All-in-One WP Migration
- Log in to WordPress on the new server and install and activate the “All-in-One WP Migration” plugin there in the same way.
3. Import the site data
Import the site data
- Go to “All-in-One WP Migration” > “Import.”
- Click the “Import From” button, choose “File,” and upload the backup file you exported earlier.
- Once the upload is complete, click the “Proceed” button to finish the import process.
Restore the site
- When the import is complete, a message will appear telling you that the import succeeded. Click “Finish.”
4. Check after migration
Update permalink settings
- Log in to the WordPress dashboard on the new site and go to “Settings” > “Permalinks.”
- Click the “Save Changes” button to refresh the permalink settings.
Check site operation
- Check each page and function of the site to confirm that the migration was carried out correctly.
5. Verify site operation and optimize it
Check the theme and plugins
- Confirm that the theme and plugins are operating properly on the new server.
- Review plugin settings again and update them if necessary.
Check images and links
- Confirm that the images in the media library display correctly.
- Confirm that internal links are redirecting properly to the URL of the new domain or server.
UpdraftPlus
UpdraftPlus is a plugin specialized in backup and restoration, but it also supports migration to a new site by using those backup files.
It offers rich options for automatic backups and cloud storage, allowing you to keep your site data safe even during the migration process. Because it can also protect the site through regular backups after the migration, it delivers two benefits at once.

1. Install UpdraftPlus and create a backup
Install UpdraftPlus
- Log in to the WordPress dashboard.
- Go to “Plugins” > “Add New,” search for “UpdraftPlus,” install it, and activate it.
Create a backup
- Go to “Settings” > “UpdraftPlus Backups.”
- Click the “Backup Now” button to start the backup.
- Check both “Backup database” and “Backup files,” then click the “Backup Now” button.
- Once the backup is complete, go to the “Backup / Restore” tab and download the backup you created. The necessary files are “Database,” “Plugins,” “Themes,” “Uploads,” and “Others.”
2. Migrate to the new server
Install UpdraftPlus
- Log in to WordPress on the new server and install and activate the “UpdraftPlus” plugin there in the same way.
3. Upload the backup files and restore them
Upload the backup files
- In the WordPress dashboard on the new server, go to “Settings” > “UpdraftPlus Backups.”
- Go to the “Backup / Restore” tab and click the “Upload backup files” button.
- Upload each of the backup files you downloaded earlier one by one.
Restore the site data
- After the uploads are complete, select the backup shown in the “Existing Backups” section and click the “Restore” button.
- Select the components to restore, such as the database, plugins, themes, uploads, and others, and click the “Next” button.
- Wait until the restore process finishes. When it is done, you will see a “Restore successful” message.
4. Check after migration
Update permalink settings
- Log in to the WordPress dashboard on the new site and go to “Settings” > “Permalinks.”
- Click the “Save Changes” button to refresh the permalink settings.
Check site operation
- Check each page and function of the site to confirm that the migration was carried out correctly.
5. Verify site operation and optimize it
Check the theme and plugins
- Confirm that the theme and plugins are operating properly on the new server.
- Review plugin settings again and update them if necessary.
Check images and links
- Confirm that the images in the media library display correctly.
- Confirm that internal links are redirecting properly to the URL of the new domain or server.
WP Migrate DB
WP Migrate DB specializes in database migration.
It can automatically replace database values to match the new URL and makes export and import easy. It is ideal for developers and users with a more technical background, and it allows detailed database customization and migration.

1. Install WP Migrate DB and export the database
Install WP Migrate DB
- Log in to the WordPress dashboard.
- Go to “Plugins” > “Add New,” search for “WP Migrate DB,” install it, and activate it.
Export the database
- Go to “Tools” > “Migrate DB.”
- Enter the new site’s URL and path into the “Find what:” and “Replace with:” fields.
- Click the “Export Database” button and download the exported database file.
2. Migrujte na nový server
Připravte nový server
- Nainstalujte WordPress na nový server.
- Vytvořte novou databázi a poznamenejte si údaje databáze, včetně názvu hostitele, názvu databáze, uživatelského jména a hesla.
Migrujte existující soubory
- Stáhněte složku „wp-content“ z původního serveru a nahrajte ji na stejné místo na novém serveru. S FTP klientem je to snadné.
3. Importujte databázi
Importujte databázi
- Přihlaste se do phpMyAdmin na novém serveru a vyberte novou databázi.
- Klikněte na kartu „Import“, nahrajte dříve exportovaný databázový soubor a proveďte import.
4. Upravte soubor wp-config.php
Upravte wp-config.php
- Upravte soubor „wp-config.php“ na novém serveru. Aktualizujte název databáze, uživatelské jméno, heslo a název hostitele podle údajů nové databáze.
Copy the PHP codedefine('DB_NAME', 'new_database_name'); define('DB_USER', 'new_database_user_name'); define('DB_PASSWORD', 'new_database_password'); define('DB_HOST', 'new_database_host_name');
5. Kontrola po migraci
Aktualizujte nastavení trvalých odkazů
- Přihlaste se do administračního panelu WordPressu na novém webu a přejděte na „Settings“ > „Permalinks“.
- Kliknutím na tlačítko „Save Changes“ obnovte nastavení trvalých odkazů.
Zkontrolujte fungování webu
- Zkontrolujte jednotlivé stránky a funkce webu, abyste potvrdili, že migrace proběhla správně.
6. Verify site operation and optimize it
Check the theme and plugins
- Confirm that the theme and plugins are operating properly on the new server.
- Review plugin settings again and update them if necessary.
Check images and links
- Confirm that the images in the media library display correctly.
- Confirm that internal links are redirecting properly to the URL of the new domain or server.
Migrate Guru
Migrate Guru se specializuje na velké weby a dokáže migraci webu provést automaticky při minimálním zatížení serveru.
Jeho vlastní technologie výrazně urychluje proces migrace, takže i větší weby WordPressu lze přesunout snadno a rychle.

1. Install Migrate Guru
Install Migrate Guru
- Log in to the WordPress dashboard.
- Go to “Plugins” > “Add New,” search for “Migrate Guru,” install it, and activate it.
2. Prepare for the migration
Prepare the destination
- Install WordPress on the destination server in advance.
- Confirm the destination server information, including the FTP information, host name, user name, and password.
3. Configure Migrate Guru and start the migration
Start Migrate Guru
- In the WordPress dashboard, go to “Migrate Guru” > “Migrate Site.”
- Select the type of destination, such as cPanel, FTP, SFTP, or WebHost Manager.
Enter the destination information
- Enter the information for the destination server. For example, if you are using FTP, enter the host name, FTP user name, and FTP password.
- Enter the destination URL and click the “Migrate” button.
Confirm the migration
- Migrate Guru starts the migration process and displays its progress. Wait until the migration is complete.
4. Check after migration
Confirm completion of the migration
- When the migration finishes, you will receive a notification from Migrate Guru. Access the destination site and confirm that it was migrated correctly.
Update permalink settings
- Log in to the WordPress dashboard on the new site and go to “Settings” > “Permalinks.”
- Click the “Save Changes” button to refresh the permalink settings.
5. Verify site operation and optimize it
Check the theme and plugins
- Confirm that the theme and plugins are operating properly on the new server.
- Review plugin settings again and update them if necessary.
Check images and links
- Confirm that the images in the media library display correctly.
- Confirm that internal links are redirecting properly to the URL of the new domain or server.
Další rady pro úspěšnou migraci WordPressu

Důkladně se připravte
Před zahájením migrace je důležité aktualizovat pluginy a motivy a vyčistit nepotřebná data.
Testování je nezbytné
Před migrací otestujte postup na staging webu nebo v místním prostředí a potvrďte, že nejsou žádné problémy.
Chraňte SEO
Pokud se během migrace mění struktura URL, nastavte vhodná přesměrování a aktualizujte sitemap, abyste zabránili poklesu pozic v SEO.
Zkontrolujte výkon
Po přesunu do nového serverového prostředí ověřte, že nedošlo k negativnímu dopadu na rychlost webu nebo uživatelský zážitek, a podle potřeby optimalizujte.
Migrace provedená serverovou společností je doporučenější než migrace pluginem WordPressu
Použití pluginů WordPressu pro migraci vždy zanechává určitou nejistotu. Namísto neúspěšné migrace a ztráty času i úsilí doporučuji použít serverovou společnost, která poskytuje migrační nástroje nebo levnou podporu migrace.
XServer Business
Pokud jste právnická osoba, doporučuji XServer Business. Server vám přesune zdarma. Protože přesun provádí samotná serverová společnost, nehrozí selhání migrace WordPressu. Pokud má vaše firma rozpočet, použijte XServer Business místo toho, abyste na přesun sami vynakládali další čas a úsilí.
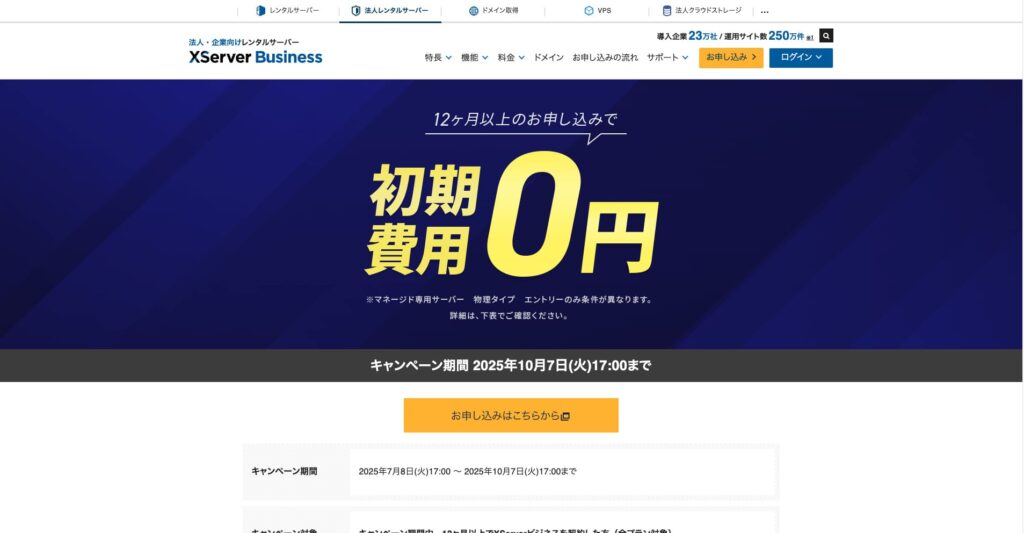
„XServer Business“ je firemní server od společnosti Xserver Inc., která má největší domácí podíl. V našich měřeních obsadil druhé místo v rychlosti zobrazení. Jde o jednu z nejlepších voleb jako cíl migrace. Migrace serveru je také zdarma.
Do 7. října 2025 je počáteční poplatek, běžně od 16 500 jenů do 385 000 jenů, zdarma a zdarma je také služba migrace serveru.
Xserver
XServer je server pro jednotlivce vybavený migračními nástroji. WordPress můžete migrovat pomocí funkce „Easy WordPress Migration“.
Tuto funkci jsem pro migraci WordPressu skutečně použil. Přesun proběhl hladce.
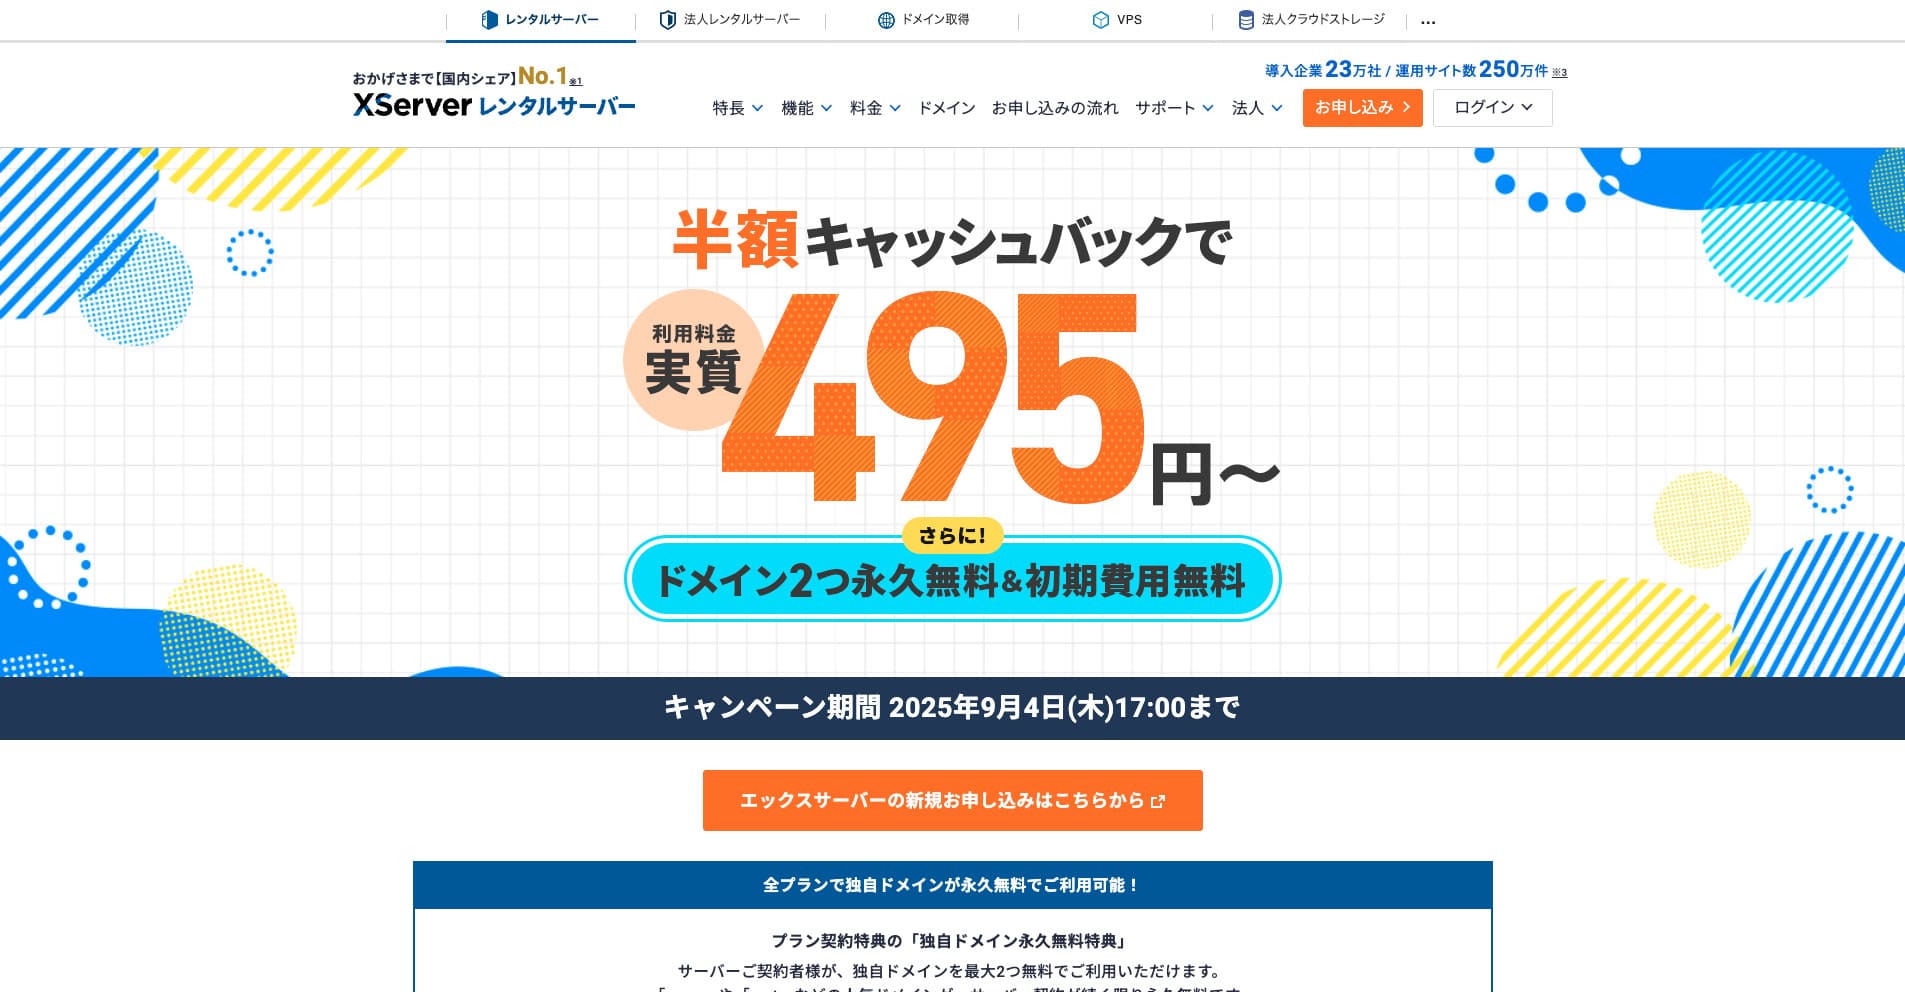
„Xserver“ je zavedený vysokorychlostní rental server s největším domácím tržním podílem. Je oblíbený u jednotlivců i firem. Upřímně nemá žádné skutečné nevýhody a jeho stabilita, funkce i podpora jsou vynikající.
Until September 34, 2025, it offers half-price cashback and a 10-day free trial.
★ Xserver’s reputation and how to start WordPress with its strong support system
ConoHa WING
ConoHa WING je server, který obsahuje funkci migrace WordPressu a používá jej i tento web. Pokud použijete „Easy WordPress Setup“, může WordPress migrovat kdokoli bez složitého nastavování.

„ConoHa WING“ je vysokorychlostní server skupiny GMO Internet Group a počet jeho uživatelů rychle roste. Protože je WordPress při registraci serveru předinstalován, může kdokoli snadno začít.
Until August 5, 2025, server fees are up to 53% off, two domains are free forever, and the first month is free.
★ How to launch a homepage in 10 minutes: ConoHa WING’s reputation and how to start WordPress with it
ColorfulBox
ColorfulBox je server, který umožňuje používat administrační panel cPanel včetně funkcí pro migraci webu. Právě teď je služba migrace WordPressu zdarma. Protože migraci provádí serverová společnost za vás, můžete WordPress přesunout s jistotou.

„ColorfulBox“ je spolehlivý server s vynikajícími automatickými zálohami podle regionu. Nabízí osm plánů, takže můžete bez plýtvání použít výkon, který potřebujete.
Until August 31, 2025, server fees are up to 50% off, you can receive an Amazon gift card worth up to 10,000 yen, and there is also a 30-day free trial.
Lolipop!
LOLIPOP je levný a snadno použitelný server s funkcí migrace WordPressu. Funkci „Easy WordPress Move (Server Migration)“ lze používat od plánu Lite výše.
WordPress jsem pomocí Lolipop! migroval také sám. Přesun byl dokončen bez problémů.
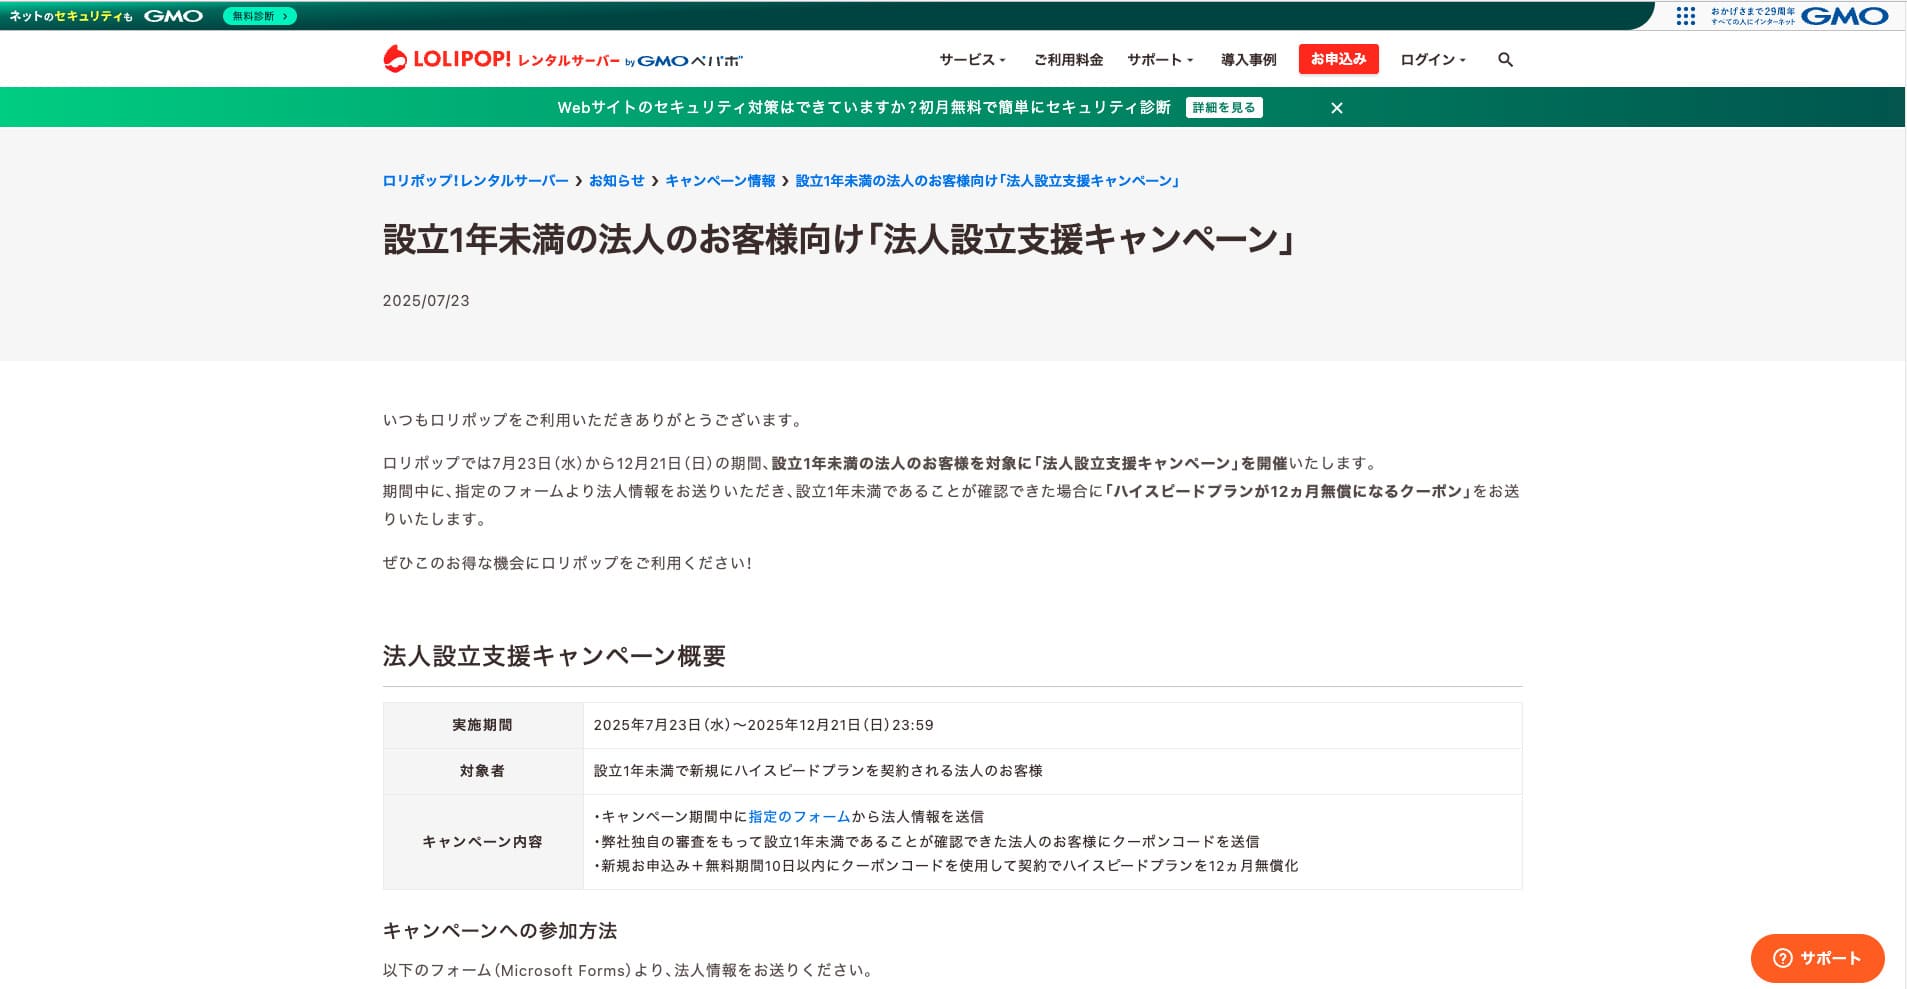
„Lolipop!“ je oblíbený zavedený rental server dostupný za nízkou cenu. I při dostupnosti 99,99 % lze plán Lite podporující WordPress používat od 264 jenů měsíčně.
Until December 21, corporations established less than one year ago can use the High Speed plan free for 12 months, and contracts of 12 months or longer receive one domain for free forever, along with a 10-day free trial.
★ Bad evaluations are a thing of the past: four reviews of Lolipop! and how to start WordPress with it
Shrnutí
Migraci webu WordPressu lze výrazně zjednodušit a zabezpečit správnými pluginy a důkladnou přípravou předem.
Využitím pluginů představených v tomto článku a uplatněním dodatečných rad můžete vlastní web hladce přesunout do nového prostředí. Při migraci webu tyto nástroje a techniky určitě využijte.
Pokud se však migrace WordPressu obáváte, použijte server, který poskytuje migrační nástroje nebo migrační podporu.
Kompletní srovnání 32 hostingů pro WordPress pro jednotlivce, firmy i použití ze zahraničí
Když si řeknete „chci začít s WordPressem“ a hledáte doporučení, najdete mnoho článků o hostingu pro jednotlivce, firmy, malé podniky, zahraniční použití i levné servery. Upřímně,
- kterému webu máte věřit?
- možná chcete jen jednoduchou a srozumitelnou odpověď.
- možná chcete začít s WordPressem hned.
Proto tento článek pečlivě vybírá doporučené možnosti z 32 poskytovatelů hostingu pro jednotlivce, firmy, domácí i zahraniční použití. Vysvětluje je vedoucí SEO v aplikační vývojové firmě, která hosting používá každý den.